
Learning how to sew fabric boxes tutorial- step by step tutorial can be a rewarding experience, especially if you enjoy DIY crafts and want to create something both practical and beautiful for your home. Fabric boxes are a wonderful way to store small items, keep things organized, and add a touch of handmade charm to any room. The best part about sewing these fabric boxes is that you can personalize them with colors, patterns, and sizes that fit your needs perfectly.
In this article, we will walk you through a detailed how to sew fabric boxes tutorial- step by step tutorial using clear instructions, beginner-friendly techniques, and tips to help you succeed even if this is your first sewing project. By the end, you will not only learn the process but also gain the confidence to create more fabric boxes in the future.
Before diving into the details, we want to make sure the entire how to sew fabric boxes tutorial- step by step tutorial is easy to follow, so we have divided the content into several sections. Each part will cover a different stage of the process, ensuring you understand the materials, cutting techniques, assembly, and finishing touches. So, gather your supplies, get your sewing machine ready, and let’s start this creative journey together.
Materials and Tools Needed
To begin the how to sew fabric boxes tutorial- step by step tutorial, it is important to gather all the necessary materials and tools beforehand. Having everything ready will make the sewing process smoother and more enjoyable. For this project, you will need cotton fabric, interfacing or batting for structure, sewing thread, scissors, a sewing machine, pins or clips, and an iron for pressing the seams.
Choose fabrics that not only look attractive but also have enough durability to hold their shape. Many people prefer quilting cotton because it is easy to sew and comes in countless prints and colors. You can even mix and match different fabrics for a patchwork effect if you want your fabric box to be extra decorative.
Interfacing or batting is essential because it gives the box its stiffness. Without it, your fabric box might collapse instead of standing upright. You can select lightweight interfacing for a soft box or a heavier one if you prefer a more rigid finish. The choice depends on the intended use of your box.
A good-quality sewing machine will speed up the process, but this project can also be done by hand if you are patient and precise. Just remember that straight, even stitches make the final product look neat and professional.
Pins or clips are helpful for keeping your fabric pieces together before sewing. Clips are often preferred for thick layers, while pins work best for thinner fabrics. These small tools prevent the fabric from shifting while you sew, ensuring accurate results.
Finally, an iron is essential for pressing seams open as you sew. This simple step makes your box look much cleaner and helps the seams lie flat, which is particularly important when assembling the sides and corners.
Cutting and Preparing the Fabric
The next step in the how to sew fabric boxes tutorial- step by step tutorial is cutting and preparing the fabric pieces. Accurate cutting ensures that all the pieces fit together correctly, so take your time with this stage. Begin by deciding the size of your fabric box. For example, if you want a box that is 6 inches square, you will need to cut the base and side panels accordingly, adding seam allowances on all sides.
Mark the fabric with a fabric-safe pencil or chalk before cutting. This helps maintain precision, especially if you are making multiple boxes of the same size. Always cut on a flat surface using sharp fabric scissors or a rotary cutter to achieve clean edges.
Once all the pieces are cut, it is time to apply the interfacing or batting. Follow the manufacturer’s instructions carefully, as some types require ironing while others may need sewing to attach. The interfacing should be slightly smaller than the fabric pieces so that the seams do not become too bulky.
After applying the interfacing, press the fabric pieces with an iron to remove any wrinkles. Smooth, flat pieces are easier to sew together, and the pressing step ensures everything aligns perfectly when assembling the box.
If you want to add pockets or decorative elements inside your fabric box, now is the time to do it. It is much easier to sew these extras before the panels are attached together rather than after the box is assembled.
Finally, double-check that all your fabric pieces match in size. Even small differences can cause issues during assembly, so accuracy at this stage saves time later on.
Assembling the Fabric Box
Now comes the exciting part of the how to sew fabric boxes tutorial- step by step tutorial: assembling the pieces to form the box shape. Start by sewing the side panels to the base. Place the right sides of the fabric together and stitch along the edges using a straight stitch. Remember to backstitch at the beginning and end of each seam to secure the stitches.
After attaching all four sides to the base, it is time to sew the sides together. This step closes the corners and forms the box shape. Pin or clip the sides carefully, ensuring the edges align perfectly. Then, sew each corner from top to bottom with a straight stitch, reinforcing the ends for durability.
Once the main structure is complete, press all the seams open with an iron. This gives the box a crisp, professional appearance and helps it maintain its shape better.
If you are making a reversible box, repeat the same process with a lining fabric. After sewing both the outer layer and the lining, place them right sides together, sew along the top edge, and then turn the entire piece right side out through an opening left for turning.
Topstitch around the top edge to close the opening and give the box a neat finish. Topstitching also adds strength to the top edge, preventing it from stretching out over time.
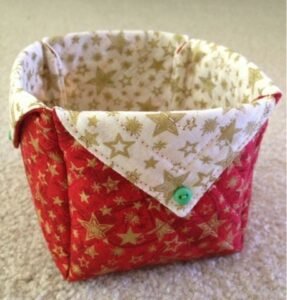
At this stage, you can fold down the edges to create a decorative cuff if desired. This small detail adds personality and makes the fabric box look even more attractive.
Finishing Touches and Customization
The last stage of the how to sew fabric boxes tutorial- step by step tutorial involves finishing touches and customization options. Once your basic box is complete, you can decorate it in many creative ways. Adding buttons, ribbons, or fabric appliqués can turn a simple storage box into a stylish home accessory.
You can also experiment with different fabrics for seasonal themes. For example, bright floral fabrics work beautifully for spring, while rich plaids or velvets can make cozy boxes for winter.
Another idea is to create a set of fabric boxes in different sizes that stack neatly inside each other. This not only saves space when storing them but also gives you multiple options for organizing items around the house.
If you prefer a minimalist look, choose solid fabrics in neutral tones and focus on perfect stitching and clean lines. Sometimes simplicity creates the most elegant results.
Consider adding labels or small tags to the front of your boxes. This makes it easier to identify the contents, especially if you use multiple boxes for organizing craft supplies, toys, or office materials.
Finally, always remember to press the entire box one last time after finishing. A well-pressed fabric box looks polished and professional, making your handmade creation something to be proud of.
FAQ – How to sew fabric boxes tutorial- Step by Step Tutorial
1. Do I need a sewing machine to make fabric boxes?
No, you can sew fabric boxes by hand, but using a sewing machine will save time and give more consistent results.
2. What type of fabric works best for fabric boxes?
Quilting cotton is a popular choice because it is durable and easy to sew. You can also use canvas or denim for a sturdier box.
3. How do I make the box stand upright?
Adding interfacing or batting gives structure to the fabric, helping the box keep its shape.
4. Can I wash fabric boxes?
Yes, most fabric boxes are washable if you use washable materials. Always pre-wash fabrics before sewing to prevent shrinkage.
5. Is this project beginner-friendly?
Absolutely! This tutorial is designed for beginners, with simple steps and clear instructions to guide you.
Conclusion
In this article, we covered the entire process of how to sew fabric boxes tutorial- step by step tutorial, from choosing materials to adding finishing touches.
We explained how to prepare the fabric, assemble the pieces, and customize the final product to suit your style and needs.
Now it’s your turn to try this project at home and create beautiful, functional fabric boxes. We would love to hear your honest opinions and suggestions in the comments. What did you think of this tutorial? Did you find it easy to follow? Share your thoughts and help us improve future guides!