
Learning how to create a Large fabric basket- Step by Step Tutorial can be a rewarding experience for anyone who enjoys sewing or DIY crafts. A large fabric basket is not only practical but also adds charm and organization to any room in your home. Whether you want to store toys, laundry, or craft supplies, making one yourself allows you to customize it with your favorite colors and fabrics.
The beauty of this Large fabric basket- Step by Step Tutorial is that it transforms a simple piece of fabric into something functional and stylish. Even if you are new to sewing, this guide will break down each stage in an easy-to-follow manner. With just a few basic tools and materials, you can create a durable basket that will last for years while reflecting your personal style.
In this tutorial, we will explain how to choose the right materials, prepare your fabric, sew the basket, and give it the perfect finishing touches. Along the way, we will provide practical tips to make the process smoother, ensuring your Large fabric basket- Step by Step Tutorial turns into a fun and creative project rather than a complicated one.
Materials and Preparation for Large Fabric Basket
Before diving into the sewing part, preparation is key when following this Large fabric basket- Step by Step Tutorial. The right materials will make a big difference in the final result, so choosing wisely will help you create a strong and beautiful basket.
Start by selecting a sturdy fabric for the exterior of your basket. Cotton canvas or upholstery fabric works best because it provides durability and structure. For the lining, you can choose a lighter fabric in a contrasting or matching color to give the inside a clean look. Interfacing or batting is also important, as it adds stiffness to help the basket hold its shape.
Next, gather the basic sewing tools you will need: scissors, a sewing machine, matching thread, pins or clips, a measuring tape, and an iron. Having all your tools organized before starting the Large fabric basket- Step by Step Tutorial will make the process much easier and prevent interruptions.
Once you have your materials, pre-wash and iron the fabrics. This step is essential because it prevents shrinking after the basket is made and gives the fabric a smooth surface for sewing. Measuring and cutting the fabric pieces accurately is also critical for a professional finish.
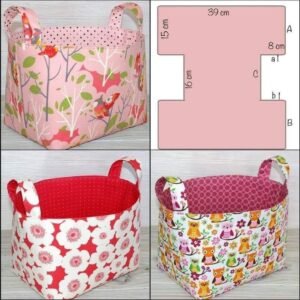
For a standard large basket, you will need two large rectangles for the exterior and lining, plus two circles for the base. The interfacing pieces should match the size of your fabric pieces. Remember, precise measurements make sewing the basket easier later in the tutorial.
Before moving to the next step of the Large fabric basket- Step by Step Tutorial, double-check all your materials and ensure everything is ready. Proper preparation sets the foundation for a smooth sewing experience and a beautiful final product.
Sewing the Basket Body
Now that you have all the materials prepared, it is time to sew the main body of your Large fabric basket- Step by Step Tutorial. This is where your project starts coming to life, so following each step carefully will help you achieve the best results.
Begin by attaching the interfacing to the wrong side of both the exterior and lining fabrics. Use an iron to fuse them together if you are using fusible interfacing. This step gives the basket the stiffness it needs to stand upright and hold heavier items.
Next, fold each rectangle in half with the right sides facing each other. Sew along the side edges using a straight stitch, leaving the top open. Do this for both the exterior and lining pieces. Once the sides are sewn, you will have two fabric tubes that form the main body of your basket.
After sewing the side seams, press them open with an iron to reduce bulk. This gives the basket a cleaner appearance and makes the next steps easier. Small details like pressing seams are what make handmade projects look professional.
With the fabric tubes ready, it is time to attach the base. Pin the circular fabric pieces to the bottom of each tube, aligning the edges carefully. Sew slowly around the circle, easing the fabric as you go to prevent puckering. This step can be a bit tricky, so take your time.
Repeat the same process for both the exterior and lining pieces. When you turn them right side out, you will start seeing the actual shape of your Large fabric basket- Step by Step Tutorial forming nicely.
Assembling and Adding Finishing Touches
After sewing the body and base, the next part of the Large fabric basket- Step by Step Tutorial is assembling the lining and exterior together. This step gives the basket its clean edges and professional appearance.
Place the exterior basket inside the lining with right sides facing each other. Align the top edges and side seams carefully before pinning them in place. This ensures that the basket’s shape will remain even after sewing.
Sew around the top edge of the basket, leaving a small gap to turn it right side out. This opening will allow you to pull the exterior fabric through the lining, creating a neat finish once everything is in place.
After turning the basket right side out, push the lining inside the exterior. Press the top edge with an iron to make it smooth and even. This gives the basket a crisp look, ready for the final topstitching step.
Topstitch around the upper edge of the basket to close the opening and reinforce the seam. This not only secures the fabrics but also adds a decorative touch, giving your Large fabric basket- Step by Step Tutorial a polished finish.
At this stage, you can add handles if desired. Simple fabric straps or rope handles can be sewn to the sides, making the basket easier to carry. Customize them according to your preference and the basket’s intended use.
Tips for Customizing Your Large Fabric Basket
One of the best things about this Large fabric basket- Step by Step Tutorial is the creative freedom it offers. You can personalize your basket in countless ways to match your home decor or personal taste.
Consider using patterned fabrics for a fun and colorful look. Florals, stripes, or geometric prints can transform a simple basket into a statement piece for any room. Pairing a bold exterior fabric with a neutral lining can create a balanced design.
You can also experiment with different sizes. While this tutorial focuses on a large basket, the same steps apply to making smaller versions for organizing drawers, shelves, or even as gift baskets. Simply adjust the measurements to fit your needs.
Adding embellishments like ribbons, buttons, or fabric appliqués can give your basket a unique touch. These small details make the basket feel truly handmade and special.
For extra sturdiness, consider using thicker interfacing or even a layer of batting. This will make the basket more rigid and capable of holding heavier items without losing its shape.
Finally, do not forget to label or personalize your basket if you are making it as a gift. A small embroidered name or a fabric tag can make it even more meaningful.
FAQ About Large Fabric Basket- Step by Step Tutorial
Q1: Do I need a sewing machine to make a large fabric basket?
A: While a sewing machine makes the process faster and easier, you can sew a fabric basket by hand using strong stitches. However, it may take longer to complete.
Q2: What type of fabric works best for a sturdy basket?
A: Cotton canvas, denim, or upholstery fabric are ideal choices because they provide durability and structure for the basket to hold its shape.
Q3: Can I wash the fabric basket after making it?
A: Yes, most fabric baskets can be hand washed or spot cleaned, but avoid washing them in hot water to maintain their shape and strength.
Q4: How can I make the basket even more rigid?
A: Use heavy-duty interfacing or add extra layers of batting between the fabrics to give the basket more stability and sturdiness.
Q5: Is it possible to add a lid to the fabric basket?
A: Yes, you can sew a simple fabric lid using the same steps as the base, attaching it with fabric hinges or Velcro for a functional finish.
Conclusion
In this Large fabric basket- Step by Step Tutorial, we covered everything from material preparation to sewing, assembling, and customizing your basket.
By following these steps, even beginners can create a beautiful and functional fabric basket for their home.
We hope this tutorial inspires you to try new fabrics, designs, and ideas for your next sewing project. Please leave your honest opinion and suggestions below—we would love to hear about your experience making a Large fabric basket- Step by Step Tutorial and any creative twists you added to it!