
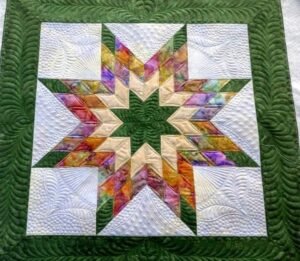
Lone Star Pattern is one of the most iconic and visually stunning quilt designs, and from the very first stitch, the Lone Star Pattern captures attention with its bold geometric symmetry and radiant starburst effect. This classic quilting style has been admired for generations due to its intricate layout and the way it transforms simple fabric strips into a striking central star. Whether you are an experienced quilter or just beginning your journey, the Lone Star Pattern offers both a challenge and a rewarding creative experience.
The beauty of the Lone Star Pattern lies in its ability to create a sense of movement and depth through color and arrangement. By carefully selecting fabric shades and positioning them strategically, quilters can produce a gradient effect that enhances the star’s dimensional appearance. This makes the Lone Star Pattern not only a technical project but also an artistic expression that reflects personal style and creativity.
Another reason the Lone Star Pattern remains so popular is its versatility. It can be used in a variety of projects, from full-sized quilts to wall hangings and decorative pieces. The adaptability of the Lone Star Pattern allows you to experiment with different sizes, color palettes, and fabric textures, making each project unique and meaningful.
Understanding the Basics of the Lone Star Pattern
The foundation of the Lone Star Pattern begins with fabric strips that are sewn together and then cut into diamond shapes. These diamonds are arranged in a circular formation to create the signature starburst design. Understanding this construction method is key to achieving a precise and balanced result.
Fabric selection plays a crucial role in the success of the Lone Star Pattern. Gradients or coordinated color schemes are often used to enhance the visual impact of the star. Choosing fabrics that transition smoothly from light to dark can create a dramatic and eye-catching effect.
Accuracy in cutting is essential for this pattern. Because the design relies on diamond shapes, even small measurement errors can affect the alignment of the star. Taking time to cut carefully ensures that your Lone Star Pattern comes together seamlessly.
Sewing the strips together before cutting them into diamonds helps maintain consistency. This technique simplifies the process and ensures that each segment of the Lone Star Pattern is uniform.
Another important aspect is understanding seam allowances. Consistent seam allowances help maintain the integrity of the design and prevent distortion in the final layout.
Finally, pressing techniques are vital for achieving a clean finish. Properly pressed seams reduce bulk and help the star points align perfectly, enhancing the overall appearance of your Lone Star Pattern.
Step-by-Step Guide to Creating a Lone Star Pattern
The first step in creating a Lone Star Pattern is selecting your fabric strips. Choose colors that complement each other and create a gradient effect. This planning stage is crucial for achieving a visually appealing design.
Next, sew the strips together into long panels. These panels will later be cut into diamond shapes that form the star. Maintaining straight seams during this step is essential for accuracy.
Once the panels are complete, use a rotary cutter to cut them into diamonds. Precision is key here, as these pieces will determine the structure of the Lone Star Pattern.
Arrange the diamonds in a circular layout to form the star. This step allows you to visualize the final design and make adjustments before sewing.
Begin sewing the diamonds together in rows, then join the rows to complete the star. Taking your time during this process ensures that the points align correctly.
Finally, add background fabric around the star and assemble the quilt top. This step frames the design and highlights the beauty of the Lone Star Pattern.
Creative Variations of the Lone Star Pattern
One of the most exciting aspects of the Lone Star Pattern is the variety of creative variations it offers. You can experiment with bold color contrasts to create a modern and vibrant look.
Using subtle color gradients can produce a softer, more traditional appearance. This approach highlights the elegance of the Lone Star Pattern and creates a timeless design.
You can also vary the size of the star by adjusting the number of strips used. Larger stars make a dramatic statement, while smaller ones add intricate detail.
Incorporating patterned fabrics can add texture and complexity to your quilt. This variation enhances the visual interest of the Lone Star Pattern.
Another idea is to combine multiple stars in a single quilt. This creates a dynamic composition and allows for greater creativity.
Finally, experimenting with different background fabrics can change the overall look of the design. A contrasting background can make the star stand out even more.
Tips for Perfecting Your Lone Star Pattern
Consistency is essential when working on a Lone Star Pattern. Keeping your seams straight and even ensures that the design remains balanced.
Using a design wall can help you arrange and adjust your pieces before sewing. This allows you to perfect the layout and avoid mistakes.
Pinning your pieces carefully can prevent shifting أثناء sewing. This helps maintain alignment and ensures accurate results.
Pressing seams as you go is another important practice. Proper pressing keeps your quilt flat and enhances the clarity of the design.
Taking your time during each step can improve the overall quality of your work. The Lone Star Pattern rewards patience and attention to detail.
Finally, practice and experimentation are key to mastering this technique. Each project helps you refine your skills and build confidence.
FAQ About the Lone Star Pattern
What is a Lone Star Pattern?
The Lone Star Pattern is a quilting design that features a central star made from diamond-shaped fabric pieces arranged in a radial pattern.
Is the Lone Star Pattern suitable for beginners?
It can be challenging for beginners, but with patience and practice, it is achievable and highly rewarding.
What fabrics work best for this pattern?
Cotton fabrics are commonly used, especially those with coordinated colors or gradients.
How long does it take to complete a quilt?
The time varies depending on the size and complexity, but it typically takes several days or more.
Can I customize the Lone Star Pattern?
Yes, you can experiment with colors, sizes, and layouts to create a unique design.
What are common mistakes to avoid?
Common mistakes include inaccurate cutting, misaligned seams, and inconsistent seam allowances.
Conclusion
The Lone Star Pattern is a timeless and captivating quilting technique that allows you to create stunning, star-shaped designs with depth and elegance. Throughout this article, you have explored the fundamentals, step-by-step process, creative variations, and essential tips for mastering this classic pattern.
By focusing on precision, thoughtful fabric selection, and careful assembly, you can achieve beautiful results that showcase your creativity and skill. The Lone Star Pattern offers endless opportunities for customization, making it a rewarding project for quilters of all levels.
Now it’s your turn to bring your ideas to life. Start your own Lone Star Pattern project, experiment with different styles, and enjoy the creative journey. Don’t forget to leave your honest opinion and share your suggestions—your feedback helps inspire and support a vibrant community of quilting enthusiasts.