
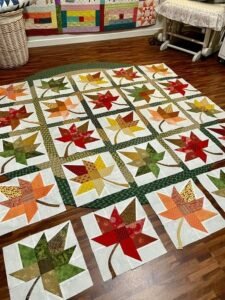
The Maple Leaf Block – Step by Step Tutorial is a beloved classic in quilting, known for its beautiful representation of autumn’s iconic leaf. Whether you are a beginner or an experienced quilter, learning how to create a maple leaf block adds a charming, seasonal touch to any quilt project. This tutorial will guide you through each step, ensuring your maple leaf block turns out crisp, vibrant, and perfectly crafted.
Quilting the Maple Leaf Block – Step by Step Tutorial offers a wonderful balance between straightforward piecing and creative expression. The block’s distinct shape and color variations allow for artistic freedom while still following a clear pattern. This versatility has made the maple leaf block a favorite for fall-themed quilts, wall hangings, and table runners. Its timeless appeal connects quilters across generations.
In this article, we will walk you through the materials you need, the detailed step-by-step instructions, some helpful tips to perfect your technique, and creative ideas for incorporating your maple leaf blocks into larger projects. We’ll also answer frequently asked questions to clear up common doubts and finish with a summary inviting your feedback and suggestions.
Materials Needed for the Maple Leaf Block – Step by Step Tutorial
To start your Maple Leaf Block – Step by Step Tutorial, gathering the right materials is essential for achieving neat, professional results. The typical materials needed include high-quality quilting cotton fabrics in colors inspired by fall foliage. Deep reds, burnt oranges, golden yellows, and warm browns are excellent choices to bring the maple leaf to life.
You’ll also need a good pair of fabric scissors or a rotary cutter with a cutting mat. Precision in cutting shapes is crucial because the sharp points of the maple leaf require accuracy to align properly when piecing. Quilting rulers help with straight edges and consistent measurements.
A sewing machine is important for stitching the block together efficiently, but hand sewing is possible for those who prefer it. Use a neutral or matching thread color to keep your seams clean and unobtrusive. Additionally, a quarter-inch presser foot can help maintain consistent seam allowances, which is key for block accuracy.
Pins or sewing clips will hold your pieces together before stitching. Pressing tools, including a reliable iron and pressing mat, are invaluable to keep seams crisp and flat. Well-pressed seams not only make piecing easier but also enhance the final look of your block.
If you want to personalize or embellish your block, consider fabric markers, appliqué supplies, or embroidery floss. These can add texture and detail beyond the piecing.
Step-by-Step Instructions for the Maple Leaf Block
Starting your Maple Leaf Block – Step by Step Tutorial begins with preparing your fabric pieces. Cut all the necessary shapes according to your chosen pattern’s measurements. The maple leaf block typically involves several triangles and squares arranged to create the characteristic leaf shape surrounded by a background fabric.
Arrange your pieces on a flat surface to visualize the block. This step helps you confirm colors and placement before sewing, ensuring the leaf shape is distinct and balanced.
Sew the pieces together in sections, usually beginning with smaller units like half-square triangles or flying geese. Use a quarter-inch seam allowance consistently. After stitching each seam, press the fabric to set the stitches and reduce bulk. Proper pressing prevents distortion and allows the block to lie flat.
Assemble the sewn sections into the final maple leaf shape, aligning edges carefully. Pin the pieces to keep them secure and sew them with steady, even stitching. Take your time to ensure sharp points meet cleanly.
Once your maple leaf block is fully pieced, give it a final press. This will smooth out any wrinkles and set the seams, creating a crisp, polished appearance.
You can then trim the block to the desired size, maintaining square edges to make it easy to join with other blocks.
Tips and Techniques to Perfect Your Maple Leaf Block
One of the keys to success in your Maple Leaf Block – Step by Step Tutorial is accuracy in cutting and sewing. Use a rotary cutter with a clear quilting ruler to ensure pieces are cut straight and true. Uneven pieces can make your leaf look distorted.
Consistent seam allowances are vital. A quarter-inch foot helps keep seams uniform, which improves block alignment and overall appearance.
Press seams carefully, ideally pressing seams open or to one side as directed by your pattern. This reduces bulk where several seams meet, which is common in the center of maple leaf blocks.
When sewing points, such as the leaf’s lobes, sew slowly and use pins to secure fabric edges. This helps avoid shifting and results in crisp, defined points.
Use contrasting thread only when you want decorative topstitching; otherwise, keep thread color subtle to blend with fabrics.
If you’re new to piecing sharp points, practicing on scrap fabric before starting your block can boost confidence and improve your technique.
Finally, don’t rush. Taking your time will make the difference between a good block and a beautiful one.
Creative Ways to Use Your Maple Leaf Block
After mastering your Maple Leaf Block – Step by Step Tutorial, you’ll want to explore various creative projects that showcase this classic design. A simple way is to repeat the block multiple times to create a seasonal quilt perfect for cozy autumn nights.
Mix your maple leaf blocks with solid or patterned blocks for visual interest and to let the leaf stand out. You can also alternate the direction of the leaf to create dynamic movement across your quilt top.
Beyond quilts, consider making table runners or placemats featuring the maple leaf block. These smaller projects bring warmth to your dining area and make wonderful seasonal decor.
Wall hangings are another fantastic option. Arrange maple leaf blocks with sashing or borders to create a framed piece of art celebrating fall.
For a unique touch, embellish your maple leaf blocks with embroidery or appliqué details such as veins on the leaves or tiny acorns.
Gift ideas abound, too—handmade maple leaf block quilts or accessories are thoughtful presents for friends and family, especially during the holidays.
Frequently Asked Questions (FAQ)
Q: Is the Maple Leaf Block difficult to sew for beginners?
A: The maple leaf block is moderately challenging due to sharp points but manageable with careful cutting and sewing. Beginners should take their time and practice piecing techniques.
Q: What fabric colors work best for the Maple Leaf Block?
A: Warm autumn tones like reds, oranges, yellows, and browns typically work best to mimic real maple leaves.
Q: Can I use the Maple Leaf Block for projects other than quilts?
A: Yes, maple leaf blocks look great on table runners, wall hangings, placemats, and even tote bags.
Q: How do I keep sharp points from becoming dull?
A: Accurate cutting, pinning before sewing, and careful pressing are crucial to maintain crisp points.
Q: What seam allowance should I use?
A: A consistent quarter-inch seam allowance is standard for quilting and recommended for maple leaf blocks.
Q: Can I combine maple leaf blocks with other block patterns?
A: Absolutely! Combining maple leaf blocks with other patterns creates unique and interesting quilt designs.
Conclusion
In this Maple Leaf Block – Step by Step Tutorial, we covered everything from selecting materials to cutting, piecing, and assembling your beautiful maple leaf quilt block. By following the instructions carefully and using the tips provided, you can create crisp, vibrant blocks perfect for a variety of fall-inspired projects. Whether you’re making a full quilt, a wall hanging, or smaller accessories, the maple leaf block adds timeless charm and warmth. I encourage you to share your thoughts, experiences, and any creative ideas you have after trying this tutorial. Your honest opinion and suggestions could inspire others to embark on their quilting journey with the maple leaf block.