
Maple Leaf Table Runner Tutorial is the perfect project for anyone who wants to combine creativity, elegance, and seasonal charm into a beautiful handmade piece. In this complete Maple Leaf Table Runner Tutorial, you will learn how to create a stunning table decoration that brings warmth and personality to your home. Whether you are a beginner or an experienced crafter, this Maple Leaf Table Runner Tutorial will guide you step by step through the entire process while helping you develop valuable sewing or crochet skills.
Creating a decorative runner using this Maple Leaf Table Runner Tutorial is not only enjoyable but also highly rewarding. You will explore techniques that improve your precision, enhance your understanding of pattern construction, and allow you to work confidently with different materials. As you progress through this Maple Leaf Table Runner Tutorial, you will notice how each step contributes to a polished and professional result that you can proudly display or gift.
Another great benefit of following this Maple Leaf Table Runner Tutorial is the opportunity for personalization. You can experiment with colors, textures, and layouts to create a piece that reflects your unique style. This flexibility makes the Maple Leaf Table Runner Tutorial suitable for different occasions, from everyday home décor to special seasonal celebrations.
Materials and Preparation for Maple Leaf Table Runner Tutorial
To begin your Maple Leaf Table Runner Tutorial, it is essential to gather all the necessary materials in advance. You will need fabric or yarn, depending on your chosen method, as well as tools such as scissors, a needle or crochet hook, measuring tape, and pins. Preparing everything beforehand ensures a smoother workflow throughout the Maple Leaf Table Runner Tutorial.
Choosing the right material is one of the most important steps in the Maple Leaf Table Runner Tutorial. If you are using fabric, select high-quality cotton for durability and ease of handling. If you are crocheting, choose a soft but sturdy yarn that holds its shape well.
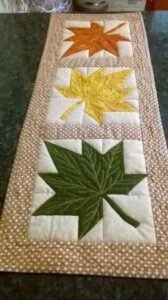
Color selection plays a key role in the visual appeal of your project. In this Maple Leaf Table Runner Tutorial, warm tones like red, orange, and yellow can create a seasonal look, while neutral colors provide a more timeless design.
Preparing your workspace is another important step. A clean and organized area helps you stay focused and makes the Maple Leaf Table Runner Tutorial easier to follow from start to finish.
Measuring your table before starting is essential. This ensures that your Maple Leaf Table Runner Tutorial results in a piece that fits perfectly and looks balanced.
Finally, reviewing basic techniques such as stitching or crocheting will help you feel more confident. This preparation step in the Maple Leaf Table Runner Tutorial sets you up for success.
Step-by-Step Instructions for Maple Leaf Table Runner Tutorial
The first step in the Maple Leaf Table Runner Tutorial is creating the base structure. This may involve cutting fabric pieces or forming a foundation chain if you are crocheting.
Next, begin assembling the main body of the runner. In this stage of the Maple Leaf Table Runner Tutorial, you will connect pieces or build rows to establish the length and width of your project.
Once the base is ready, start adding the maple leaf design. This is a key feature of the Maple Leaf Table Runner Tutorial, giving your piece its unique and decorative look.
Continue working carefully to ensure that each section is even and aligned. Precision is very important in the Maple Leaf Table Runner Tutorial to achieve a professional finish.
After completing the design, focus on edging and finishing details. These steps in the Maple Leaf Table Runner Tutorial enhance durability and improve the overall appearance.
Finally, secure all loose ends and make final adjustments. This completes your Maple Leaf Table Runner Tutorial and ensures a polished result.
Creative Ideas for Maple Leaf Table Runner Tutorial
One of the best aspects of the Maple Leaf Table Runner Tutorial is the ability to customize your design. You can experiment with different color combinations to create a unique look.
Adding texture is another creative option. In this Maple Leaf Table Runner Tutorial, textured stitches or layered fabric pieces can add depth and interest.
You can also vary the size of the maple leaf motifs. This flexibility in the Maple Leaf Table Runner Tutorial allows for creative layouts and designs.
Decorative stitching or embroidery can enhance your project even further. These details in the Maple Leaf Table Runner Tutorial make your runner stand out.
Personalizing your runner with initials or small accents is another idea. This adds a special touch to your Maple Leaf Table Runner Tutorial.
You can also create matching items such as placemats. This expands the versatility of the Maple Leaf Table Runner Tutorial into a coordinated set.
Tips for Best Results in Maple Leaf Table Runner Tutorial
Maintaining consistent tension is essential when working on the Maple Leaf Table Runner Tutorial. This ensures that your stitches or seams are even and neat.
Take your time with each step. Rushing through the Maple Leaf Table Runner Tutorial can lead to mistakes and uneven results.
Use high-quality materials for better durability. This improves the overall outcome of your Maple Leaf Table Runner Tutorial.
Measure your progress regularly to ensure proper sizing. Accuracy is important throughout the Maple Leaf Table Runner Tutorial.
Practice basic techniques if needed before starting. This helps build confidence when working on the Maple Leaf Table Runner Tutorial.
Most importantly, enjoy the creative process. The Maple Leaf Table Runner Tutorial is meant to be both relaxing and rewarding.
Maple Leaf Table Runner Tutorial
Is this tutorial suitable for beginners?
Yes, the Maple Leaf Table Runner Tutorial is beginner-friendly and easy to follow.
What materials should I use?
The Maple Leaf Table Runner Tutorial can be made with fabric or yarn, depending on your preference.
How long does it take to complete?
The time required for the Maple Leaf Table Runner Tutorial depends on your experience and the complexity of your design.
Can I customize the design?
Yes, customization is a key feature of the Maple Leaf Table Runner Tutorial.
Do I need special tools?
No, basic crafting tools are sufficient for the Maple Leaf Table Runner Tutorial.
How do I care for the finished runner?
After completing the Maple Leaf Table Runner Tutorial, gentle washing and proper storage are recommended.
Conclusion
This detailed Maple Leaf Table Runner Tutorial has guided you through every step needed to create a beautiful and functional handmade piece.
From gathering materials and following step-by-step instructions to exploring creative ideas and applying helpful tips, you now have the knowledge to complete your own project with confidence.
The Maple Leaf Table Runner Tutorial is a wonderful way to express creativity while enhancing your home décor. If you found this tutorial helpful, please share your honest opinion and leave your suggestions, as your feedback is essential for improving future content.