
Learning how to make a Mini bag keychain- Step by Step Tutorial is a fun and creative project perfect for beginners and experienced crafters alike. These tiny accessories are not only cute but also practical, as they can hold small items like coins, lip balm, or earbuds while adding a personal touch to your keys or bags. Whether you want to make them for yourself, as gifts, or even to sell, this guide will help you create beautiful mini bag keychains with ease.
The best thing about this Mini bag keychain- Step by Step Tutorial is that it requires only basic crafting or crochet skills, a few simple materials, and a little bit of creativity. Even if you have never made anything like this before, the tutorial breaks down the process into manageable steps so you can follow along at your own pace. By the end, you will have a lovely and functional accessory that shows off your crafting talent.
Another advantage of this Mini bag keychain- Step by Step Tutorial is its versatility. You can customize the size, colors, and embellishments to suit your style or match the preferences of someone you are making it for. These mini bags can be created in countless variations, making each one unique. Plus, they are small enough to finish quickly, so you can make several in different designs without investing too much time or money.
Materials and Tools for Mini Bag Keychain
Before starting the Mini bag keychain- Step by Step Tutorial, it is important to gather all the necessary materials and tools. Having everything ready will make the crafting process smooth and enjoyable from start to finish.
You will typically need some yarn or fabric, depending on whether you plan to crochet the mini bag or sew it. Cotton yarn is a popular choice because it is durable and holds its shape well, making it ideal for small accessories like keychains.
A suitable crochet hook or sewing needle will be required depending on your chosen technique. Always check the yarn label for recommended hook sizes if crocheting, or use a sharp needle if sewing.
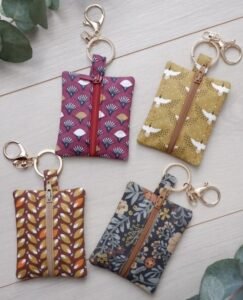
You will also need small accessories such as a keychain ring or lobster clasp to attach the mini bag securely to your keys, backpack, or purse. These are inexpensive and widely available in craft stores.
For extra decoration, consider adding small buttons, beads, or even embroidery. These details can give your mini bag a unique and personalized look.
Lastly, have a pair of sharp scissors for cutting yarn or thread, a yarn needle for weaving in loose ends, and a measuring tape to keep the size consistent across multiple keychains.
Step by Step Tutorial for Making the Mini Bag Keychain
Now let’s dive into the Mini bag keychain- Step by Step Tutorial itself. This section will break down the process so that even beginners can follow along easily and create a beautiful mini bag.
Start by making the base of the mini bag. If you are crocheting, you can begin with a chain of stitches and work in rows or rounds depending on your chosen design. The goal is to create a small rectangular or circular base that will form the bottom of the bag.
Next, build up the sides of the mini bag. Continue crocheting or sewing upward from the base to give the bag its depth. Keep your stitches even to ensure the bag holds its shape properly.
Once the desired height is reached, it’s time to create the opening. You can leave it simple or add a flap for extra style and functionality. A small button or snap closure can also be added to keep the contents secure.
Attach a small strap or loop at the top of the mini bag. This is where you will connect the keychain ring or lobster clasp later. Make sure this loop is sturdy because it will carry the weight when the mini bag is hanging.
Finally, attach the keychain hardware securely to the loop. Double-check that everything is well fastened so the mini bag can be used safely without falling apart.
Once complete, trim any excess yarn or threads and make sure all edges look neat. Congratulations—you have just finished your first Mini bag keychain- Step by Step Tutorial project!
Creative Ideas and Variations for Mini Bag Keychains
One of the best things about following a Mini bag keychain- Step by Step Tutorial is how easily you can customize the design to make each mini bag unique and special.
You can experiment with different yarn colors to match the seasons, holidays, or personal preferences. Bright colors make the mini bags cheerful and fun, while neutral tones give them a classic, elegant look.
Adding decorative details such as beads, sequins, or small patches can transform a simple mini bag into a stylish accessory. Personalizing with initials or tiny embroidered designs also makes them great as gifts.
If you are comfortable with crochet techniques, try adding textured stitches like bobbles or shells to give the bag extra charm and dimension. These small details can make a big difference in the final appearance.
Another fun variation is to make themed mini bags, such as heart-shaped ones for Valentine’s Day or pumpkin-shaped ones for Halloween. These seasonal designs are perfect for decorations or party favors.
You can also make matching sets by creating several mini bags in different colors but using the same pattern. These sets look lovely when given as gifts or sold as handmade accessories.
Finally, try experimenting with different sizes. Tiny mini bags can be used purely as decorative charms, while slightly larger ones can hold small essentials like coins, earbuds, or lip balm.
Tips for Perfecting Your Mini Bag Keychain
While this Mini bag keychain- Step by Step Tutorial is beginner-friendly, a few tips can help you achieve the best results and ensure your mini bags look professional.
First, always check your stitch tension if crocheting. Consistent tension keeps the mini bag looking neat and helps it hold its shape properly over time.
If you are sewing the mini bag instead, make sure to use even stitches and secure any seams firmly. Double stitching areas like the loop or strap will make the mini bag more durable.
Choose high-quality yarn or fabric that won’t fray easily. This will keep your mini bag looking nice even after long-term use.
Adding a lining to the inside of the mini bag can give it a more finished look and make it sturdier, especially if you plan to store small objects inside.
Always double-check the attachment of the keychain ring or clasp. This is a functional part of the mini bag, so it needs to be secure enough to handle everyday use.
Finally, store your mini bag keychains flat until you are ready to use or gift them. This prevents them from losing their shape or getting tangled with other items.
FAQ About Mini Bag Keychain- Step by Step Tutorial
1. Can beginners follow this tutorial easily?
Yes, the Mini bag keychain- Step by Step Tutorial is designed for beginners, with simple instructions and basic stitches that are easy to learn.
2. How long does it take to make one mini bag keychain?
Most people can finish one mini bag keychain in under an hour, making it a quick and satisfying craft project.
3. What type of yarn is best for this project?
Cotton yarn is recommended because it is durable, holds its shape well, and comes in many beautiful colors.
4. Can I use this tutorial to make mini bag keychains to sell?
Absolutely! Handmade mini bag keychains are popular at craft fairs and online shops, and this tutorial gives you a solid foundation to create them.
5. How can I make my mini bag keychain unique?
Experiment with colors, textures, decorations, and themed designs to create mini bag keychains that reflect your personal style.
6. Do I need any special tools for this tutorial?
No, basic crafting tools like yarn, a hook or needle, scissors, and a keychain ring are all you need to complete the project.
Conclusion
We have reached the end of our Mini bag keychain- Step by Step Tutorial, covering everything from materials and instructions to creative variations and expert tips.
By following this tutorial, you can create adorable and functional mini bag keychains that make perfect accessories or thoughtful handmade gifts.
I hope this guide inspires you to try making your own mini bag keychains. Please share your honest feedback and suggestions—we would love to hear your ideas and see the beautiful creations you come up with!