
If you have been looking for a simple and practical sewing project, this Mini zipper bag- Step by Step Tutorial is the perfect place to start. A mini zipper bag is a versatile and useful accessory that can be used to store coins, makeup, keys, or other small essentials. Whether you are new to sewing or have some experience, this tutorial will guide you through the process in a clear and beginner-friendly way.
One of the best things about creating a mini zipper bag is that it does not require a lot of materials or advanced sewing skills. Even if you have never sewn a zipper before, this guide will help you gain confidence while creating something functional and stylish. Handmade bags also make thoughtful gifts because you can customize them with different fabrics, colors, and patterns to suit anyone’s style.
Throughout this Mini zipper bag- Step by Step Tutorial, you will learn how to choose the right materials, prepare your fabric, sew the zipper, and assemble the bag properly. The steps are broken down into easy-to-follow instructions so that beginners can successfully complete the project. By the end, you will have a practical and beautiful bag that you can use or give to someone special.
Materials and Tools for Mini Zipper Bag
Before you begin this Mini zipper bag- Step by Step Tutorial, it is important to gather all the necessary materials and tools. Having everything ready will make the sewing process smooth and enjoyable. For this project, you will need fabric, a zipper, thread, scissors, sewing pins or clips, and a sewing machine.
Choosing the right fabric is the first step toward making a durable and attractive mini zipper bag. Cotton fabric is a great choice for beginners because it is easy to work with, affordable, and available in a wide variety of patterns and colors. If you want a sturdier bag, you can use canvas or denim, which provide more structure and durability.
The zipper is one of the main features of the bag, so selecting the right size is important. A 6 to 8-inch zipper usually works well for a mini bag, but you can adjust the size depending on how big or small you want your bag to be. Matching the zipper color to the fabric can create a sleek look, while using a contrasting color can make your bag more eye-catching.
Thread quality also matters because it affects the strength and longevity of your stitches. Using polyester thread is recommended since it is strong and works well with most fabrics. Choosing a thread color that matches your fabric will give your bag a neat and professional finish.
Other helpful tools include sewing pins or clips to hold the fabric in place, especially when sewing around the zipper. A pair of sharp fabric scissors will make cutting more accurate, and an iron can help press seams for a polished look.
With all materials and tools prepared, you will be ready to start the actual sewing process for your Mini zipper bag- Step by Step Tutorial.
Cutting and Preparing the Fabric
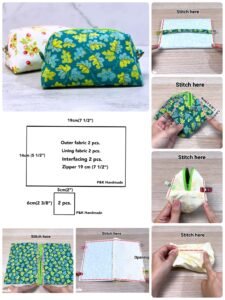
The next step in this Mini zipper bag- Step by Step Tutorial is to cut and prepare your fabric. Begin by measuring and cutting two pieces of fabric for the outside of the bag and two pieces for the lining. A common size for a mini bag is about 8 inches wide by 6 inches tall, but you can adjust these measurements to your preference.
Make sure to cut your fabric pieces as accurately as possible. Even a small difference in size can affect how the bag looks once it is sewn together. Using a ruler and fabric marker can help keep the edges straight and the sizes consistent.
After cutting the fabric, you can choose to add interfacing to the wrong side of the outer fabric pieces. Interfacing adds structure and helps the bag maintain its shape. This step is optional, but it is highly recommended if you are using lightweight fabric like cotton.
If you are using patterned fabric, pay attention to the direction of the design before cutting. You want to make sure the pattern appears correctly when the bag is finished. This small detail can make a big difference in the overall look of your mini zipper bag.
Once the fabric pieces are cut and interfacing applied, press them with an iron to remove any wrinkles. Working with smooth fabric makes sewing easier and ensures cleaner seams.
At this stage, you can also prepare the zipper by checking that it opens and closes smoothly. If the zipper is longer than needed, you can trim it carefully and add zipper stops using stitches to prevent the slider from coming off.
Sewing the Zipper and Bag Assembly
Now comes the most exciting part of the Mini zipper bag- Step by Step Tutorial: sewing the zipper and assembling the bag. Many beginners find sewing zippers intimidating, but with the right steps, it becomes much easier than it looks.
Start by placing one outer fabric piece right side up, then position the zipper on top with the right side facing down. Place one lining piece on top of the zipper with the right side facing down as well. You now have a fabric-zipper-fabric sandwich with the zipper in the middle. Pin or clip everything in place to prevent shifting while sewing.
Using a zipper foot on your sewing machine, stitch along the edge of the zipper. The zipper foot allows you to sew close to the zipper teeth, creating a neat and professional look. Once sewn, flip the fabrics right side out and press them to keep everything flat.
Repeat the same process with the remaining outer and lining fabric pieces on the other side of the zipper. After both sides are sewn, open the zipper halfway. This is important because it allows you to turn the bag right side out later.
Next, align the outer fabric pieces together and the lining pieces together, with right sides facing each other. Pin or clip around the edges to hold everything in place. When sewing, leave a small gap in the lining fabric for turning the bag right side out.
Sew around the edges with a consistent seam allowance, typically about ¼ inch. Reinforce the stitches near the zipper ends for extra durability. After sewing, trim the corners carefully to reduce bulk when turning the bag right side out.
Turn the bag right side out through the gap in the lining. Push out the corners gently using a blunt tool like a knitting needle or chopstick to make them crisp. Finally, sew the gap in the lining closed with a small topstitch or by hand for a neat finish.
Finishing Touches and Personalization
The last part of this Mini zipper bag- Step by Step Tutorial is adding finishing touches to make your bag unique and professional-looking. Start by giving the entire bag a final press with an iron. This step smooths out any wrinkles and makes the seams look sharp and clean.
You can also add decorative elements like fabric labels, appliques, or embroidery to personalize your bag. These small details can make your handmade item stand out and reflect your personal style.
If you want a more polished look, consider topstitching along the edges of the zipper. This not only adds a decorative touch but also keeps the fabric from getting caught in the zipper teeth during use.
For added functionality, you can sew a small fabric loop into one side of the bag before assembling it. This loop can hold a wrist strap or key ring, making the mini bag even more practical.
Experimenting with different fabric combinations can also give you a variety of looks. Using contrasting colors for the lining and outer fabric creates a fun surprise when you open the bag.
Lastly, consider making several mini zipper bags in different sizes. They can be used for organizing items in larger bags or suitcases, making them a perfect travel accessory.
FAQ About Mini Zipper Bag
1. Is this Mini zipper bag- Step by Step Tutorial suitable for beginners?
Yes, this tutorial is beginner-friendly and explains each step clearly for those new to sewing.
2. What size zipper works best for a mini zipper bag?
A 6 to 8-inch zipper is ideal, but you can adjust the size depending on your preference.
3. Do I need a sewing machine to make this bag?
While a sewing machine makes the process faster, you can also sew the bag by hand with a bit of patience.
4. Can I wash my mini zipper bag?
Yes, most fabric mini bags can be hand washed or machine washed on a gentle cycle, depending on the fabric used.
5. How can I make the bag more durable?
Using interfacing, reinforcing seams, and choosing sturdy fabrics like canvas or denim can increase durability.
6. Can I sell the mini zipper bags I make?
Yes, handmade mini zipper bags are popular at craft fairs and online shops, especially if you use unique fabrics and designs.
Conclusion
In this Mini zipper bag- Step by Step Tutorial, we covered everything from gathering materials and preparing fabric to sewing the zipper and adding finishing touches.
This simple project is perfect for beginners and offers plenty of room for creativity and personalization.
Now it is your turn to try making a mini zipper bag. Share your honest opinions and suggestions about this tutorial so others can learn from your experience and feel inspired to start their own sewing projects.