
If you have ever wanted to make something practical, stylish, and easy to carry, learning how to create a New Style Pouch with Zipper – Step by Step Tutorial is a great place to start. This type of pouch is not only functional but also allows you to add your own creativity and personality. Whether you want to use it as a makeup bag, a coin purse, or a small storage case for essentials, this guide will help you create a pouch that matches your taste and needs.
The beauty of a new style pouch with zipper lies in its versatility. You can choose fabrics, colors, and patterns that suit your preferences, making each piece unique. The zipper makes it secure, keeping your belongings safe while adding a professional finish. Beginners may find sewing a zipper a bit intimidating at first, but with clear instructions and patience, this project becomes manageable and enjoyable.
Throughout this step by step tutorial, we will walk through the process in detail. You will learn how to prepare your fabric, cut it properly, attach the zipper, and stitch everything together neatly. The project is designed to be beginner-friendly, but even experienced crafters will enjoy making these stylish and functional pouches. By the end, you will not only have a finished product but also a set of skills that can be applied to future sewing projects.
Materials and Preparation
To begin the new style pouch with zipper – step by step tutorial, it is important to gather the right materials. Choosing quality materials makes a big difference in the durability and appearance of your finished pouch. Basic sewing supplies such as scissors, pins, and a sewing machine are essential, but you also need specific items for this project.
First, select your fabric. Cotton is a popular choice because it is easy to work with, but you can also use canvas, denim, or other sturdy fabrics depending on your desired look. Consider using two different fabrics for the outer layer and the lining to add a stylish touch. A medium-weight fabric usually provides enough structure without being too stiff.
Second, you will need a zipper. The zipper should be slightly longer than the pouch’s opening, so you have some room to trim it down if necessary. Nylon coil zippers are often recommended for beginners because they are easy to sew over. Choose a color that matches or contrasts with your fabric, depending on the design you want.
Third, prepare interfacing if you want to add more structure. Interfacing helps the pouch hold its shape, especially if you plan to use softer fabrics. Fusible interfacing can be ironed directly onto your fabric pieces, making it easy to apply. This step is optional but highly recommended for a more polished look.
Lastly, make sure you have sewing thread that matches your fabric or adds a decorative contrast. A matching thread creates a seamless finish, while a bold thread color can turn stitching into a design element. Having all your materials ready before starting ensures a smoother sewing experience.
Cutting and Sewing the Fabric
Now that materials are ready, the next step in the new style pouch with zipper – step by step tutorial is cutting the fabric pieces. Accuracy during this stage is crucial for a professional finish. Even small measurement errors can cause problems when sewing everything together.
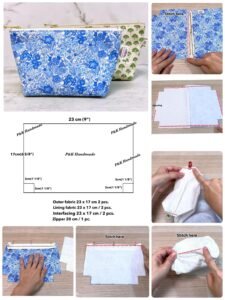
Start by measuring and marking two rectangles of equal size from your chosen fabric. The size can vary depending on the pouch you want, but a common beginner size is 8 by 6 inches. Cut two pieces for the outer layer and two for the lining. If you are using interfacing, cut matching pieces as well.
Once cut, apply the interfacing to the wrong side of the outer fabric pieces if needed. This gives them extra stiffness. Make sure the interfacing is ironed smoothly without wrinkles or bubbles. With everything prepared, it is time to begin sewing the zipper.
To sew the zipper, place one outer fabric piece right side up, align the zipper along the top edge with the zipper pull facing down, and place the lining piece on top with the right side facing down. This sandwich method secures the zipper between the fabrics. Pin everything in place before sewing.
Using a zipper foot on your sewing machine, sew close to the zipper teeth for a neat finish. Once done, flip the fabric and press it flat with an iron. Repeat the process with the other side of the zipper, the remaining outer fabric, and the lining. At this stage, you will have a zipper neatly installed between the two fabric layers.
Assembling the Pouch
With the zipper in place, assembling the pouch is the next focus in this new style pouch with zipper – step by step tutorial. This stage brings the project together, transforming flat pieces into a functional pouch.
First, unzip the zipper halfway. This is a critical step; forgetting to leave the zipper partially open will make it difficult to turn the pouch right side out later. Position the outer fabrics right sides together and the lining fabrics right sides together, pinning around the edges.
When sewing, start at one side of the lining and continue all around, leaving a small opening at the bottom of the lining. This opening will be used to turn the pouch inside out. Remember to backstitch at the beginning and end to secure the stitches.
Pay attention to the corners. To achieve sharp edges, sew slowly and pivot your fabric carefully at each corner. Once the stitching is complete, trim excess fabric and clip the corners to reduce bulk. Be careful not to cut into your stitches.
Now, turn the pouch inside out through the opening in the lining. Push out the corners gently with a blunt tool, like the end of a pencil, for a clean shape. The zipper should now be visible and functional. Close the opening in the lining with a small stitch, either by hand or using the sewing machine.
Finally, press the entire pouch with an iron to smooth out wrinkles and give it a professional finish. At this point, your new style pouch with zipper is complete and ready to use.
Creative Ideas and Customization
One of the most exciting parts of this new style pouch with zipper – step by step tutorial is the opportunity for creativity. While the steps above cover the basics, you can personalize your pouch in many ways to make it truly unique.
For instance, you can add decorative stitching or embroidery to the fabric before sewing. Simple patterns, names, or small motifs can make your pouch more personal and thoughtful, especially if you plan to give it as a gift.
Another option is experimenting with different shapes and sizes. While the classic rectangle is easiest, you can try squares, triangles, or even circular designs for a fresh look. Each variation adds a new challenge but also expands your sewing skills.
You can also add features like interior pockets. Small fabric strips sewn into the lining create slots for cards, pens, or small accessories. This makes the pouch even more functional and versatile.
Don’t forget about embellishments. Buttons, lace trims, appliques, or fabric paint can completely change the style. These touches allow you to express your personality and turn a simple project into something special.
Mixing fabrics is another fun idea. Pairing solid colors with prints or combining textures like denim with cotton creates striking contrasts. The more you experiment, the more unique and stylish your new style pouch with zipper will become.
FAQ
Q: Is sewing a zipper difficult for beginners?
A: It may seem intimidating, but with this step by step tutorial, even beginners can learn to sew a zipper confidently. Using a zipper foot makes the process much easier.
Q: What size should I make my pouch?
A: The size depends on your needs. A small pouch works well for coins or keys, while a larger one can hold makeup, stationery, or travel items. The steps remain the same regardless of size.
Q: Can I make a pouch without interfacing?
A: Yes, interfacing is optional. However, it helps the pouch hold its shape and last longer, especially if you are using soft or lightweight fabrics.
Q: Do I need a sewing machine for this project?
A: While a sewing machine makes the process faster and neater, you can also sew the pouch by hand. Just use small, consistent stitches for durability.
Q: How can I make my pouch look more professional?
A: Pay attention to pressing your fabric, clipping corners, and sewing close to the zipper teeth. Choosing quality fabric and thread also improves the final look.
Q: Can I wash my pouch?
A: Yes, most pouches made with cotton or similar fabrics are washable. Be sure to use washable interfacing and consider pre-washing your fabric to avoid shrinking later.
Conclusion
In this New Style Pouch with Zipper – Step by Step Tutorial, you learned how to choose materials, cut fabric, attach a zipper, assemble the pouch, and add creative touches.
This project combines practicality with creativity, making it perfect for beginners and experienced crafters alike. By following the steps carefully, you can create a stylish, durable pouch for everyday use or as a handmade gift.
Now that you know how to make your own new style pouch with zipper, why not give it a try? Practice will make you more confident, and each pouch you create will become better than the last. We would love to hear your honest opinion and suggestions about this tutorial. Share your experience, your creative ideas, and let us know how your pouch turned out!