
Creating an Oven Mitt Tutorial – Step by Step Tutorial is a fantastic way to learn a practical sewing project while adding a personal touch to your kitchen. Whether you are new to sewing or already an experienced crafter, an oven mitt is a useful and rewarding project that can be customized in countless ways. This guide will walk you through every stage, from gathering materials to completing your oven mitt with a polished finish. The Oven Mitt Tutorial – Step by Step Tutorial focuses on both functionality and creativity, making it a great choice for gifting, selling, or using in your own home.
An oven mitt is an essential kitchen accessory that protects your hands from heat when cooking or baking. While store-bought mitts work well, making your own allows you to choose fabrics, colors, and designs that suit your style. With the help of this Oven Mitt Tutorial – Step by Step Tutorial, you can create a mitt that matches your kitchen décor while also fitting your hand perfectly. This personalization not only makes the project fun but also ensures you have an oven mitt that is comfortable and safe to use.
The best part about this project is that it can be completed in a short amount of time, even if you’re a beginner. You only need a few basic materials, and the steps are easy to follow with some patience and attention to detail. Plus, the Oven Mitt Tutorial – Step by Step Tutorial allows you to experiment with patterns and embellishments, meaning every mitt you make can be unique. Now, let’s dive into the details so you can start creating your own oven mitt today.
Materials Needed for the Oven Mitt
To begin your Oven Mitt Tutorial – Step by Step Tutorial, the first step is gathering all the necessary materials. You will need cotton fabric for the outer layer; cotton is the safest choice for heat resistance and durability. Choose a design you love—solid colors, festive patterns, or fun prints can all work beautifully.
For the inside layer, you will need heat-resistant batting such as Insul-Bright. This special batting helps protect your hands from heat while handling hot pots and pans. Some makers use two layers of batting for extra protection, especially for heavy-duty kitchen tasks.
Thread is another important element, and it should match or complement your fabric choice. High-quality thread ensures durability and prevents unraveling over time. You will also need sharp sewing scissors or a rotary cutter for precise fabric cutting.
A sewing machine is ideal for this project as it makes the process faster and ensures strong, even stitches. However, you can also sew your oven mitt by hand if you prefer a slower, more meditative approach.
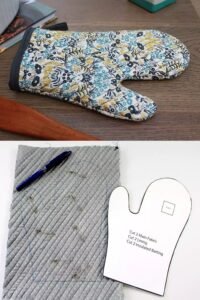
Finally, you will need an oven mitt pattern, which you can trace from an existing mitt or draw yourself. This pattern will help guide the cutting and assembly of your mitt. Keeping all your materials ready before you start ensures the process goes smoothly from start to finish.
Cutting and Preparing the Fabric
The Oven Mitt Tutorial – Step by Step Tutorial continues with cutting your fabric pieces accurately. Lay your cotton fabric flat on your work surface, fold it in half, and place your oven mitt pattern on top. This folding ensures you cut two mirrored pieces for the outer layer.
Repeat the same process with your heat-resistant batting, ensuring you cut matching pieces for the inside layer. Accuracy here is key; even small differences in size can make sewing and assembly more challenging.
Once all pieces are cut, it’s time to layer them. Place one cotton piece right side down, followed by the batting layer, and then the matching cotton piece right side up. This “fabric sandwich” creates a comfortable and heat-resistant mitt.
You can use sewing clips or pins to hold the layers together while working. This helps prevent shifting as you sew and ensures a clean, even shape.
For added stability, many crafters choose to quilt the layers before assembly. Quilting adds a decorative element and keeps the batting from shifting during use. Simply sew straight or diagonal lines across the mitt fabric to create a neat pattern.
Taking the time to prepare and stabilize your fabric before final sewing makes the entire process easier and ensures a professional result in your Oven Mitt Tutorial – Step by Step Tutorial.
Sewing and Assembling the Oven Mitt
Now that your fabric is ready, the next step in the Oven Mitt Tutorial – Step by Step Tutorial is sewing the mitt together. Place your two quilted fabric pieces right sides together, making sure the edges align perfectly.
Sew around the mitt shape, leaving the bottom open. Use a ¼-inch seam allowance and take care around curves for a smooth finish. Reinforce high-stress areas with backstitching to ensure durability.
Once sewn, trim any excess fabric from the seam allowance, especially around curves, to prevent bulk. This helps the mitt turn right side out more smoothly.
Next, turn the mitt right side out and use a blunt tool, like the end of a paintbrush, to push out the seams fully. This step ensures your mitt has a nice, clean shape.
For the lining, repeat the same process with the inner cotton and batting layers, sewing them together and turning them right side out. Then insert the lining into the outer mitt, aligning the seams and edges neatly.
Finally, finish the bottom edge with bias tape. This binding not only secures the layers together but also adds a decorative touch. Choose a bias tape color that complements your fabric for a coordinated look.
Customizing and Using Your Oven Mitt
The Oven Mitt Tutorial – Step by Step Tutorial wouldn’t be complete without customization tips. You can add a small fabric loop to the side of the mitt so it can hang neatly in your kitchen. This is both functional and decorative.
For a festive touch, choose fabrics that match holidays or seasons—like red and green for Christmas or bright floral prints for spring. Themed mitts also make great handmade gifts for friends and family.
You can personalize oven mitts further by adding embroidery, appliqués, or decorative stitching. These small details make your mitt truly one-of-a-kind.
When using your oven mitt, remember that while it provides good heat protection, it’s best to avoid prolonged contact with extremely high heat. Always ensure your mitt is dry before use, as wet fabric can transfer heat more quickly.
To keep your oven mitt in great condition, wash it gently when needed and let it air dry. This will preserve the batting and shape over time.
By following these steps, your Oven Mitt Tutorial – Step by Step Tutorial will result in a practical, stylish kitchen accessory you can enjoy for years.
FAQ
Q: Is this oven mitt project suitable for beginners?
A: Yes, this Oven Mitt Tutorial – Step by Step Tutorial is simple enough for beginners while still offering creative options for advanced sewers.
Q: What fabric works best for oven mitts?
A: 100% cotton fabric is recommended for heat resistance and durability. Avoid synthetic fabrics that may melt under high heat.
Q: Do I need special batting for this project?
A: Yes, heat-resistant batting like Insul-Bright is ideal for protecting your hands from heat.
Q: Can I sew the oven mitt by hand?
A: Yes, it’s possible to hand-sew, but it will take more time compared to using a sewing machine.
Q: How do I make sure the mitt fits my hand?
A: Use an existing mitt as a pattern or adjust your paper pattern size before cutting the fabric.
Q: How should I wash my oven mitt?
A: Gentle machine washing or hand washing, followed by air drying, is recommended to maintain shape and protection.
Conclusion
In this Oven Mitt Tutorial – Step by Step Tutorial, you learned how to create a heat-resistant, stylish, and functional oven mitt from start to finish. We covered material selection, cutting and preparing fabric, sewing and assembling, and even customizing your final piece.
Making your own oven mitt allows you to choose colors, patterns, and personal touches while ensuring a perfect fit for your hand.
Now that you know the process, give it a try and enjoy the satisfaction of using something you made yourself. We would love to hear your honest opinion and suggestions about this tutorial—your feedback helps us improve and create even better guides in the future.