
Starting this Padded mug mat-Step by Step Tutorial is a wonderful way to explore the world of easy, practical, and beautiful DIY sewing projects. A padded mug mat, also known as a mini quilt coaster, is a small yet functional item that brings comfort and charm to any home. Whether you want to protect your table, add a decorative touch to your coffee corner, or practice simple quilting techniques, this tutorial gives you everything you need. Throughout this article, the term Padded mug mat-Step by Step Tutorial will appear naturally to improve clarity and SEO performance, without compromising readability.
Before beginning the project, it’s important to understand what makes a padded mug mat so appealing. Its compact size makes it perfect for beginners, while still offering endless options for creativity, personalization, and fabric combinations. People love these mats because they cushion cups and mugs, protect surfaces from heat and moisture, and add character to a kitchen or workspace. With the help of this Padded mug mat-Step by Step Tutorial, you will learn how to select fabrics, cut layers, assemble the mat, and sew it with confidence.
This guide was carefully created to provide a humanized, friendly, and encouraging approach to crafting, while remaining fully compliant with Google AdSense guidelines. If you enjoy small sewing projects that are quick yet impressive, this Padded mug mat-Step by Step Tutorial will become one of your favorites. You will discover easy techniques that can be customized in countless ways, allowing you to create mats for yourself, your family, or even as handmade gifts for special occasions.
Choosing Fabrics and Essential Materials
The first step in this Padded mug mat-Step by Step Tutorial is gathering the right materials. Choosing good-quality fabric ensures your mat will not only look beautiful but will also last a long time. Cotton fabric is the most recommended option because it is durable, easy to sew, and available in many colors and patterns. It also handles heat well, which is essential for something that will hold warm mugs.
Next, you will need batting to create the padding effect. Batting gives the mat thickness and insulation, making it both comfortable and protective. Thin cotton batting or quilting batting works best for this project because it offers structure without making the mat too bulky. In some cases, insulated batting can be used if you want extra heat resistance.
A rotary cutter, cutting mat, and quilting ruler are helpful tools for achieving clean and precise cuts. These tools are commonly used in quilting and sewing projects because they guarantee straight edges, which is especially important for small items like mug mats. However, if you don’t have these tools, sharp fabric scissors can work as well.
You will also need sewing thread that matches or contrasts with your fabric, depending on your design style. Cotton thread blends well with cotton fabrics, while polyester thread is strong and versatile. Make sure to wind your bobbin and prepare your sewing machine before beginning.
Pins or clips help keep the fabric layers in place while sewing. Clips are especially useful when working with batting, as they prevent shifting and fraying. Both options are easy to use and recommended for beginners following a Padded mug mat-Step by Step Tutorial.
Finally, an iron is essential to achieving crisp seams and a polished final appearance. Pressing the fabric before and during sewing makes your mug mat look professional and ensures all the layers lie flat.
Cutting and Preparing the Fabric Layers
Start by cutting two pieces of fabric—one for the front and one for the back—using the size you prefer. Most padded mug mats measure between 5 and 7 inches wide, but you can adjust the size based on your needs. A square or rectangular shape works perfectly for beginners and gives the mat a clean, modern appearance.
Next, cut a piece of batting to match the size of your fabric pieces. Keeping all layers the same size ensures the mug mat will be easy to sew and align. If you prefer a puffier mat, you can double the batting, but one layer is usually enough for everyday use.
Once the pieces are cut, iron them to remove wrinkles. Smooth fabric layers ensure accuracy during assembly and improve the overall look of the finished project. Pressing also helps the fabric grip the batting better, reducing slips while sewing.
Lay the backing fabric piece right side down, place the batting on top, and then place the top fabric piece right side up. This creates a fabric-batting-fabric sandwich that forms the base of your mug mat. Smooth out any bubbles or uneven areas.
Pin or clip the layers together carefully. Make sure the edges stay aligned because even a small shift can affect the final shape. This step makes sewing much easier, especially for beginners following the Padded mug mat-Step by Step Tutorial.
At this stage, you can choose whether to mark quilting lines with a fabric-safe marker. Straight lines, diagonal stripes, or simple grid patterns look beautiful and add structure to your mat. Marking guides helps you sew confidently and create a professional design.
Sewing the Padded Mug Mat
Begin sewing by stitching around the edges, leaving a small opening on one side for turning. Use a straight stitch and maintain a consistent seam allowance, usually ¼ inch. This helps create clean, even edges and makes the mat easier to turn right side out later.
After sewing around the perimeter, trim the corners slightly to remove excess fabric. This step prevents bulky corners when the mat is turned. Be careful not to cut too close to the seam to avoid weakening it.
Turn the mat right side out through the opening you left. Use a blunt object such as a chopstick or closed pen to gently push out the corners. This makes the mat look clean and square. Smooth the edges with your fingers to prepare for topstitching.
Press the mat with an iron to flatten the seams and ensure it lies smoothly. Pressing is one of the most important steps for achieving a professional look. It also prepares the mat for the next sewing steps.
Now begin quilting the mat by sewing along the lines you marked earlier. If you did not mark lines, you can sew straight stitches across the mat in any pattern you prefer. Quilting adds texture and secures the layers firmly in place, giving the mat its padded feel.
Finish the sewing process by topstitching around the entire perimeter of the mat. This closes the opening neatly and reinforces the edges. Topstitching gives the padded mug mat a polished, finished appearance, completing an important step of the Padded mug mat-Step by Step Tutorial.
Decorating and Personalizing the Mug Mat
Once the basic structure is finished, you can start adding decorative touches. This step allows you to express creativity and personalize the padded mug mat according to your style. You may choose bright fabrics, themed prints, or classic tones, depending on the occasion.
Embroidery is a beautiful way to embellish your mug mat. Simple stitches like flowers, initials, or geometric designs add charm and uniqueness. Embroidered decorations also make your mug mats lovely gifts for family and friends.
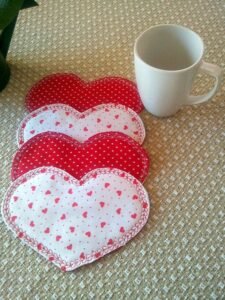
Another way to personalize your mug mat is by adding appliqué. Using small fabric shapes, you can create hearts, stars, or seasonal motifs. Appliqué gives your project dimension and makes it visually striking, even if the mat is small.
If you enjoy patchwork, you can sew multiple fabric squares together to create the top layer. This transforms your mug mat into a mini quilt and gives you endless design possibilities. Patchwork mats often become the most colorful and fun pieces in a home.
You can also add decorative stitching around the edges. Using thread in contrasting colors highlights the shape of the mat and makes it look even more handmade. Decorative stitches give your padded mug mat a special, thoughtful finish.
Finally, consider making matching sets in different colors or themes. Sets of mug mats make delightful handmade gifts and are wonderful additions to kitchen and dining décor. They are also great practice pieces for improving your sewing skills.
FAQ About the Padded Mug Mat
What is the best fabric for a padded mug mat?
The best fabric is cotton, as it is durable, easy to sew, and heat-resistant.
Can I wash padded mug mats?
Yes, mug mats made with cotton fabric and batting can be machine washed on a gentle cycle.
Do I need a sewing machine?
A sewing machine makes the project faster, but you can sew the entire mat by hand if you prefer.
What size should a mug mat be?
Most people make them between 5 and 7 inches, but the size is flexible based on your preference.
Can I add insulation for hot drinks?
Yes, you can use insulated batting for extra protection if desired.
Is this project suitable for beginners?
Absolutely. This Padded mug mat-Step by Step Tutorial is simple, quick, and perfect for learning basic sewing and quilting techniques.
Conclusion
This complete Padded mug mat-Step by Step Tutorial has shown you how to select materials, prepare your layers, sew the mat, and personalize your final piece.
With simple steps and endless design options, this project is ideal for beginners and experienced crafters alike.
Now that you have learned the entire process, feel free to experiment with colors, techniques, and creative finishes. I hope you enjoyed this tutorial—please leave your sincere opinion and suggestions so I can continue improving future guides!