
If you have ever wanted to make your own padded toiletry bag – step by step tutorial, you are in the right place. This project is both practical and fun because it allows you to create something functional while also giving you the freedom to choose fabrics, colors, and patterns that match your personal style. A padded toiletry bag is perfect for organizing your essentials whether you are traveling, going to the gym, or simply storing items neatly at home. The padding gives it extra durability and protection for your belongings, making it a useful and stylish accessory.
Learning how to make a padded toiletry bag – step by step tutorial is easier than it might seem. Even if you are a beginner at sewing, this tutorial will guide you through the entire process. From choosing the right materials to finishing the final stitches, you will be able to create a bag that is not only practical but also beautiful. The key is to follow each step carefully and take your time to get neat and professional results. Once you finish, you will have a handmade item that you can use daily or even give as a thoughtful handmade gift.
This guide will show you exactly how to create your padded toiletry bag with clear explanations. It will include everything from cutting the fabric, adding padding for extra support, sewing zippers, and assembling all the parts into a finished product. With this padded toiletry bag – step by step tutorial, you can transform simple pieces of fabric into a stylish and long-lasting accessory. It’s not only a sewing project, but also a creative experience that will give you satisfaction every time you use the bag you made yourself.
Materials You Will Need
To begin the padded toiletry bag – step by step tutorial, it is important to gather the right materials. The quality of your bag will depend largely on the fabric and supplies you choose. Always pick durable fabrics that are easy to clean, since a toiletry bag may be exposed to moisture or spills. Cotton, canvas, or waterproof fabrics are ideal. In addition, make sure you have a soft padding layer, such as fusible fleece or quilt batting, which will provide the structure and protection the bag needs.
You will also need a zipper that matches the size of your bag. Zippers are essential for keeping all items safe inside, and they also give the bag a professional finish. If you are new to sewing, don’t worry – attaching a zipper becomes much easier with practice, and this tutorial will guide you through the steps. Having a sewing machine will make the process quicker, but hand sewing can also be used if you are patient and careful with your stitches.
Other necessary tools include fabric scissors, sewing pins, measuring tape, and thread in a matching or contrasting color depending on the style you prefer. Having a good iron is also very important because pressing your fabric and seams during each stage will make your bag look polished. Don’t forget a ruler or cutting mat if you prefer precision cutting. These materials together will help ensure your padded toiletry bag – step by step tutorial turns out just the way you want.
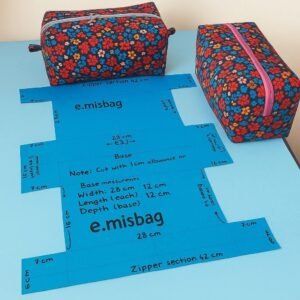
Before starting, decide the size of your toiletry bag. Smaller versions are perfect for short trips or for carrying makeup, while larger ones can store full-sized bottles and more personal care items. Preparing the correct measurements and materials from the beginning will save time later and give you a bag that perfectly suits your needs.
It is also helpful to choose a lining fabric for the inside of your bag. A wipeable or waterproof lining is especially practical, as it makes cleaning much easier in case of leaks. With all your materials gathered and prepared, you are ready to begin the process of creating your own padded toiletry bag with this detailed tutorial.
Having everything ready before you start ensures that you can follow each step smoothly without interruptions. Preparation is one of the keys to success in this padded toiletry bag – step by step tutorial, so take the time to organize your materials before beginning the fun part – the sewing process.
Cutting and Preparing the Fabric
The first stage of the padded toiletry bag – step by step tutorial is cutting your fabric. Using your chosen measurements, cut two rectangles for the outer fabric, two for the lining, and two pieces of padding or fusible fleece. Make sure all the pieces are the same size so they fit together neatly when sewn. Precision in cutting is essential to get a professional-looking result.
Once the fabric is cut, attach the padding to the wrong side of the outer fabric. If you are using fusible fleece, follow the instructions to press it with an iron so it sticks firmly. If you are using quilt batting, you can baste it with a few stitches to keep it in place. The padding is what gives the bag its shape and protection, so take your time in this step to ensure it is well attached.
Next, prepare the zipper. Place it between one piece of the outer fabric and one piece of the lining fabric, with the right sides of the fabric facing each other. This step may feel a little tricky, but using sewing clips or pins will help keep everything in place. Sew along the zipper edge slowly, making sure the stitches are even. Then press the fabric neatly away from the zipper to make it look professional.
Repeat the same process with the other side of the zipper, attaching it to the remaining fabric pieces. When you open and close the zipper, both sides of the bag should now be attached. This is the foundation of your padded toiletry bag. Always check the zipper works smoothly before moving to the next stage.
Once the zipper is attached, topstitch along both edges to secure the fabric and give it a polished appearance. Topstitching not only looks professional but also prevents the fabric from getting caught in the zipper teeth. This detail makes a big difference in the final look of your toiletry bag.
Finally, press all your pieces again to ensure everything is flat and aligned. At this stage, you will clearly see the shape of your toiletry bag starting to come together. Good preparation in this stage ensures the rest of the padded toiletry bag – step by step tutorial goes smoothly.
Assembling the Bag
Now that your pieces are prepared, it is time to assemble the padded toiletry bag – step by step tutorial. Begin by opening the zipper halfway. This step is very important because you will need the zipper opening to turn the bag right side out at the end. Place the outer fabrics right sides together and the lining fabrics right sides together, making sure all edges align.
Pin or clip the edges to hold everything securely. Sew all around the edges, leaving a small opening at the bottom of the lining fabric. This opening will be used to turn the bag inside out later. Make sure to backstitch at the beginning and end to reinforce the seams, especially around the zipper area where there is more stress.
After sewing the edges, square the corners of the bag by folding the corners into a triangle shape and sewing across. This step creates depth and gives your toiletry bag a boxy shape, allowing it to hold more items. Trim off the excess fabric at the corners to reduce bulk and make the bag look neat.
Next, turn the bag right side out through the zipper and the opening in the lining. Push out all the corners carefully with a blunt tool like a knitting needle or chopstick to give them sharp edges. Then sew the opening in the lining closed, either with a machine or by hand using a ladder stitch for a clean finish.
Once the lining is closed, push it into the bag and smooth it out with your hands. The padding will now show its effect, giving the bag structure and a soft protective layer. Check that the zipper opens and closes smoothly, and press the bag one last time for a crisp, professional look.
Congratulations! You now have a completed padded toiletry bag. This step marks the final stage of the assembly process, and you can proudly admire your handmade creation. The padded toiletry bag – step by step tutorial has shown how simple fabric pieces can turn into a functional and stylish accessory.
Personalization and Creative Ideas
One of the best parts of following a padded toiletry bag – step by step tutorial is that you can personalize the bag in endless ways. Instead of sticking to plain fabrics, you can choose colorful patterns, fun prints, or even patchwork designs. This adds a unique touch and makes your bag stand out. It can also be a reflection of your personality or a thoughtful gift made with love.
You can also experiment with different zipper colors or decorative pulls to add more character. Small details like this make a big difference in the overall appearance. Matching or contrasting thread for topstitching can also enhance the look, giving your bag a modern or classic finish depending on your choice.
Adding pockets inside or outside is another great idea. A small inner pocket can hold tiny items like earrings or hair ties, while an outer pocket can provide easy access to frequently used items. These extra details can make your bag even more practical and customized to your needs.
If you want to make the bag extra special, you can embroider initials, names, or small motifs on the fabric before assembling it. This creates a personalized gift option for friends and family. Embroidery or applique can also add texture and charm to your bag.
Different sizes of padded toiletry bags can be made from the same tutorial. Smaller ones are great for daily use, while larger ones are perfect for traveling. You can even make a matching set of various sizes for ultimate organization.
Personalizing your bag not only makes it more functional but also turns it into a unique handmade item that carries your creative touch. The padded toiletry bag – step by step tutorial gives you the foundation, but your creativity can make each bag truly one of a kind.
FAQ
1. Can beginners follow this padded toiletry bag – step by step tutorial?
Yes, beginners can definitely follow this tutorial. The steps are clear and detailed, and while sewing a zipper may feel challenging at first, practice makes it much easier. This project is perfect for learning basic sewing techniques.
2. What type of fabric works best for a padded toiletry bag?
Durable fabrics like cotton, canvas, or waterproof fabric work best. Using a lining fabric that is easy to clean, such as nylon or vinyl, is also highly recommended for practicality.
3. Do I need a sewing machine to make this bag?
A sewing machine makes the process faster and neater, but it is possible to sew by hand. Just make sure to use strong stitches, especially around the zipper and corners, for durability.
4. What kind of padding should I use?
Fusible fleece or quilt batting works perfectly. Fusible fleece is easier since it can be ironed on, while quilt batting may require basting to hold it in place before sewing.
5. Can I wash the padded toiletry bag?
Yes, you can wash it depending on the fabrics used. If you choose washable fabrics and padding, the bag can be machine-washed on a gentle cycle. For delicate fabrics, spot cleaning is recommended.
6. How can I make my toiletry bag waterproof?
To make the bag waterproof, use waterproof outer fabric and a wipeable lining. You can also add a waterproof spray finish to help protect the fabric.
Conclusion
Creating your own padded toiletry bag – step by step tutorial is a rewarding sewing project that combines functionality with creativity. From preparing your fabrics to assembling the final bag, each step allows you to practice essential sewing skills while ending with a beautiful and useful product. With personalization options like fabric choices, embroidery, or added pockets, each bag can be made unique.
Now that you have learned how to make a padded toiletry bag, take a moment to reflect on what you enjoyed most about the process. We hope this guide has inspired you to create more handmade items and explore your creativity.
Please share your honest opinion and suggestions in the comments – your feedback is always welcome and helps make future tutorials even better.