
Creating a Patchwork Forest Tree Quilt Block – Step by Step Tutorial is one of the most enjoyable and rewarding quilting projects for beginners and experienced quilters alike. This design combines the beauty of nature with the timeless art of patchwork, resulting in a quilt block that is both charming and versatile. The quilt block can be used in large quilts, table runners, wall hangings, or even as part of smaller handmade gifts. By following this tutorial, you will not only learn how to create the block but also gain valuable skills that can be applied to other quilting projects.
The Patchwork Forest Tree Quilt Block is especially popular because of its geometric design and the endless color possibilities it offers. Each tree block can be made using different fabrics, creating a forest full of unique and beautiful trees. Some quilters prefer traditional green tones, while others experiment with modern prints, creating a playful and contemporary twist on this classic block. The step-by-step approach ensures that you can follow along at your own pace, even if this is your first quilting project.
Another reason this tutorial is highly valued among quilters is the connection it creates between tradition and creativity. Quilting is more than sewing fabric together; it is storytelling with stitches and colors. With this Patchwork Forest Tree Quilt Block – Step by Step Tutorial, you can express your creativity while making something practical and beautiful. Each tree represents growth, harmony, and balance, making the block meaningful beyond its appearance.
Understanding the Patchwork Forest Tree Quilt Block
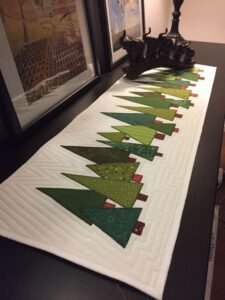
The Patchwork Forest Tree Quilt Block is built from simple geometric shapes, mainly triangles and rectangles, which makes it beginner-friendly while still offering endless design variations. Each tree can be constructed with a trunk made from darker fabrics and a tree top made with contrasting or vibrant fabrics. This balance between simplicity and flexibility is what makes this block so beloved among quilters.
When approaching this block for the first time, it is important to understand the structure of the pieces. The tree shape is usually created from half-square triangles, while the trunk is formed by small rectangles or squares. The beauty of patchwork lies in how these small pieces come together to form a complete picture. With this method, you can create one block at a time, slowly building your quilt.
Fabric choice plays a vital role in the overall look of the block. Traditional quilters often stick to green and brown tones, mimicking the natural colors of a forest. However, modern quilting allows you to explore bold, bright, and even unconventional colors like pink, blue, or patterned fabrics for the tree tops. This means every quilter can make the design uniquely their own while still staying true to the Patchwork Forest Tree Quilt Block – Step by Step Tutorial.
Cutting accuracy is another key element in quilting. For this block, precise measurements ensure that the pieces align perfectly when sewn together. Using a rotary cutter, quilting ruler, and cutting mat will make the process smoother and more efficient. Beginners often discover that accurate cutting saves a lot of frustration later in the sewing stage.
Stitching the pieces together is where the magic truly happens. Chain piecing is a technique that can make this step faster and more efficient. By sewing multiple pairs of fabric together in a continuous chain, you save time and thread. This is especially useful when making a quilt with many tree blocks.
Finally, pressing seams correctly will help your blocks lie flat and fit together neatly. Whether you choose to press seams open or to one side, consistency is key. This attention to detail ensures that your Patchwork Forest Tree Quilt Block comes together beautifully.
Step by Step: Making the Patchwork Forest Tree Quilt Block
The first step in this Patchwork Forest Tree Quilt Block – Step by Step Tutorial is choosing your fabrics. You will need at least two different fabrics: one for the tree top and one for the trunk. Many quilters enjoy using scraps, which adds character and variety to the quilt. This is a perfect project for scrap quilting because each tree can have its own personality.
Next, cut the pieces for your block. For a simple tree, you will need squares for half-square triangles and small rectangles for the trunk. Measuring carefully is important, as even small inaccuracies can affect the final block size. A common block size for beginners is 6 inches, but you can easily adjust depending on your quilt design.
After cutting, you will make the half-square triangles that form the tree top. To do this, place two squares of fabric right sides together, draw a diagonal line, and sew a seam ¼ inch away on both sides of the line. Then, cut along the diagonal line and press open. This creates two identical half-square triangles, which are the building blocks of the tree top.
Assembling the trunk is the next step. The trunk can be made from one or two small rectangles of darker fabric. These pieces are sewn between background fabrics to create the base of the tree. This step adds stability to the block and creates the signature “tree trunk” look.
Once you have your tree top and trunk ready, you can arrange the pieces into the full block layout. This step allows you to see how the block will look before sewing it together. Adjusting colors or patterns at this stage is much easier than after everything is stitched.
Finally, sew the rows together carefully, pressing seams as you go. Once complete, you’ll have a finished Patchwork Forest Tree Quilt Block that can be joined with others to create a forest-inspired quilt.
Creative Variations for the Patchwork Forest Tree Quilt Block
One of the best aspects of this Patchwork Forest Tree Quilt Block – Step by Step Tutorial is its versatility. While the basic design is simple, there are countless ways to personalize it.
You can experiment with fabric choices to create different moods. For example, using deep greens and browns creates a realistic forest look, while using bright, playful fabrics makes the quilt more whimsical. Holiday-themed fabrics can transform the block into a Christmas tree quilt, perfect for festive decorations.
Another variation is changing the block size. Small blocks create intricate quilts with a lot of detail, while larger blocks can make the project faster and easier to complete. This flexibility allows the design to suit different purposes, from bed-sized quilts to wall hangings.
You can also try making wonky or improvisational tree blocks. Instead of cutting perfect triangles, cut irregular shapes to create a playful and modern version of the tree. This style is popular among quilters who enjoy breaking away from traditional rules.
Adding embellishments can further personalize the quilt. Appliqué, embroidery, or even small buttons can be used to decorate the tree tops. This adds texture and uniqueness to each block.
Lastly, mixing tree blocks with other quilt blocks creates interesting quilt layouts. Combining trees with stars, houses, or animals can tell a complete story through the quilt. The possibilities are endless, limited only by your imagination.
Tips for Success with the Patchwork Forest Tree Quilt Block
The Patchwork Forest Tree Quilt Block – Step by Step Tutorial is beginner-friendly, but there are tips that can make the process smoother and more enjoyable.
Start by organizing your fabrics and tools before you begin. Having everything prepared will make the sewing process more efficient and stress-free. A clean and organized space helps avoid mistakes.
Practice your half-square triangles on scrap fabric before starting your main blocks. This will help you get comfortable with the technique and ensure your pieces come out accurate.
Use a consistent seam allowance, usually ¼ inch, throughout the project. This consistency ensures that your blocks will be the correct size and will fit together properly when joined into a quilt.
Take your time with pressing seams. While it may seem like a small step, properly pressed seams make a huge difference in the final look of your quilt. A good iron and pressing surface are essential tools for every quilter.
Consider using a design wall or flat surface to lay out your blocks as you work. This allows you to see the overall look of your quilt and make adjustments to colors and patterns before committing to sewing.
Finally, don’t be afraid to make mistakes. Quilting is a learning process, and even imperfect blocks can add character and charm to a finished quilt. The most important thing is to enjoy the journey of creating.
FAQ About the Patchwork Forest Tree Quilt Block – Step by Step Tutorial
Q: What size should I make my Patchwork Forest Tree Quilt Block?
A: Common sizes are 6 to 12 inches, but the block can easily be adjusted depending on your quilt project.
Q: Do I need special tools to make this quilt block?
A: Basic quilting tools such as a rotary cutter, ruler, cutting mat, and sewing machine are sufficient. Specialized tools can make the process easier but are not required.
Q: Can I use scrap fabric for this block?
A: Absolutely! The Patchwork Forest Tree Quilt Block is perfect for using up scraps, and it gives each tree a unique look.
Q: How many blocks do I need to make a full quilt?
A: This depends on the desired quilt size. For example, a lap quilt may need 20–30 blocks, while a bed quilt could require 50 or more.
Q: Is this a good project for beginners?
A: Yes, this tutorial is very beginner-friendly. The block is made from simple shapes, making it easy to follow even for new quilters.
Q: Can I make different styles of trees in one quilt?
A: Yes, mixing different tree styles or fabric choices can add variety and make your quilt more visually interesting.
Conclusion
The Patchwork Forest Tree Quilt Block – Step by Step Tutorial is an excellent project for quilters of all levels. It combines simplicity with creativity, allowing you to experiment with colors, fabrics, and variations. From learning how to cut precise shapes to assembling blocks into a quilt, each step of this tutorial helps you grow as a quilter.
If you love creating handmade projects that are meaningful and beautiful, this quilt block is a perfect choice. Not only does it produce stunning results, but it also connects you to the long tradition of patchwork quilting.
I hope this tutorial inspires you to start your own Patchwork Forest Tree Quilt Block project. Please share your honest opinion and suggestions in the comments—I’d love to know how your quilting journey is going and what variations you plan to try!