
Creating a “Pot holder”, pumpkin-shaped and made of fabric-Step by Step Tutorial is the perfect project for anyone who loves to mix creativity with functionality. A pot holder is an essential item in any kitchen, but when you give it a festive and cozy touch—like a pumpkin design—it becomes something truly special. This handmade project combines seasonal charm with practicality, making it perfect for fall decorations, Thanksgiving table settings, or even as a thoughtful handmade gift.
The best part about this pumpkin-shaped pot holder is that it’s simple to make, even for beginners. You can create it using leftover fabric scraps, making it a sustainable and cost-effective project. Whether you’re an experienced sewer or just getting started with fabric crafts, this tutorial will guide you through every step—from choosing the right materials to stitching your pumpkin-shaped design to perfection. The final result will not only protect your hands and table surfaces but also bring warmth and personality to your kitchen.
Throughout this Step by Step Tutorial, you’ll learn how to select appropriate fabrics, cut and assemble your pumpkin shape, and add final details that make your creation look professional. Using a combination of basic sewing techniques and a creative eye, you’ll be able to make a unique and durable pot holder that perfectly suits your home’s decor. Once completed, your pumpkin pot holder can serve both as a decorative accent and a practical tool for handling hot dishes.
Choosing the Right Materials
To begin this “Pot holder”, pumpkin-shaped and made of fabric-Step by Step Tutorial, let’s start by gathering the materials you’ll need. The beauty of this project lies in its simplicity—most of the supplies are probably already in your home. You’ll need two types of fabric: one for the front and one for the back. Cotton fabric works best because it’s heat-resistant and easy to handle. You can choose solid orange fabric or printed patterns that resemble pumpkins for a more whimsical touch.
In addition to fabric, you’ll need batting or heat-resistant padding to protect your hands from hot surfaces. You can use regular quilt batting or insulated batting for extra safety. Make sure you also have basic sewing tools like scissors, pins, a fabric marker, and a sewing machine or needle for hand stitching. Matching thread will give your project a polished look, while contrasting thread can add a decorative touch.
You’ll also need a template or pattern for the pumpkin shape. You can draw one freehand or use a circular object as a guide, then add gentle curves to create the pumpkin sections. Remember to include a stem shape at the top—it can be a small rectangle or leaf shape in green or brown fabric.
To make your pot holder even more functional, consider adding a small fabric loop for hanging. This will allow you to display your pumpkin pot holder in your kitchen as a cute seasonal decoration when not in use.
Before starting the sewing process, wash and iron your fabrics to prevent shrinking later. This also ensures that your stitches stay neat and the final result looks professional. Preparing your materials ahead of time makes crafting more enjoyable and efficient.
Once you have everything ready, it’s time to start shaping your pumpkin!
Cutting and Assembling the Pumpkin Shape
In this part of the “Pot holder”, pumpkin-shaped and made of fabric-Step by Step Tutorial, you’ll create the base of your pot holder. Begin by tracing your pumpkin shape onto both fabric pieces—the front and back. Make sure the shapes align perfectly, as this will make sewing easier later. Then, trace and cut the same shape onto the batting.
Once all three pieces are ready, layer them in this order: the bottom fabric piece facing down (wrong side up), batting in the middle, and the top fabric piece facing up (right side up). Pin all layers together so they don’t shift while you sew.
Using your sewing machine or hand stitching, sew around the edge of the pumpkin shape, leaving a small gap at the top or side for turning it right side out later. After stitching, carefully cut small notches along the curved edges of the pumpkin. This helps the fabric lay flat when turned right side out and prevents it from puckering.
Turn the pot holder inside out through the opening. Gently push out the curves using a blunt object like a pencil or crochet hook. Once the shape is smooth, press it with an iron to flatten it. Then, sew the opening closed using a small, neat stitch.
To give your pumpkin shape more dimension, use a sewing machine or needle and thread to stitch lines from the top to the bottom of the pot holder. These lines mimic the natural sections of a pumpkin and add a decorative touch. You can use slightly darker orange thread for a more realistic look.
Now, it’s time to add the stem. Cut a small piece of green or brown fabric, fold it in half, and sew along the edges. Turn it right side out, press it flat, and attach it to the top of your pumpkin pot holder. This detail completes the pumpkin’s charming shape.
Adding Decorative Details
This section of the “Pot holder”, pumpkin-shaped and made of fabric-Step by Step Tutorial focuses on making your creation truly unique. Adding decorative details not only enhances the design but also makes your handmade piece stand out as a beautiful craft.
Start by adding a hanging loop. Cut a small strip of fabric about 4 inches long and 1 inch wide. Fold it in half lengthwise, press it flat, and sew along the edge. Fold it into a loop and stitch it securely to the back of your pumpkin stem. This small detail allows you to hang the pot holder easily and adds a nice finishing touch.
If you enjoy embroidery, you can stitch simple vines, leaves, or even your initials onto the surface of the pot holder. A few embroidered lines in green thread can represent pumpkin vines, while small leaf motifs can bring your design to life. Embroidery is a great way to personalize your project and make it one-of-a-kind.
Another decorative option is to add a layer of quilting. By sewing additional lines or patterns across the pumpkin, you not only give it texture but also make it more durable. Quilting stitches can follow the natural curve of the pumpkin or create geometric shapes for a more modern look.
For those who prefer a playful touch, you can use felt cutouts to create facial features, turning your pot holder into a jack-o’-lantern design. This is especially fun for Halloween-themed decorations. Just remember to attach felt pieces securely, especially if the pot holder will be used near heat.
Lastly, don’t forget to iron your finished pot holder gently to set all the stitches. Pressing helps everything look neat and crisp, giving your handmade pumpkin pot holder a professional finish that’s ready to show off or gift to loved ones.
Finishing Touches and Practical Use
Now that your “Pot holder”, pumpkin-shaped and made of fabric-Step by Step Tutorial project is nearly complete, let’s focus on the final touches that make it both beautiful and functional. These last details will ensure that your pot holder is ready to use in your kitchen and will last for many seasons to come.
Check all your seams and stitches to make sure everything is secure. Reinforce any weak spots with additional stitching if necessary. If you’ve added decorative embroidery or quilting, go over them gently with your iron to make them stand out.
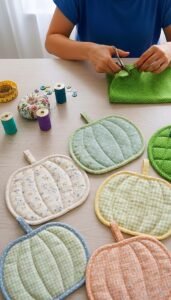
Consider making a set of pumpkin-shaped pot holders in different sizes or colors. A mix of orange, yellow, and green fabrics can represent a variety of pumpkins, adding a festive touch to your kitchen during the fall season.
This pot holder is not just for decoration—it’s practical too! The layered batting makes it safe to handle hot pans, dishes, and pots. You can also use it as a trivet to protect your table or countertop from heat damage. Because it’s made from washable fabric, it’s easy to clean and reuse.
If you plan to gift your handmade pot holder, consider wrapping it in a small basket with kitchen towels or homemade treats. Handmade gifts like this one are always appreciated because they show thoughtfulness and effort.
Finally, admire your work! You’ve turned simple materials into a charming and functional piece of kitchen art. Each time you use your pumpkin-shaped fabric pot holder, you’ll be reminded of your creativity and craftsmanship.
FAQ
1. Can I make this project without a sewing machine?
Yes! You can hand-stitch the pot holder using basic stitches like running or backstitch. It might take longer, but the result will still be beautiful.
2. What type of batting is best for pot holders?
Use heat-resistant batting or two layers of regular batting for extra insulation. Avoid polyester-only materials since they can melt under heat.
3. Can I make different fruit or vegetable shapes using this pattern?
Absolutely! You can adapt this same method to make apple, pear, or even tomato-shaped pot holders.
4. How do I keep the pot holder clean?
Wash it gently with mild detergent and air dry. Avoid high heat in dryers to prevent shrinking.
5. Is this project beginner-friendly?
Yes, this tutorial is great for beginners. The shapes are simple, and the steps are easy to follow.
6. Can I use recycled fabric for this project?
Definitely! Old shirts, pillowcases, or leftover scraps are perfect for sustainable crafting.
Conclusion
In this “Pot holder”, pumpkin-shaped and made of fabric-Step by Step Tutorial, you learned how to create a charming and practical kitchen accessory that blends creativity and functionality. From selecting the right fabrics and cutting the pumpkin shape to adding decorative stitches and finishing touches, each step allows you to express your love for handmade crafts.
Your pumpkin-shaped fabric pot holder is more than just a kitchen tool—it’s a cozy addition to your home decor and a symbol of your creativity. Whether you make it for yourself or as a thoughtful gift, this project is sure to bring warmth and joy to your kitchen.
If you enjoyed this tutorial, please share your honest opinion and suggestions. Your feedback helps inspire new ideas and improve future step-by-step craft guides!