
Creating a quilted bag tutorial – Step by Step Tutorial is a delightful way to combine practicality with artistry. Quilted bags are not only stylish and functional but also offer the satisfaction of crafting something entirely unique with your own hands. Whether you are a beginner or an experienced quilter, making a quilted bag allows you to explore patterns, textures, and colors while producing an accessory that is as useful as it is beautiful. In this guide, we will walk through the entire process with easy-to-follow instructions, ensuring your project is enjoyable from start to finish.
The charm of quilting a bag lies in its versatility. You can design one for daily use, gift-giving, or even as a decorative item for special occasions. By following a quilted bag tutorial – Step by Step Tutorial, you can learn essential quilting techniques while crafting something that matches your personal style. Using different fabrics, thread colors, and quilting designs, you can customize the look of your bag to be classic, modern, rustic, or even whimsical. This makes it a perfect project for those who enjoy experimenting with creative combinations.
One of the benefits of this type of project is that it can be as simple or as complex as you choose. A beginner can follow a basic quilted bag tutorial – Step by Step Tutorial to create a functional tote or pouch, while an advanced quilter can add intricate patchwork, embroidery, or embellishments for a more detailed look. No matter your skill level, the process will help you improve your sewing skills, understand fabric handling better, and gain confidence in your creative abilities.
Materials Needed for a Quilted Bag
To successfully complete a quilted bag tutorial – Step by Step Tutorial, gathering the right materials is crucial. The quality and type of fabric you choose will significantly affect the bag’s appearance and durability. Cotton fabrics are a popular choice for quilting projects because they are easy to work with and come in a wide range of patterns and colors. Batting, which is the middle layer that gives the bag its quilted texture, can be cotton, polyester, or a blend, depending on the level of structure and softness you prefer.
You will also need quality thread, preferably 100% cotton or polyester, that matches or contrasts nicely with your chosen fabrics. A sewing machine is recommended for efficiency, although hand stitching is also possible for those who enjoy a slower, more meditative approach. Ensure you have sharp scissors or a rotary cutter, a cutting mat, and quilting rulers to measure and cut your fabric precisely.
Other important supplies include pins or clips to hold pieces in place while sewing, an iron for pressing seams, and a zipper or magnetic snap if your design includes a closure. Handles or straps can be made from the same fabric as the bag or from sturdier materials like leather or webbing for added strength. Having everything ready before starting ensures a smooth and enjoyable sewing process.
Batting thickness is an important consideration. Thinner batting will give your bag a softer, more flexible feel, while thicker batting provides structure and durability. If you want your quilted bag to stand upright, opt for a sturdier batting or even a layer of interfacing in addition to the batting. The choice depends entirely on the final look and functionality you desire for your bag.
The lining fabric should complement the outer design while also being practical. Consider a darker lining for bags that will be used frequently, as it will hide stains and wear better. A smooth cotton or polyester lining makes it easier to clean and ensures that small items won’t snag inside.
Finally, before cutting your fabric, always wash and press it. This step helps prevent shrinkage and ensures that your fabric pieces fit together accurately during assembly. Pre-washing also removes any chemical finishes from the fabric, making it safer and softer to work with.
Step-by-Step Quilting Process
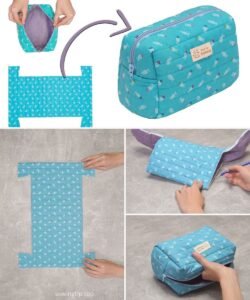
The first step in the quilted bag tutorial – Step by Step Tutorial is to cut your fabric pieces according to your chosen pattern. If you are following a basic tote design, you will need two outer fabric panels, two lining panels, batting for each panel, and fabric for the handles or straps. Measure carefully, as precise cutting is key to a professional-looking result.
Once the pieces are cut, layer each outer fabric panel with batting. Secure them together using pins or basting spray. This will keep the layers from shifting while you sew. At this stage, you can choose your quilting design—straight-line quilting, diagonal grids, or free-motion quilting for more intricate patterns. The quilting stitches not only add beauty but also help hold the layers together.
Sew your chosen quilting pattern across each panel, starting from the center and working outward to prevent puckering. Take your time, as neat stitching will elevate the overall appearance of your bag. Once quilting is complete, trim any excess batting to match the edges of the fabric.
Next, assemble the main body of the bag by placing the quilted panels right sides together and sewing along the sides and bottom. Leave the top edge open. If your design includes boxed corners for extra depth, mark and sew these at this stage. Press the seams open or to one side to reduce bulk.
Prepare the lining in the same way by sewing the lining panels together along the sides and bottom, leaving a small gap in the bottom seam for turning the bag right side out later. If you are adding pockets inside, attach them to the lining before sewing it together.
With both the outer bag and lining complete, place them right sides together, aligning the top edges. Sew around the top edge, then turn the bag right side out through the gap in the lining. Close the gap with a small seam, push the lining into the bag, and press the top edge flat.
Adding Finishing Touches
At this stage in the quilted bag tutorial – Step by Step Tutorial, you can add closures, embellishments, and final touches that make the bag truly your own. A magnetic snap or zipper keeps the contents secure, while decorative buttons or fabric appliqués can enhance the overall look.
If you are adding straps, ensure they are securely attached to withstand regular use. Fabric handles can be reinforced with interfacing, while leather or webbing straps can be sewn or riveted in place for extra durability. The length of the straps can be adjusted depending on whether you want a shoulder bag, handbag, or crossbody style.
Topstitching along the upper edge of the bag not only adds a polished finish but also strengthens the opening. This small detail makes a big difference in the bag’s overall appearance and durability.
For a truly unique look, consider using patchwork techniques for the outer fabric. This allows you to incorporate fabric scraps, creating a one-of-a-kind piece that reflects your personal style and reduces fabric waste.
Lining pockets can be designed to fit your specific needs—whether for holding a phone, keys, or other small items. This practical touch adds to the bag’s functionality and makes it easier to keep your belongings organized.
Finally, give your finished quilted bag a good press to smooth out any wrinkles and set the seams. At this point, your handmade creation is ready to use, gift, or even sell if you wish.
Caring for Your Quilted Bag
To keep your handmade quilted bag looking its best, proper care is important. Most quilted bags made from cotton fabrics can be gently hand-washed or machine-washed on a delicate cycle with mild detergent. Always check the materials used, especially if you’ve added leather straps or special embellishments that might require different cleaning methods.
Avoid using bleach or harsh chemicals, as these can damage the fabric and batting. After washing, reshape the bag and let it air-dry completely. If necessary, press it lightly with an iron to restore its crisp appearance.
For bags used daily, spot cleaning can help maintain their appearance between washes. Simply use a damp cloth to gently clean any dirt or stains. Lining fabrics can also be wiped down to keep the inside fresh.
Storing your quilted bag in a cool, dry place away from direct sunlight will prevent fading and fabric damage. If the bag has straps, avoid hanging it for long periods, as this can stretch or deform the handle area over time.
For quilted bags with intricate quilting patterns, a light steam press can refresh the texture and keep it looking neat. Just be careful not to flatten the quilting too much.
Regular maintenance not only keeps your quilted bag looking beautiful but also extends its lifespan, allowing you to enjoy your handmade creation for years to come.
FAQ About Quilted Bag Tutorial – Step by Step Tutorial
1. Can beginners make a quilted bag?
Yes! A quilted bag tutorial – Step by Step Tutorial is perfect for beginners because it allows them to learn quilting and bag construction in a single project. Starting with a simple design helps build skills and confidence.
2. How long does it take to make a quilted bag?
Depending on the complexity of the design, it can take anywhere from a few hours to a couple of days. Simple tote bags are quicker, while detailed patchwork or embellishments require more time.
3. What type of fabric is best for quilted bags?
Cotton fabrics are ideal for beginners because they are easy to work with, durable, and widely available. More advanced makers may experiment with canvas, linen, or blends for different textures.
4. Do I need a sewing machine to make a quilted bag?
While a sewing machine speeds up the process, you can hand-sew a quilted bag if you have patience. The key is consistent stitching and secure seams.
5. How do I make my quilted bag sturdier?
Using thicker batting, adding interfacing, and reinforcing seams will increase the bag’s structure and durability. The type of straps you choose also plays a role in strength.
6. Can I sell quilted bags I make from tutorials?
In most cases, yes, as long as the tutorial doesn’t have restrictions on selling finished products. Always check the pattern’s usage terms if it is from a designer.
Conclusion
In this quilted bag tutorial – Step by Step Tutorial, we explored how to choose materials, prepare and quilt the fabric, assemble the bag, and add finishing touches that make it unique.
From beginner-friendly steps to advanced customization ideas, you now have the knowledge to create a beautiful, functional accessory tailored to your style. We hope this guide inspires you to start your own quilting journey.
Share your honest opinions and suggestions—we’d love to hear about your experiences and see your creations!