
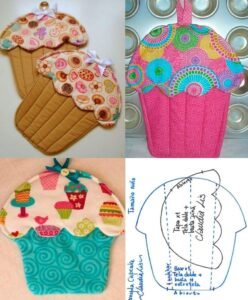
Learning how to make a quilted cupcake – step by step tutorial is a delightful way to combine quilting techniques with a fun and creative project. A quilted cupcake can be used as a wall decoration, a patchwork block for a larger quilt, or even as a small gift for someone special. Because it combines the basics of quilting with playful shapes, it is a wonderful option for beginners who want to practice their skills while also producing something beautiful and functional. Throughout this tutorial, we will explore how to cut, sew, and assemble fabric pieces to create your own unique quilted cupcake.
One of the advantages of making a quilted cupcake is that you don’t need a large amount of fabric or advanced quilting tools. This makes it the perfect project for using fabric scraps and testing different color combinations. By following a clear and structured tutorial, you can complete your cupcake block with confidence. As you continue, you will also gain essential quilting skills such as accurate cutting, pressing, piecing, and finishing techniques. This means that while you are creating a fun design, you are also building a strong quilting foundation.
The quilted cupcake – step by step tutorial that follows is written with simplicity in mind. Even if you have never quilted before, you can follow these instructions and enjoy the process of making your cupcake design. Experienced quilters will also appreciate the opportunity to add personal touches and experiment with textures, fabrics, and embellishments. Whether you plan to frame your cupcake block, turn it into a potholder, or include it in a quilt, this tutorial will guide you through every detail with clarity.
Materials and Preparation for a Quilted Cupcake
Before starting your quilted cupcake – step by step tutorial, it is important to prepare all the materials. Proper preparation ensures a smoother process and allows you to enjoy quilting without interruptions. For this project, you will need a small selection of cotton fabrics in different colors, scissors or a rotary cutter, quilting pins, a ruler, thread, a sewing machine, and batting. Having these ready will make the steps easier to follow.
Choose fabrics that represent the different parts of a cupcake. For the base, you can use striped or patterned fabric to resemble a cupcake liner. For the top, select soft colors like pink, cream, or chocolate tones to represent frosting. You can also add a bright red or colorful fabric scrap to represent a cherry or sprinkles. This thoughtful selection will bring your design to life.
Cutting fabric accurately is one of the most important aspects of quilting. When working on your quilted cupcake, make sure to measure twice before cutting. Using a rotary cutter with a ruler on a cutting mat will help you achieve precise shapes. This accuracy will make the sewing process easier and ensure that your cupcake block looks neat and professional.
Another essential step in preparation is choosing the right batting. Batting gives your quilted cupcake its soft and padded appearance. A thin cotton batting is ideal for small quilting projects like this because it provides structure without being too bulky. Once you have chosen your batting, cut it slightly larger than your fabric pieces to allow room for adjustments.
Thread selection also plays a role in the overall look of your quilted cupcake. Neutral threads work well when you want the stitching to blend, while colored threads can be used for decorative quilting lines. Preparing extra bobbins before starting the sewing will save time and avoid interruptions.
Finally, make sure your sewing machine is ready with the correct settings for quilting. Test your stitches on a fabric scrap before starting the project. Once your materials are prepared, you will be ready to move on to the fun part—assembling the quilted cupcake step by step.
Step by Step Assembly of the Quilted Cupcake
The quilted cupcake – step by step tutorial begins with piecing together the cupcake base. Start by sewing two or three fabric strips together to represent the cupcake liner. Use a straight stitch and make sure the seams are pressed flat with an iron. This creates a neat and sturdy base for your design.
Next, prepare the frosting section of your cupcake. Cut a rounded piece of fabric to represent the top. If you want a more decorative look, cut scalloped edges to mimic the swirls of frosting. Pin the frosting piece above the base and carefully sew them together. Remember to press the seam flat to keep your block smooth.
Once the base and frosting are attached, add a small fabric circle or triangle on top to represent a cherry or decoration. This step allows you to be creative and add your personal touch. You can also stitch small pieces of colorful fabric onto the frosting to represent sprinkles.
After assembling the main cupcake design, place it on top of the batting and a backing fabric. Pin all three layers together to prepare for quilting. This is when your design starts to transform into a quilted block. Make sure all layers are smooth and flat before sewing.
Quilting stitches will hold the layers together and add texture to your cupcake. You can follow the shape of the cupcake with curved lines or create a grid pattern for a modern look. If you are a beginner, start with simple straight lines to practice control and precision. More experienced quilters can experiment with free-motion quilting for extra creativity.
Once quilting is complete, trim the edges of your cupcake block neatly. You can leave it as a square block to be added into a quilt or add binding around the edges to finish it as a small standalone piece. Either way, your quilted cupcake will be ready to display or gift.
Creative Variations of the Quilted Cupcake
One of the most enjoyable parts of the quilted cupcake – step by step tutorial is exploring creative variations. Every quilter has their own style, and this project allows for plenty of personalization. You can make different flavors of cupcakes simply by changing the fabrics used.
For a chocolate cupcake, choose dark brown fabrics for the base and frosting. For a strawberry version, use pink fabrics with white dots or small floral prints. Lemon or vanilla cupcakes can be made with light yellow or cream fabrics. This flexibility makes the quilted cupcake a versatile project.
Another fun variation is experimenting with embellishments. Adding small beads or sequins can represent sprinkles, while embroidery stitches can outline the frosting. Buttons can be sewn on as cherries or candies, giving the project an extra playful look. These additions make your cupcake truly one-of-a-kind.
You can also adjust the size of your quilted cupcake. Smaller versions can be used for coasters or appliqués, while larger versions can serve as pillow covers or quilt centerpieces. By resizing the design, you can adapt the project to different purposes and needs.
For those who enjoy themed quilting, making a collection of quilted cupcakes in different colors can be a fun project. Imagine a quilt filled with dozens of colorful cupcakes, each one unique and charming. This makes a great gift for birthdays or celebrations.
Finally, you can combine the quilted cupcake with other quilt blocks to create a mixed-theme quilt. Pair it with heart, star, or flower blocks to design a cheerful and personalized quilt. This creativity shows how versatile a small project can become.
Tips for Beginners Following the Quilted Cupcake Tutorial
If you are new to quilting, the quilted cupcake – step by step tutorial is a great starting point. However, like any craft, it comes with a learning curve. Following some tips will make your first project smoother and more enjoyable.
Start with simple fabrics rather than slippery or stretchy materials. Cotton fabric is ideal because it is easy to cut, sew, and press. Avoid using fabrics that fray easily until you gain more experience. The right fabric makes quilting easier and reduces frustration.
Take your time with cutting and measuring. Accuracy at this stage will save you from difficulties later in the project. Beginners often rush the cutting process, but neat and even pieces are the foundation of a successful quilted cupcake.
When sewing, go slowly and guide the fabric gently without pulling. This will help maintain straight seams and prevent uneven stitching. If your seams are not perfect, do not worry—quilting is about progress and practice. Each project will help you improve.
Use pins or clips to hold fabric pieces in place before sewing. This ensures that the cupcake design stays aligned as you work. Beginners sometimes skip pinning, but it makes a big difference in the final result.
Pressing seams with an iron after every step is another habit that improves quilting results. Flat seams make your cupcake block more polished and professional. Even though it may seem time-consuming, it is worth the effort.
Finally, be patient and enjoy the process. Quilting is not just about the finished product but also about the creativity and relaxation it brings. Your first quilted cupcake may not be perfect, but it will be unique and handmade with care.
FAQ About Quilted Cupcake – Step by Step Tutorial
1. What is a quilted cupcake?
A quilted cupcake is a small quilting project where fabric pieces are sewn together to resemble the shape of a cupcake. It can be used as a quilt block, decoration, or gift.
2. Do I need advanced quilting skills to make a quilted cupcake?
No, this project is beginner-friendly. The steps are simple, and it is a great way to practice basic quilting techniques like cutting, piecing, and quilting.
3. What kind of fabric is best for a quilted cupcake?
Cotton fabric is the best choice because it is easy to cut and sew. It also holds its shape well, making the quilting process smoother.
4. Can I hand sew a quilted cupcake instead of using a sewing machine?
Yes, you can hand sew the cupcake if you prefer. While it may take longer, it is possible to complete the project with hand stitching.
5. How can I decorate my quilted cupcake?
You can use beads, buttons, embroidery, or appliqué to add sprinkles, cherries, or decorative details. This adds personality and creativity to your cupcake.
6. What can I do with a finished quilted cupcake?
A quilted cupcake can be used as a wall hanging, a coaster, a potholder, or as part of a larger quilt. It also makes a thoughtful handmade gift.
Conclusion
In this quilted cupcake – step by step tutorial, we explored how to prepare materials, cut and assemble fabric, quilt the layers, and add personal touches. We also discussed variations, creative decorations, and beginner-friendly tips. This project is not only fun but also an excellent way to practice quilting skills.
Now that you have learned how to create your own quilted cupcake, it’s time to try it yourself. Enjoy the process, experiment with fabrics, and let your creativity shine.
Once you finish, share your experience and leave a sincere opinion along with suggestions. Your feedback is valuable and helps inspire more quilting projects in the future.