
If you are looking for an eco-friendly and practical way to keep your meals warm or cold, then this Reusable thermal sandwich container-Step by Step Tutorial is perfect for you. With just a few materials and simple sewing techniques, you can create a durable, washable, and stylish container for your sandwiches, snacks, or even small meals. Not only does this help reduce the use of disposable plastic bags and wraps, but it also adds a personal touch to your daily lunch routine. Making your own reusable thermal sandwich container is an enjoyable project that combines sustainability and creativity.
The idea behind a reusable thermal sandwich container is to maintain the ideal temperature of your food while minimizing waste. Whether you’re packing lunch for work, school, or a picnic, having a reliable thermal container ensures your meal stays fresh for hours. The best part? You can customize it using your favorite fabrics, colors, and designs. Once you understand the basic structure, you’ll be able to make several containers of different sizes for all your needs.
In this Step by Step Tutorial, you’ll learn how to select the right thermal materials, measure and cut your fabric accurately, and assemble your reusable sandwich container with easy sewing methods. You don’t need to be a professional sewer to create one—this project is suitable even for beginners. With patience and attention to detail, you can craft something practical and reusable that will last for years. Let’s begin this journey toward a more sustainable kitchen habit by learning how to make your own thermal sandwich container.
Materials Needed for the Reusable Thermal Sandwich Container
Before starting this Reusable thermal sandwich container-Step by Step Tutorial, it’s essential to gather all the materials you’ll need. The quality of your materials plays a significant role in how effective and long-lasting your thermal container will be. Don’t worry—most of these supplies are easy to find and budget-friendly.
Start with two main layers of fabric: one outer layer and one inner lining. The outer layer should be made of cotton, canvas, or polyester—something strong and durable that can withstand daily use. For the inner lining, choose a food-safe, waterproof material like PUL (polyurethane laminate) or a thermal-insulated fabric. These materials help maintain the temperature of your food and prevent moisture from leaking.
You will also need some thermal insulation material, such as Insul-Bright or aluminum thermal batting. This layer is what keeps your food warm or cold for longer periods. It’s lightweight, flexible, and machine-washable, making it perfect for reusable projects like this one.
Other essentials include thread, Velcro or snap buttons for the closure, scissors, pins or clips, and a sewing machine (though you can hand-sew if you prefer). Having a ruler or measuring tape will help you cut your pieces accurately.
Once you have all your materials ready, prepare your workspace. Make sure your table is clean, flat, and well-lit. This will make cutting and sewing easier and ensure that your reusable thermal sandwich container turns out neat and professional. With all your supplies organized, you’re ready to move on to the next step—cutting your fabric and assembling your layers.
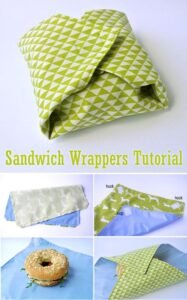
Cutting and Preparing the Fabric
Now that you’ve gathered everything, the next part of this Reusable thermal sandwich container-Step by Step Tutorial is to cut and prepare your fabric pieces. Precise measurements are key to achieving a neat and functional container that properly fits your sandwiches or snacks.
Start by deciding the size of your container. A good standard size for a sandwich holder is around 10 inches by 10 inches, but you can adjust it depending on the size of the sandwiches you typically make. Add an extra inch on all sides for seam allowances. Using your ruler or measuring tape, mark the fabric with tailor’s chalk or a washable marker before cutting.
Cut one piece of outer fabric, one piece of lining fabric, and one piece of thermal insulation. Make sure all three layers are exactly the same size. Once you’ve cut them, stack the pieces in this order: outer fabric (right side facing down), thermal insulation in the middle, and lining fabric (right side facing up). Pin or clip the layers together to hold them securely in place.
Before sewing, you can choose to round the corners for a softer look or keep them square for a more structured shape. If you prefer, you can also cut an extra small flap piece for the top, which will later hold the Velcro or snap button closure. This flap helps keep your sandwich secure inside the container.
It’s important to note that the lining fabric should always face the food side. Make sure it’s clean and made of food-safe material. If you’re using PUL or a waterproof fabric, place it so that the shiny, laminated side faces inward to prevent any leakage.
After everything is properly aligned and pinned, you’re ready to move on to sewing the layers together and assembling your reusable thermal sandwich container.
Sewing and Assembling the Thermal Sandwich Container
In this stage of the Reusable thermal sandwich container-Step by Step Tutorial, you’ll begin sewing the pieces together to form your container. Even if you’re new to sewing, this process is easy to follow, and the results are incredibly satisfying.
Start by sewing around the edges of your layered fabrics, leaving a small opening of about 2 inches so you can turn it inside out later. Use a straight stitch and keep a consistent seam allowance of about ½ inch. Once you’ve sewn all the sides except for the opening, carefully trim any excess fabric or corners to reduce bulk.
Turn your piece right side out through the opening. You should now see the outer fabric on one side and the lining fabric on the other, with the thermal layer hidden in between. Use a blunt tool, like the end of a crochet hook or pen, to push out the corners for a clean finish. Then, press the fabric with a warm iron to flatten it neatly.
Next, close the opening you left earlier. You can do this by sewing a topstitch all the way around the edge of the square. This not only closes the opening but also adds a professional touch and strengthens the seams.
Now it’s time to fold and shape your sandwich container. Lay the piece flat with the lining side facing up. Fold the bottom up about two-thirds of the way, leaving the top portion as a flap. Pin or clip the sides and sew along the two edges to form a pocket shape. This pocket will hold your sandwich securely while the flap will close over it.
Finally, attach your closure. Sew one piece of Velcro on the inside of the flap and the other on the outside of the main pocket, ensuring they line up perfectly when closed. Alternatively, you can use snap buttons or a zipper if you prefer a different style. Your reusable thermal sandwich container is now functional, durable, and ready to use!
Personalization and Care Tips
Now that your Reusable thermal sandwich container is complete, it’s time to make it your own. Adding personal touches not only makes your container more attractive but also helps differentiate yours from others if you make several.
You can embellish the outer fabric with embroidery, iron-on patches, or even fabric paint to create fun designs. A cute idea is to add your initials or a simple icon, such as a sandwich, fruit, or leaf, to highlight its eco-friendly purpose. Just make sure that any decoration you add does not interfere with the functionality or washability of the container.
For those making containers for kids, using fun prints like animals, cartoons, or bright colors can make lunchtime more exciting. You can even sew a small fabric loop on one corner so it can hang on a backpack or lunch bag.
As for maintenance, caring for your reusable thermal sandwich container is easy. After each use, wipe the inside clean with a damp cloth if there are crumbs or residue. For a deeper clean, hand wash it with mild soap and cold water, then let it air dry completely before storing. Avoid using bleach or harsh detergents, as they can damage the insulation and waterproof layers.
Over time, if the container starts showing signs of wear, you can easily replace parts like Velcro or even resew the seams to extend its lifespan. Unlike disposable options, this reusable solution can last for years, saving money and reducing plastic waste.
With proper care, your thermal sandwich container will remain functional, hygienic, and environmentally friendly—a true reflection of sustainable living through creativity and craft.
FAQ about Reusable Thermal Sandwich Container-Step by Step Tutorial
1. What makes this container thermal?
The insulation layer inside the container helps maintain the food’s temperature. It keeps sandwiches warm or cool for longer periods compared to regular fabric bags.
2. Is this project beginner-friendly?
Yes! This Reusable thermal sandwich container-Step by Step Tutorial is perfect for beginners. The steps are simple, and it only requires basic sewing skills.
3. Can I wash my thermal sandwich container in the washing machine?
It’s recommended to hand wash it to maintain the integrity of the insulation and waterproof lining, but gentle machine washing can work if you use cold water and avoid high heat.
4. What fabric is safe for food contact?
PUL (polyurethane laminate) or food-safe waterproof nylon is ideal for the lining. Always ensure the material you use is clean and non-toxic.
5. Can I adjust the size of the container?
Absolutely! You can make smaller versions for snacks or larger ones for full meals by adjusting your cutting measurements accordingly.
6. How long does the container keep food warm or cold?
Typically, it maintains the temperature for 2–4 hours, depending on external conditions and the thickness of the insulation used.
Conclusion
In this Reusable thermal sandwich container-Step by Step Tutorial, we explored how to make a practical, eco-friendly, and stylish alternative to disposable lunch wraps.
You learned how to choose the right materials, measure and cut the fabric, sew and assemble the layers, and personalize your finished container. This simple project not only helps reduce plastic waste but also adds convenience and creativity to your daily routine.
Now that you know how to make your own reusable thermal sandwich container, it’s time to put your sewing skills to work and start creating! It’s a rewarding project that supports sustainability and showcases your craftsmanship. We’d love to hear your honest opinion and suggestions—share your thoughts about this tutorial and inspire others to join the movement toward eco-friendly handmade living!