
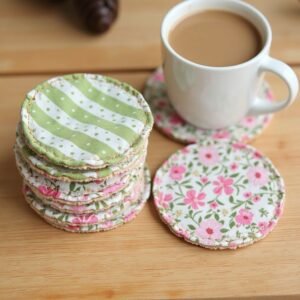
Round fabric coaster-Step by Step Tutorial is a wonderful and practical sewing project that adds charm and personality to your home décor. Whether you are decorating your dining table, protecting furniture surfaces, or preparing handmade gifts, creating your own round fabric coasters gives you full creative freedom. They can be made using leftover fabric, cotton scraps, or themed materials for holidays and celebrations. This project is also beginner-friendly, making it perfect for anyone who wants to practice sewing while producing something useful and stylish. Throughout this guide, we will explore simple steps to create beautiful coasters that are durable, washable, and aesthetically pleasing.
By following this Round fabric coaster-Step by Step Tutorial, you can experiment with various textures, colors, and stitching techniques. From floral prints to geometric patterns, you have the freedom to mix fabrics that match your personal taste or the style of your home. These coasters are also fun because they require very little material, which means they are low-cost and eco-friendly. Instead of throwing away fabric pieces, you can transform them into something functional and decorative. Crafting in this way encourages sustainability and gives handmade items a special sentimental value.
Additionally, making coasters by hand allows you to personalize them for different occasions. You can create sets for holidays, housewarming gifts, or everyday use. The process of sewing these coasters can be calming and enjoyable, allowing time for creativity and relaxation. The steps are straightforward and easy to follow, and even if you are new to sewing, you will find the project achievable. Now, let’s begin this Round fabric coaster-Step by Step Tutorial by gathering the necessary materials and preparing your workspace for a smooth crafting experience.
Materials Needed and Preparation
To start this Round fabric coaster-Step by Step Tutorial, gather the fabrics you want to use. Cotton fabric works best because it is durable and easy to sew. You may choose solid colors, patterns, or coordinating prints depending on your design preference. You will also need a piece of batting or felt to add thickness and structure to your coaster. This inner layer helps protect surfaces from heat and moisture.
Make sure to have basic sewing tools, including scissors, sewing pins, a needle, and thread. If you prefer, you can also use a sewing machine to speed up the process, but hand stitching works perfectly fine for this project. A fabric marker or piece of chalk is helpful for tracing the circular shape. Additionally, find an item such as a cup, lid, or small bowl that you can use as a round template for the coaster.
Before sewing, iron your fabric to remove wrinkles and ensure smooth, even cuts. This step helps create more precise stitching later on. Lay the fabric flat on your workspace, making sure you have enough room to cut multiple circles. If you are planning to make a set of coasters, consider cutting all your pieces at once to save time.
Next, decide on the size of your coasters. A standard coaster size is about 4 to 5 inches in diameter, but you can adjust the size depending on your needs. Larger coasters work well for coffee cups and mugs, while smaller ones fit glasses and tea cups. Once you decide on the size, use your chosen round object to trace the shape onto the fabric.
When cutting your fabric pieces, cut two circles of fabric for each coaster and one circle of batting or felt to place between them. The sandwich structure ensures durability and gives your coaster a neat appearance. Once you have all materials ready, you are prepared to begin sewing the pieces together and shaping your coaster.
Sewing the Coaster Layers
The next step in this Round fabric coaster-Step by Step Tutorial is to assemble and sew the layers together. Begin by placing the two fabric circles with their right sides facing each other. This ensures that the pattern or print will be visible when the coaster is turned right-side out. Then place the batting or felt circle on top of the wrong side of one of the fabric pieces.
Once the layers are stacked, secure them with sewing pins. The pins help keep the circles aligned while sewing, especially around the curved edges. Be sure to leave a small opening—about one inch—unsewn. This gap will allow you to turn the coaster right side out once the stitching is complete.
Now, using a needle and thread or a sewing machine, sew around the edge of the coaster. Carefully follow the circular shape to maintain an even seam. If sewing by hand, use a backstitch for strength and durability. This ensures that the coaster maintains its shape and does not come apart with use or washing.
After stitching around the circle, remove the pins and carefully turn the coaster right-side out through the opening you left. Take your time with this step to avoid stretching the fabric or tearing the seam. Once the coaster is turned, use a pencil or blunt tool to gently push out the edges for a smooth, rounded shape.
Next, iron the coaster to flatten it and prepare for the final stitching step. Pressing the fabric helps the edges lay flat and gives the coaster a polished appearance. Make sure the seam allowance inside the opening is folded inward neatly.
Finally, sew the opening closed using a hidden or ladder stitch if sewing by hand. If using a sewing machine, sew a narrow topstitch around the entire edge of the coaster. Topstitching strengthens the coaster and adds a clean, finished look.
Adding Decorative Stitches and Texture
Once your coaster base is complete, you can enhance it with decorative elements. This part of the Round fabric coaster-Step by Step Tutorial allows you to express your creativity. Adding decorative stitching not only improves the aesthetic but also secures the inner batting and prevents shifting.
One idea is to stitch a spiral starting from the center of the coaster and working outward. This pattern complements the round shape and gives your coaster a unique design. You may also stitch simple lines, grids, or waves depending on your style.
If you enjoy embroidery, consider adding small designs such as flowers, leaves, stars, or initials. Embroidered designs give the coaster a personalized touch and make it a meaningful keepsake. Use embroidery floss in contrasting colors to make the designs stand out.
Fabric paint or fabric markers can also be used to decorate the coaster surface. These allow for more expressive designs and patterns. However, be sure the paint is washable and heat-safe, especially if your coaster will be used for hot beverages.
You can also create themed coaster sets. For example, choose holiday fabrics and add festive stitching for Christmas, or pastel colors and floral embroidery for spring. A set of themed coasters makes a thoughtful handmade gift.
Decorative trim, such as lace or bias tape, can be added to the outer edge for an elegant finish. Be sure to stitch it carefully so that the trim lays flat around the circular shape.
Tips for Care, Use, and Customization
To ensure the longevity of your finished coasters, proper care is recommended. Because they are made from fabric, these coasters are washable. Gently hand wash using mild soap and allow them to air dry. If you prefer, you may also machine wash them on a delicate cycle. Avoid using bleach, as it may fade the fabric.
If the coaster becomes wrinkled over time, ironing it on a low heat setting will restore its smooth shape. Using fabric with good quality fibers helps the coaster maintain structure even after multiple washes.
One of the benefits of this Round fabric coaster-Step by Step Tutorial is that it allows endless customization. You can experiment with quilted patterns, textured fabrics, or even patchwork designs. Mixing different fabric pieces can create a beautiful artistic effect.
For a more luxurious feel, consider using linen or soft velvet. For kitchen use, cotton remains the most practical option. Matching the coaster fabric to your dining table aesthetic helps create a cohesive look.
If gifting your coasters, you may wrap them with a ribbon or place them in a small box. Handmade items always carry emotional value, showing care and attention to detail.
FAQ
1. Can I make the coaster without batting or felt inside?
Yes, but adding batting gives the coaster thickness and better heat protection.
2. Which fabric is best for this project?
Cotton is ideal as it is durable and easy to sew.
3. Can I sew these coasters by hand?
Yes, hand stitching works perfectly and is great for beginners.
4. Can these coasters be washed?
Yes, they are machine or hand washable with mild soap.
5. What size should I make the coaster?
A diameter of 4 to 5 inches is standard, but you can adjust to your preference.
6. Can I add personalization?
Absolutely—embroidery, fabric paint, and decorative stitches all work well.
Conclusion
This Round fabric coaster-Step by Step Tutorial has guided you through selecting materials, sewing the fabric layers, adding texture, and personalizing your final design.
By creating your own coasters, you enjoy a fun and relaxing craft while producing something beautiful and useful. Handmade coasters bring comfort, style, and creativity to your home décor.
I hope you enjoyed this tutorial—please leave your sincere opinion and any suggestions for future projects. Your feedback is always appreciated!