
Creating a sanitary pad bag tutorial – step by step tutorial is a wonderful way to combine practicality with creativity. A small and discreet bag designed to store sanitary pads can make everyday life more organized and more comfortable. Many people appreciate having a neat and stylish accessory that allows them to carry their essentials without drawing attention, and making one yourself adds a special personal touch. By following this guide, you will learn not only how to make the bag but also how to add unique details that reflect your own style.
The process of making a sanitary pad bag is very beginner-friendly and does not require advanced sewing or crafting skills. All it takes is some patience, a bit of fabric, and a willingness to learn. Once you understand the basic steps, you can create multiple versions in different sizes, colors, and patterns. This sanitary pad bag tutorial – step by step tutorial is written in a clear way so you can follow along easily, even if you are new to sewing projects. The main goal is to help you create a functional yet stylish item that you will be proud to carry.
Another advantage of this tutorial is the flexibility it offers. A sanitary pad bag can also be used for other small essentials such as tissues, small cosmetics, or even medication. This versatility makes it not only practical but also a thoughtful handmade gift. By the end of this sanitary pad bag tutorial – step by step tutorial, you will have a finished product that is both useful and attractive. Let’s dive into the details and see how you can make one yourself.
Materials You Will Need
To start the sanitary pad bag tutorial – step by step tutorial, the first step is to gather all the necessary materials. Preparing everything beforehand will make the process smoother and more enjoyable. You do not need a long list of supplies, and many of them may already be available at home.
You will need two pieces of fabric – one for the exterior and one for the lining. Cotton fabric is a great choice because it is durable, washable, and easy to work with. You can choose plain colors, prints, or even mix fabrics to create a unique look. Having fabric that feels soft but strong ensures that the bag is practical and long-lasting.
A sewing machine is ideal for this project, but hand stitching is also possible if you prefer a slower, more mindful process. You will also need sewing thread, scissors, pins or clips, and a small piece of Velcro, a button, or a snap closure to secure the bag. These items are easy to find and inexpensive, making this a budget-friendly project.
An iron is also very helpful during the process. Pressing the fabric as you go gives the bag a professional finish and makes sewing much easier. A ruler or measuring tape will also ensure precision, which is important for creating a neat final product.
Before you begin cutting, make sure to wash and iron your fabric. This step prevents any shrinkage after the bag is completed and makes it easier to work with. With these simple preparations, you will be ready to start crafting your sanitary pad bag.
One of the best parts about this tutorial is the freedom to choose your own style. Whether you prefer bright and playful patterns, minimalistic tones, or something elegant, the choice is yours. This makes every bag unique and perfectly suited to your needs.
Step by Step Instructions
Now that your materials are ready, let’s begin the sanitary pad bag tutorial – step by step tutorial. This section will guide you through each step carefully so you can follow along and create a functional bag with ease.
First, cut two rectangles of fabric, one for the outside and one for the lining. A good size to start with is around 18 cm by 22 cm, but you can adjust depending on the size of sanitary pads you want to store. Having precise measurements ensures your bag will be the perfect size for its purpose.
Place the two fabric rectangles together with the right sides facing each other. Pin or clip them in place, leaving a small gap on one side that will allow you to turn the fabric inside out later. Stitch all around the edges with a straight stitch, making sure to leave that gap unsewn.
Once stitched, trim the corners to reduce bulk, being careful not to cut the seam itself. Then, turn the fabric inside out through the gap. Press the fabric with an iron to create crisp edges, and sew a topstitch all around to close the gap and give the piece a professional look.
Next, fold the fabric in half like a wallet, with the lining side inside. This will create the pocket where your sanitary pads will be stored. Pin the sides and stitch along both edges, securing the shape of the bag. The top remains open for easy access.
Finally, attach your chosen closure. Velcro is simple and secure, while a snap button or a decorative button adds charm. Once attached, your bag is ready to use. The entire process is quick, taking less than an hour for most beginners.
By following these instructions, you have completed your own sanitary pad bag. Each step is straightforward, and the satisfaction of creating something useful with your hands is truly rewarding.
Personalizing Your Bag
The beauty of a sanitary pad bag tutorial – step by step tutorial lies in how customizable the project can be. While the basic shape is simple, you can add many details to make it special and unique to you.
One option is to choose fabrics that reflect your personal style. You can combine contrasting patterns, use seasonal prints, or even repurpose fabric scraps from other projects. This not only makes the bag unique but also eco-friendly.
Adding embroidery or appliqué is another way to personalize your bag. A small flower, a geometric design, or even initials can make the bag truly yours. These details add charm and make your handmade project stand out.
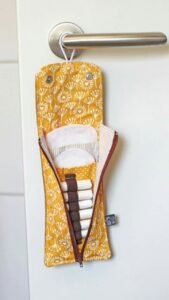
You can also play with the type of closure you use. A magnetic snap feels sleek, while a wooden button gives a rustic feel. If you want extra security, adding a zipper is also possible, though it requires slightly more sewing skills.
Another idea is to adjust the size of the bag. You can create a slightly larger version to carry tissues or personal care items, or a smaller one just for emergency pads. Having different sizes can be practical for different situations.
Finally, lining your bag with waterproof fabric can make it even more functional. This way, if you ever carry items that might spill, the bag remains clean and easy to wash. Practical touches like these ensure that your bag is not only stylish but also durable and useful.
Tips for Beginners
If you are new to sewing, this sanitary pad bag tutorial – step by step tutorial is a great project to start with. Here are some tips to help beginners succeed and enjoy the process.
Always measure your fabric carefully before cutting. Accuracy at this stage saves time later and ensures your finished bag looks neat and professional. A small mistake in measurement can affect the overall shape.
Practice using your sewing machine on fabric scraps before starting. This will help you adjust tension and stitch length without the stress of working on your main project. Confidence in handling the machine makes the process smoother.
Use pins or fabric clips generously to hold the fabric in place. This prevents slipping while sewing and helps maintain straight lines. Taking time to secure your fabric properly is always worth it.
Do not rush the ironing step. Pressing seams open or flat as you go creates a polished look and makes the final product much neater. Many beginners underestimate how much difference ironing makes.
Start with simple closures like Velcro before moving on to snaps or zippers. This way, you can gain confidence before tackling more advanced techniques. Each bag you make will help improve your sewing skills.
Finally, remember that handmade items are never about perfection but about care and creativity. Small imperfections add charm and make your bag unique. The key is to enjoy the process and be proud of what you create.
FAQ – Sanitary Pad Bag Tutorial
1. What size should I make my sanitary pad bag?
A common size is around 18 cm by 22 cm, but you can adjust depending on the type of sanitary pads you use. Always measure before cutting your fabric.
2. Can I make this bag without a sewing machine?
Yes, you can sew it by hand with a backstitch. It will take more time, but the result will still be strong and functional.
3. What type of fabric works best for this project?
Cotton is highly recommended because it is easy to sew, washable, and durable. You can also use waterproof lining for extra protection.
4. How do I close the bag securely?
Velcro, snaps, or buttons are simple closures. Zippers can also be used, but they require more sewing skill.
5. Can this bag be used for other purposes?
Absolutely. Besides sanitary pads, it can hold tissues, small makeup items, medication, or other small personal items.
6. Is this a good project for beginners?
Yes, this is one of the easiest sewing projects to start with. It involves basic stitches and simple shapes, making it ideal for those learning.
Conclusion
This sanitary pad bag tutorial – step by step tutorial has shown how to create a functional, stylish, and discreet accessory. From gathering your materials to sewing and adding personal touches, the process is simple and enjoyable. Beginners will find it approachable, and experienced crafters can explore endless customization options.
With this guide, you now have the knowledge to create a useful bag that makes daily life easier and more organized. Handmade projects like this bring satisfaction not only because of their practicality but also because of the creativity and care put into them.
I would love to hear your opinion about this tutorial. Did you find it helpful? Do you have suggestions or ideas for improving it? Share your thoughts and inspire others to try making their own sanitary pad bags too!