
Learning how to make a Scrunchie with a quick and easy tie – Step by Step Tutorial is the perfect way to combine creativity and practicality in one simple project. If you love accessorizing your hair or gifting handmade items to friends, this crochet or fabric-based scrunchie is an excellent option. It’s fast, fun, and doesn’t require advanced crafting skills. Whether you’re a beginner or a seasoned crafter, this project allows you to create beautiful and useful pieces with leftover yarn or fabric scraps.
The Scrunchie with a quick and easy tie is not only a stylish addition to your collection but also a sustainable choice. Instead of purchasing mass-produced accessories, you can design your own with eco-friendly materials. You’ll have full control over the colors, textures, and size of your scrunchie, making it unique and perfectly matched to your personal style. This DIY project is ideal for anyone who enjoys small crafts that deliver big satisfaction.
This Step by Step Tutorial will guide you through every part of the process — from choosing the right materials to finishing touches that make your scrunchie stand out. You’ll learn how to prepare your fabric or yarn, assemble the elastic core, and create a neat tie that adds charm and function. Let’s dive into this enjoyable project that’s easy to follow and produces professional-looking results you’ll be proud to wear or share.
Choosing the Right Materials
When starting your Scrunchie with a quick and easy tie – Step by Step Tutorial, the first thing to consider is material selection. The success of your scrunchie depends on choosing the right fabric or yarn. Lightweight cotton, satin, velvet, or even soft crochet yarns are ideal. Each type of material gives your scrunchie a different texture and style, so pick one that suits your preference and the season.
For the elastic, select one that’s durable but stretchy enough to hold hair securely without causing tension or damage. Typically, ¼-inch or ½-inch elastic works perfectly. It’s important to measure your hair tie length carefully so it’s neither too tight nor too loose when worn.
In addition to fabric and elastic, you’ll need a few essential tools: scissors, a needle and thread or sewing machine, and optionally, a crochet hook if you’re crafting a yarn-based scrunchie. Having everything ready before you start ensures a smooth workflow and prevents unnecessary interruptions.
Choosing the right colors can also make your scrunchie visually appealing. For example, bright and cheerful hues are great for summer, while darker tones like burgundy or navy blue fit perfectly for winter. Consider creating multiple scrunchies in different shades to match your outfits.
If you want to add flair, you can decorate your scrunchie with ribbons, beads, or small bows. These little details elevate your design, turning a simple accessory into something stylish and one-of-a-kind. With creativity, you can transform a basic scrunchie into a statement piece.
Lastly, ensure your materials are comfortable against the skin. Avoid rough or abrasive fabrics that may cause irritation, especially for those with sensitive scalps. Comfort is just as important as style when it comes to creating a scrunchie you’ll love using every day.
Preparing and Cutting the Fabric or Yarn
To make your Scrunchie with a quick and easy tie, preparation is key. Start by cutting your fabric into a rectangular strip. The average size should be around 18 inches long and 4 inches wide, but you can adjust based on how thick or thin you want the scrunchie to appear. For crochet versions, create a long chain to match the desired length of your elastic band.
Next, fold the fabric lengthwise with the right sides facing each other. Pin or clip the edges to hold them in place. If sewing, use a straight stitch along the long side, leaving the short ends open. This forms a tube shape that will later encase the elastic. For crochet, you’ll continue by working single or double crochet stitches in rows until you achieve the correct width.
After stitching or crocheting, turn the fabric right side out using a safety pin or small tool to push the ends through. This can be a little tricky but is essential for achieving a neat, professional look. Smooth out any wrinkles or uneven areas once the piece is turned.
Measure your elastic band by wrapping it gently around your wrist or ponytail to ensure it fits comfortably. Cut it about one inch shorter than your desired final circumference, as it will stretch during assembly. This guarantees a secure fit that still allows easy removal.
Before threading the elastic through the fabric tube, attach a safety pin to one end of the elastic. This will help guide it through smoothly without twisting. Keep the other end of the elastic held firmly so it doesn’t disappear into the tube. Once both ends emerge, overlap and sew them securely.
Finally, close the open ends of your scrunchie by sewing or crocheting them together. Make sure your stitches are tight and hidden for a polished finish. At this point, your scrunchie should already resemble a complete accessory, but we’ll add the quick and easy tie next to make it even cuter.
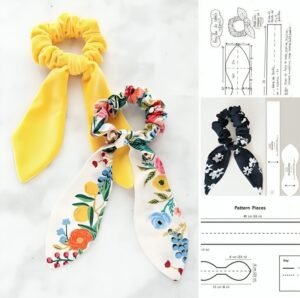
Making and Attaching the Quick and Easy Tie
Adding the tie is what gives your Scrunchie with a quick and easy tie its signature look. The tie adds a playful bow-like effect that makes the accessory stand out. To make the tie, cut another strip of fabric measuring about 10 inches long and 2 inches wide. If crocheting, create a chain of similar length and work a few rows of single crochet for stability.
Fold this strip in half lengthwise, right sides together, and sew or crochet along the edges, leaving a small opening in the center. Once finished, turn it right side out and press flat with your fingers or a warm iron if using fabric. This gives it a crisp and neat appearance.
If you prefer a pointed bow shape, trim the ends diagonally before sewing them together. This small adjustment gives the tie a more refined and stylish design. You can also experiment with rounded or square edges for variety.
Next, place the tie over the seam of your scrunchie and wrap it securely. Tie a knot or bow around the scrunchie, adjusting the tightness until it looks balanced and attractive. You can sew the tie in place if you want it permanently attached or leave it removable for versatility.
A removable tie is great if you plan to switch designs often or want to wash the scrunchie separately. It also allows you to mix and match different ties with the same scrunchie base, giving you endless styling options without making multiple bases.
Once your tie is attached, fluff the scrunchie and bow to give it volume and shape. This final step brings the project to life and transforms your handmade accessory into something store-worthy.
Styling and Caring for Your Scrunchie
Now that your Scrunchie with a quick and easy tie is complete, it’s time to style it! This versatile accessory can be used in ponytails, messy buns, or even as a wrist decoration. Its gentle grip ensures your hair stays in place without tangling or breaking. Whether for casual wear or special occasions, it adds a charming, handmade touch to your look.
One fun idea is to match your scrunchie with your outfit. A floral scrunchie complements summer dresses beautifully, while velvet or satin versions pair perfectly with winter coats and sweaters. You can even make themed scrunchies for holidays like Christmas or Valentine’s Day.
When it comes to care, handwashing is best to maintain the quality of your handmade accessory. Use mild detergent and cold water, gently squeeze out excess moisture, and let it air dry. Avoid wringing or machine drying, as this can damage the fabric or elastic over time.
If you made a crocheted scrunchie, take extra care during washing to preserve the stitches. A gentle wash inside a mesh bag can help protect your creation. Keep in mind that natural fibers like cotton may shrink slightly, so allow for that when sizing.
Proper storage also extends your scrunchie’s life. Keep it in a dry, cool place away from direct sunlight to prevent color fading. If you have several scrunchies, organize them neatly in a small box or hanging organizer to keep them in shape.
Finally, enjoy showing off your handmade Scrunchie with a quick and easy tie. Every time you use it, you’ll be reminded of the joy of crafting something practical and beautiful with your own hands.
1. Can I make a scrunchie without a sewing machine?
Yes, you can easily sew it by hand using a simple backstitch. It may take a little more time, but the result will be just as durable and beautiful.
2. What kind of fabric works best for a scrunchie?
Cotton, satin, silk, and velvet are ideal. They’re comfortable, stylish, and easy to work with for beginners.
3. How long does it take to make a scrunchie with a tie?
Usually, it takes around 20 to 30 minutes, depending on your skill level and the materials used.
4. Can I use this tutorial for crocheted versions?
Absolutely! Just replace the fabric with crocheted pieces of similar dimensions and follow the same assembly steps.
5. How do I keep my scrunchie elastic from twisting?
Make sure to hold one end of the elastic while threading it through and sew the ends securely once they meet.
6. Are these scrunchies suitable as gifts?
Yes! Handmade scrunchies make thoughtful and stylish gifts for friends and family, especially when personalized with their favorite colors or patterns.
Conclusion
By following this Scrunchie with a quick and easy tie – Step by Step Tutorial, you’ve learned how to create a simple yet elegant accessory from scratch.
This project shows that crafting can be both fun and functional, turning everyday materials into something beautiful. Whether made for yourself or as a heartfelt gift, your handmade scrunchie is sure to impress.
We hope you enjoyed this tutorial and found it easy to follow. Don’t forget to share your experience and leave a sincere opinion or suggestions on what other handmade accessories you’d like to learn next. Your feedback helps inspire more creative and enjoyable crafting projects for everyone!