
If you are a creative sewing enthusiast, learning how to sew an oval basket/bag with leftover fabric- Step by Step Tutorial is a rewarding and practical project. Not only does it allow you to upcycle scraps of fabric that might otherwise go unused, but it also helps you create something stylish and useful. Oval baskets or bags are versatile items that can serve many purposes, from holding small household items to functioning as a chic handmade accessory. The beauty of this project lies in the fact that you can turn simple leftover fabric into something functional and aesthetically pleasing.
One of the greatest benefits of following a sew an oval basket/bag with leftover fabric- Step by Step Tutorial is its sustainability. In a world that increasingly values eco-friendly living, reusing fabric scraps is a great way to reduce waste. Instead of throwing away fabric remnants from previous projects, you can give them new life by transforming them into an oval basket or bag. This approach not only helps the environment but also saves money, since you don’t need to buy entirely new materials to start.
This type of sewing project is also perfect for beginners. Even if you have limited experience with sewing, the process is straightforward and forgiving. The tutorial format ensures that each stage is explained in detail, making it easy to follow along. You don’t need advanced sewing skills or expensive equipment to achieve beautiful results. With just leftover fabric, a sewing machine, and some basic supplies, you can create a durable and practical basket or bag that reflects your creativity and resourcefulness.
Preparing Materials and Tools
When you begin to sew an oval basket/bag with leftover fabric- Step by Step Tutorial, preparation is key. The first step is gathering the right materials. Since this project focuses on using leftover fabric, you can combine different textures and colors for a patchwork-style design or choose pieces in matching tones for a cleaner look. Cotton fabric is ideal because it is easy to sew and holds shape well, but denim, canvas, or linen scraps also work beautifully.
In addition to fabric, you will need a few essential supplies. A sewing machine will speed up the process and make seams stronger, though hand sewing is possible for smaller projects. Scissors, pins or clips, and a measuring tape are also necessary. Interfacing or batting is recommended to give your basket or bag extra structure and durability. The sturdier the material, the better your finished product will maintain its oval shape.
Next, think about lining fabric. Adding a lining to your basket or bag ensures a professional finish and protects the outer fabric. It also adds strength, making the project more durable. A plain cotton lining works well, but you can get creative with colorful prints that complement the outer design.
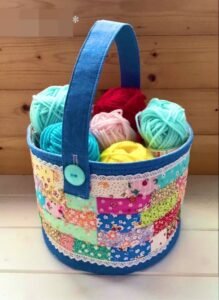
Handles are another component to consider. You can either sew fabric handles, use webbing straps, or even repurpose old belt straps for a more unique look. Handles determine whether your project functions more as a basket to store items or as a bag to carry things around.
Thread selection is important as well. Always match the thread color to your fabric or choose a contrasting shade for decorative stitching. High-quality polyester or cotton thread is recommended, as it holds up better over time and prevents seams from unraveling.
Finally, keep pressing tools like an iron nearby. Pressing seams as you sew helps the project come together neatly and gives it a polished appearance. Even for beginners, these small steps make a noticeable difference in the outcome.
Cutting and Shaping the Fabric
The next stage in a sew an oval basket/bag with leftover fabric- Step by Step Tutorial is cutting and shaping the fabric. Begin by measuring and cutting an oval base. The size of this oval will determine the overall size of your basket or bag. You can trace around a household object like a tray or plate to create an even oval shape. Once the base is cut, duplicate it with interfacing or batting for added stability.
After preparing the base, cut the side panels. These are long strips of fabric that will wrap around the oval base to form the basket’s walls. For a bag, the strips should be taller to provide enough room for carrying items. To ensure a proper fit, measure the circumference of your oval base and cut the fabric strips accordingly, adding seam allowances.
If you are using different fabric scraps, arrange them in a pleasing pattern before sewing. Patchwork panels can be stitched together to form one long strip that will become the sides of your basket or bag. This is a great opportunity to play with colors and textures, giving your project a one-of-a-kind design.
Don’t forget the lining. Cut an oval base and side panels from your lining fabric, making them slightly smaller than the outer pieces so they fit neatly inside. If you’re adding pockets, this is the stage to cut and prepare them before assembling the lining. Pockets can add extra functionality to your bag version.
For handles, cut strips of fabric or prepare straps of your chosen material. If sewing fabric handles, fold the strips lengthwise, press them, and stitch along the edges for strength. Reinforcing handles is important because they carry the weight of the basket or bag’s contents.
Once everything is cut and ready, lay the pieces out to double-check that sizes and proportions are correct. A little extra preparation at this stage ensures smoother assembly later on.
Sewing the Oval Basket or Bag
With all the pieces ready, you can now begin to sew an oval basket/bag with leftover fabric- Step by Step Tutorial by assembling the outer shell. Start by attaching the side panels to the oval base. Pin or clip the strip around the edges of the oval, easing the fabric around curves carefully to avoid puckering. Sew slowly and steadily along the seam, ensuring the sides are securely attached to the base.
Once the outer shell is complete, repeat the process with the lining fabric. Sew the lining side panels to the oval base, leaving a small opening at the bottom to turn the project right side out later. Adding interfacing between the layers at this stage strengthens the structure, particularly for baskets that need to hold shape.
Next, place the lining inside the outer shell, with right sides facing each other. Pin the top edges together and sew around the perimeter. Be sure the handles are inserted between the lining and the outer fabric before stitching so they are secured in place. Backstitch at the handle points for reinforcement.
After sewing the top seam, turn the project right side out through the opening left in the lining. Push out the seams carefully and press with an iron for a neat edge. Stitch the lining opening closed, either by hand with a slip stitch or by machine with a narrow seam.
Topstitching around the upper edge of the basket or bag adds durability and a professional finish. It also secures the lining in place, preventing it from shifting. This step gives the final product a polished look and makes it more durable for regular use.
Finally, check the overall shape and structure. If needed, press the basket or bag again to smooth out wrinkles. At this point, you’ll have a beautiful, functional item created entirely from leftover fabric, ready to use or gift.
Creative Ideas and Variations
Following a sew an oval basket/bag with leftover fabric- Step by Step Tutorial doesn’t limit you to a single design. Once you understand the basic process, you can experiment with endless variations. For example, you can make a shallow oval basket for holding keys, mail, or craft supplies. These smaller versions are quick to sew and make great gifts.
For larger projects, create a tall oval bag with sturdy handles. These make excellent reusable shopping bags or beach totes. By using denim or canvas scraps, you can ensure the bag is strong enough to carry heavier loads. Adding a zipper closure or magnetic snaps transforms the design into a practical everyday bag.
You can also experiment with quilting techniques. Adding quilted panels gives texture and extra durability to your bag or basket. Quilted patchwork designs are especially charming when using small leftover fabric pieces. This method allows you to showcase creativity while making use of every scrap.
Decorative embellishments add personality to your project. Consider sewing lace trim, buttons, or appliqué designs onto the outer panels. These touches make your basket or bag stand out and allow you to match it with personal style or home décor.
Another variation is creating nesting baskets in different sizes. These sets are perfect for organizing shelves or storing sewing supplies. They also highlight how versatile this project can be, as you adjust dimensions to suit specific needs.
Finally, don’t hesitate to combine different textures. Mixing denim with cotton, or canvas with linen, gives your bag or basket a modern look. The contrast in textures enhances the design while keeping the project eco-friendly by using all available fabric remnants.
FAQ about Sewing an Oval Basket/Bag
1. Is this project suitable for beginners?
Yes, absolutely. A sew an oval basket/bag with leftover fabric- Step by Step Tutorial is beginner-friendly, as long as you follow the instructions carefully and take your time with the curved seams.
2. What type of fabric works best for this project?
Cotton, denim, linen, and canvas are all great choices. Sturdier fabrics create stronger baskets or bags, while lighter fabrics may need interfacing.
3. Do I need a sewing machine?
A sewing machine makes the process faster and produces stronger seams, but it’s possible to hand sew smaller projects if you prefer.
4. How do I make the basket or bag more durable?
Using interfacing, batting, or quilted layers strengthens the structure. Reinforced handles and quality thread also add to durability.
5. Can I wash my finished basket or bag?
Yes, most fabric baskets and bags can be washed, but always check the fabric type. Hand washing is safest for preserving shape and strength.
6. What can I use the finished project for?
You can use it as a storage basket for household items, as a reusable shopping bag, or as a decorative accessory. The possibilities are endless.
Conclusion
Learning how to sew an oval basket/bag with leftover fabric- Step by Step Tutorial is a creative and sustainable way to upcycle fabric scraps into something practical and stylish.
From choosing materials and cutting fabric to sewing the base and adding handles, each step brings you closer to a unique handmade piece. The versatility of this project allows you to create baskets, bags, or decorative storage items that reflect your creativity and reduce waste.
I hope this guide has inspired you to try your own version. If you enjoyed this tutorial, please share your honest opinion and suggestions. Your feedback not only helps improve future projects but also encourages others to explore the joy of sewing and sustainable crafting.