
If you love sewing projects that are both stylish and functional, then Sew Your Own Two-Tone Flap Bag: A Detailed Pattern-Step by Step Tutorial is exactly what you need. Creating your own bag gives you the opportunity to choose your colors, fabrics, and style, making it a unique piece that fits your personality. Handmade bags are not only practical but also carry a sense of achievement every time you wear them. This tutorial will walk you through every step with easy-to-follow instructions.
One of the best things about making a two-tone flap bag is how versatile it can be. Whether you want to use it as a casual everyday bag or as a chic accessory for special occasions, this design adapts beautifully. The step by step tutorial ensures that even beginners can follow along while still producing a bag that looks professional and polished. You’ll learn how to prepare your materials, cut the fabrics, assemble the pieces, and add the finishing touches that will make your bag stand out.
In this guide, we will break down each part of the process carefully. You don’t need advanced sewing skills to complete this project, but patience and attention to detail will make the process smoother. By following Sew Your Own Two-Tone Flap Bag: A Detailed Pattern-Step by Step Tutorial, you will gain both new skills and a handmade bag that you’ll be proud to show off. Let’s dive in and begin the exciting journey of crafting your very own bag.
Choosing Materials for Your Two-Tone Flap Bag
The first step in Sew Your Own Two-Tone Flap Bag: A Detailed Pattern-Step by Step Tutorial is selecting the right materials. The success of your project depends heavily on the fabric and accessories you choose. Go for sturdy fabrics like canvas, denim, or cotton blends, which hold structure well. If you want a more elegant look, faux leather or upholstery fabric works beautifully.
When selecting your two tones, think about contrast and harmony. You can choose complementary colors for a bold effect or soft pastels for a subtle appearance. The two-tone design is what makes this flap bag visually appealing, so be creative with your choices. Remember, the outside fabric will be seen the most, while the lining adds a fun surprise every time you open your bag.
Besides fabric, you’ll need thread, interfacing to give structure, a magnetic snap or button for closure, and a strap material. Some crafters like to sew their straps from the same fabric, while others prefer pre-made leather straps for durability. Small accessories like metal rings or D-rings can also enhance the overall design.
Gathering your supplies ahead of time will make the process more enjoyable. Keep everything organized and within reach before you start cutting and sewing. A well-prepared workspace helps reduce mistakes and allows you to focus entirely on following the step by step tutorial.
If you’re new to bag making, don’t worry about buying expensive materials. You can start with affordable fabrics to practice and then move on to premium ones once you gain confidence. What matters most is learning the detailed pattern and understanding the process.
The materials you choose will influence the durability, look, and comfort of your final bag. So take your time during this stage, and remember that every choice you make adds to the uniqueness of your handmade two-tone flap bag.
Cutting and Preparing Your Bag Pieces
Once your materials are ready, the next stage in Sew Your Own Two-Tone Flap Bag: A Detailed Pattern-Step by Step Tutorial is cutting the fabric. This step is crucial because precise cutting ensures that your pieces fit together perfectly. Use a rotary cutter or sharp scissors and always measure twice before cutting once.
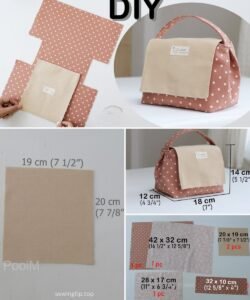
Start with the main body of the bag. Cut two rectangles from your outer fabric and two from the lining. The size depends on how large you want your bag to be, but a standard size is around 12 inches wide by 10 inches tall. Next, cut the flap. This should be slightly wider than the bag’s body and shaped according to your preference—rounded, triangular, or rectangular.
For the two-tone effect, divide the outer fabric of the body into two contrasting colors. For example, cut the bottom half in a darker shade and the top half in a lighter shade. Then sew them together with a neat seam to create your two-tone panel. Do this for both sides of the bag body.
Cut interfacing pieces to match your fabric pieces. Iron the interfacing onto the wrong side of the fabric to add stability. This step gives your bag structure so it won’t collapse when in use. Skipping this step may result in a floppy and less durable bag.
Don’t forget smaller pieces like straps, pockets, and closures. If you want an inside pocket, cut an additional piece of fabric for that. This adds practicality to your bag and makes it more functional. A zippered pocket is a great option, though it requires a bit more sewing skill.
After everything is cut, lay your pieces flat and double-check that you have all required components. Following the detailed pattern carefully will prevent you from missing important steps and ensures that the sewing process goes smoothly.
Sewing and Assembling the Bag
This is the most exciting part of Sew Your Own Two-Tone Flap Bag: A Detailed Pattern-Step by Step Tutorial—bringing your pieces together. Start by sewing the two-tone outer panels together if you haven’t already. Once complete, place the two panels right sides together and sew along the sides and bottom, leaving the top open.
Next, prepare the lining. Sew the lining pieces in the same way, but leave a small gap at the bottom. This gap will later be used to turn the bag right side out. If you are adding an interior pocket, sew it onto one lining panel before assembling the lining.
Now, attach the flap. Place the flap piece between the outer fabric and lining at the back top edge of the bag, right sides facing. Pin in place and sew carefully. Make sure the flap is centered and aligned properly, as it is one of the most noticeable features of your bag.
With the flap attached, place the outer bag inside the lining, right sides facing each other. Sew along the top edge completely. This step secures the outer fabric, lining, and flap together. Then, pull the bag through the small gap you left in the lining and turn everything right side out. Sew the gap in the lining closed with a hidden stitch.
At this stage, your bag is taking shape. Add the closure mechanism, such as a magnetic snap or button, to secure the flap. If you’re using D-rings for a removable strap, sew fabric tabs to the sides of the bag and attach the hardware. Finally, attach your strap to complete the assembly.
The satisfaction of seeing your bag come together is one of the highlights of this project. Following the step by step tutorial carefully ensures that your final piece is both stylish and functional.
Adding Final Touches and Personalization
The last stage in Sew Your Own Two-Tone Flap Bag: A Detailed Pattern-Step by Step Tutorial is personalization. This is where you can add your own creative flair and make the bag truly yours. Start by topstitching around the flap and bag edges to give a neat, professional finish.
Consider embellishments like decorative stitching, fabric appliqués, or embroidery. These small details can transform a simple bag into a one-of-a-kind accessory. If you enjoy experimenting, try mixing textures like combining denim with faux leather or adding metallic accents.
You can also play with the strap style. Adjustable straps make your bag more versatile, while short handles give it a handbag-like feel. For a trendy look, add a crossbody strap with chain details. These options make your two-tone flap bag suitable for different occasions.
Don’t forget the inside. A patterned lining adds a hidden surprise every time you open your bag. You can also include extra compartments or card slots if you want to increase functionality. Small touches like these show your attention to detail.
Finishing your project with care is important. Press all seams neatly and trim any loose threads. A well-finished bag looks polished and professional, even if it’s handmade. Your detailed pattern ensures that every part of the bag has been carefully thought out and executed.
Once complete, step back and admire your work. Not only have you followed the step by step tutorial, but you’ve also created something uniquely yours. Carrying a bag you made yourself brings confidence and pride in your crafting skills.
FAQ About Sewing a Two-Tone Flap Bag
1. Do I need advanced sewing skills to make this bag?
No, this project is suitable for beginners who can follow instructions carefully. The step by step tutorial simplifies the process into manageable parts.
2. What type of fabric is best for a two-tone flap bag?
Sturdy fabrics like canvas, denim, cotton blends, or faux leather are ideal. They provide structure and durability while allowing for stylish finishes.
3. Can I make the bag without interfacing?
Technically yes, but the bag will lack structure. Interfacing is recommended for a professional finish and long-lasting results.
4. How long does it take to complete the bag?
Depending on your sewing speed, it can take between 3 to 6 hours. Beginners may need extra time to ensure accuracy.
5. Can I wash my handmade bag?
Yes, but it depends on the fabric. Cotton bags are washable, but faux leather and certain materials should only be spot-cleaned. Always check the care instructions for your chosen fabric.
6. Can I resize the pattern?
Absolutely! You can make the bag larger for everyday use or smaller for a chic evening accessory. Just adjust your fabric measurements accordingly.
Conclusion
By following Sew Your Own Two-Tone Flap Bag: A Detailed Pattern-Step by Step Tutorial, you’ve learned how to select materials, cut and prepare pieces, sew the bag together, and add unique finishing touches. This project allows you to combine practicality with creativity, resulting in a functional yet stylish accessory.
Now that you’ve seen how simple and rewarding it is to sew your own bag, I’d love to hear from you. Share your thoughts, suggestions, and experiences in the comments.
Did you enjoy this step by step tutorial? Would you like to see more detailed bag-making guides? Your feedback helps inspire future projects and keeps the creative community growing.