
The Spinning Star Quilt Block – Step by Step Tutorial is a fascinating guide for quilters who want to add a sense of motion and dynamic design to their projects. Quilt blocks are the foundation of quilting, and the spinning star is one of those patterns that immediately catches the eye. Its symmetrical points create a beautiful illusion of rotation, making it a favorite choice for both beginners and advanced quilters. By following a detailed step-by-step tutorial, you can learn how to bring this block to life with precision and creativity.
When working on the Spinning Star Quilt Block – Step by Step Tutorial, you are not only making a simple square; you are creating a versatile piece that can be repeated and combined to form stunning quilts. The spinning star design adds both elegance and energy, making it suitable for modern quilts, traditional projects, or even as a centerpiece for a larger creation. The tutorial allows quilters to explore fabric choices, color contrasts, and alignment techniques that enhance the spinning effect.
This article will guide you through understanding the structure of the spinning star, selecting fabrics, piecing techniques, and finishing touches. Whether you are a beginner who wants to learn the basics or an experienced quilter looking for a refresher, this tutorial is designed to be clear and accessible. Let’s dive into the process and learn how to create the Spinning Star Quilt Block – Step by Step Tutorial with confidence.
Understanding the Spinning Star Quilt Block
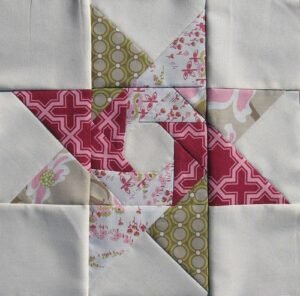
The Spinning Star Quilt Block – Step by Step Tutorial begins with learning what makes this block unique. Unlike simpler square or rectangular blocks, the spinning star uses triangles and angled cuts to create the illusion of movement. The star looks as if it is rotating, which is why it’s called the spinning star. This illusion is achieved through careful placement of dark and light fabrics.
One of the key elements of this block is color contrast. Choosing fabrics that strongly differ in shade or tone makes the spinning motion stand out. For example, combining a dark navy with a crisp white or a vibrant red with a soft cream can enhance the star’s bold look. If softer transitions are desired, you can use fabrics of similar tones for a more subtle effect.
The geometry of the spinning star can seem intimidating at first, but the step-by-step process makes it approachable. It mainly involves half-square triangles (HSTs) and careful alignment. Mastering HSTs is essential for most quilt patterns, and the spinning star is an excellent project to practice these skills.
Another important feature of the spinning star is symmetry. Every triangle and square must be cut precisely and sewn accurately to ensure that the points of the star meet neatly in the center. This precision is what makes the block visually striking. A slight misalignment can affect the overall spinning effect, so patience and attention to detail are necessary.
The size of the block can be adjusted depending on your project. Beginners may want to start with a larger block, such as 12 inches, as it is easier to piece together. More advanced quilters might create smaller blocks for intricate quilt layouts. Regardless of size, the construction process remains the same.
Finally, understanding the spinning star is not just about following instructions; it’s about developing an appreciation for the balance between geometry, color, and design. By grasping these basics, you are better prepared to begin the practical steps of creating your own spinning star quilt block.
Materials and Fabric Selection
To create the Spinning Star Quilt Block – Step by Step Tutorial, you need to gather the right materials. The essentials include fabric, a rotary cutter, a quilting ruler, a cutting mat, sewing pins, and a sewing machine. Having the correct tools makes the process smoother and ensures that your cuts and seams are precise.
When it comes to fabric, choosing contrasting colors is crucial for highlighting the spinning motion of the star. A traditional choice is to use a bold fabric for the star and a lighter background fabric. However, modern quilters often experiment with gradients, patterns, or even scrappy fabrics for a more eclectic look.
Pre-washing your fabrics is highly recommended. This prevents shrinking and color bleeding later when the quilt is washed. Ironing the fabrics before cutting also helps in achieving clean, straight cuts. A well-prepared fabric can make a significant difference in the outcome of your quilt block.
For beginners, solid fabrics may be easier to work with because they allow the shape of the star to stand out without distraction. Advanced quilters might prefer prints, but it’s important to consider how the patterns interact with the block design. Small prints can enhance the star without overwhelming it, while large prints may disrupt the geometry.
Accurate cutting is one of the most important steps in quilting. Using a rotary cutter and ruler ensures that each triangle and square is the correct size. Consistency in measurement is what allows the star to spin smoothly. Even a slight variation in size can cause problems during assembly.
By carefully selecting fabrics and preparing your materials, you set yourself up for success. The spinning star is a block that rewards precision, and investing time in choosing the right fabrics and tools will pay off in the final design.
Step-by-Step Construction Process
The heart of the Spinning Star Quilt Block – Step by Step Tutorial is learning how to assemble the block. The process is methodical and can be broken down into clear steps that even beginners can follow.
First, begin by cutting squares and triangles according to the block size you are making. Half-square triangles are the foundation of this block. To make them, place two fabric squares right sides together, draw a diagonal line, and sew a quarter-inch seam on each side of the line. Cut along the line, press open, and you have two identical HST units.
Once you have all your HSTs ready, arrange them into the spinning star layout. This is where you see the design come together. Place the units on a flat surface or design board, rotating them until the star’s spinning motion is clearly visible. This step is essential to ensure accuracy before sewing.
Next, sew the HSTs into rows. Keep a consistent quarter-inch seam allowance and press the seams open or to the side depending on your preference. Accurate seam allowances help the points align properly. Pinning before sewing can prevent shifting, especially with angled pieces.
After sewing the rows, join them together to complete the block. At this stage, pay close attention to the center where all the points meet. It’s common for this area to become bulky, so pressing seams carefully is important for a flat finish. Some quilters even trim small seam allowances in the center to reduce bulk.
Once the block is sewn together, square it up with your ruler. This ensures that the edges are straight and the block is the correct size. Squaring up is a critical step, as it makes assembling the quilt top easier later on.
Finally, admire your completed spinning star block. This step may seem simple, but appreciating your progress is an important part of quilting. Each block you make adds to your skills and builds confidence for larger projects.
Tips for Perfecting Your Spinning Star
The Spinning Star Quilt Block – Step by Step Tutorial is rewarding, but achieving perfection requires practice and attention to detail. There are several tips that can help you make your block stand out.
First, always check your seam allowance. A consistent quarter-inch seam is the backbone of accurate quilt piecing. Using a quarter-inch presser foot on your sewing machine can make this process easier.
Second, press your seams carefully. Pressing is not just about flattening the fabric; it helps align pieces and reduce bulk. Use an iron rather than finger pressing for best results. Some quilters prefer pressing seams open, while others press to the side. Experiment with both methods to see which works best for you.
Third, trim your HSTs to the exact size before assembling the block. Even small inaccuracies in HST units can throw off the alignment of the star. Taking time to trim ensures that all pieces fit together neatly.
Fourth, consider using a design wall or board. Laying out your pieces before sewing allows you to see the star’s shape clearly and make adjustments if needed. This step also helps prevent mistakes in orientation.
Fifth, don’t rush the process. Precision is more important than speed when quilting. Taking your time to measure, cut, and sew accurately will result in a more professional-looking block.
Lastly, remember that quilting is a creative journey. Even if your first spinning star isn’t perfect, it’s part of the learning process. Each block improves your skills and brings you closer to mastering this beautiful design.
FAQ About Spinning Star Quilt Block – Step by Step Tutorial
1. What is a spinning star quilt block?
It is a quilt block made with triangles and squares arranged to create the illusion of a rotating star.
2. Is the spinning star block suitable for beginners?
Yes, it is beginner-friendly, especially for those who want to practice making half-square triangles.
3. What size should I make my spinning star block?
The block can be made in various sizes, but 12 inches is a common starting point for beginners.
4. How do I make the star look like it’s spinning?
Using contrasting fabrics and arranging the triangles in the correct orientation creates the spinning effect.
5. What fabrics work best for this block?
Solid or small-print fabrics with strong contrast work best to highlight the star’s movement.
6. Can I make a quilt using only spinning star blocks?
Yes, repeating the spinning star block creates a dynamic quilt full of motion and interest.
7. How do I avoid bulky seams in the center?
Careful pressing and trimming seam allowances can reduce bulk in the center of the block.
8. Do I need a sewing machine, or can I sew by hand?
While a sewing machine is faster and more precise, the block can also be sewn by hand with patience.
9. What common mistakes should I watch out for?
Inaccurate cutting, inconsistent seam allowances, and incorrect fabric placement are the most common mistakes.
10. Can I use this block in modern quilting?
Absolutely! The spinning star is versatile and fits both traditional and modern quilt designs.
Conclusion
The Spinning Star Quilt Block – Step by Step Tutorial is a beautiful and dynamic design that allows quilters to explore geometry, precision, and creativity. From understanding the structure of the block to selecting fabrics, cutting, piecing, and adding finishing touches, this tutorial provides everything you need to get started.
By following these steps and practicing consistently, you will gain confidence and improve your quilting skills. The spinning star is not only a rewarding block to make but also a stunning addition to any quilt.
Now that you know how to create this block, I’d love to hear from you. Share your sincere opinions and suggestions about this tutorial in the comments. Your feedback helps improve the quilting journey for everyone.