
Learning how to create a super easy to make zipper bag- Step by Step Tutorial is one of the best projects for beginners who want to combine both functionality and creativity in sewing or crafting. A zipper bag is practical for daily use, perfect for carrying small essentials, and also makes a thoughtful handmade gift. In this guide, we will walk through the process carefully so that even someone who has never made a bag before can confidently follow along. The best part is that you do not need advanced skills, just patience and the willingness to try.
When we talk about a super easy to make zipper bag- Step by Step Tutorial, we mean simplifying each stage of the process. From choosing the right fabric to attaching the zipper neatly, this project focuses on clarity and straightforward steps. Many people avoid sewing projects involving zippers because they think it’s complicated. However, this tutorial shows that even beginners can create a neat and professional-looking bag without stress. With practice, you will not only gain confidence but also be able to experiment with different sizes, fabrics, and designs.
This project is also highly versatile. A zipper bag can be used for cosmetics, stationery, coins, travel items, or even as an organizer for larger bags. Because it is such a practical item, learning this super easy to make zipper bag- Step by Step Tutorial gives you a useful skill that can be repeated and adapted in many ways. Once you understand the basic method, you can create countless variations to suit your personal style or gifting needs. Now, let’s go step by step into the process.
Materials Needed for a Super Easy Zipper Bag
To successfully complete a super easy to make zipper bag- Step by Step Tutorial, you first need to prepare the right materials. The most essential material is fabric. Cotton fabric is often the best choice for beginners because it is easy to handle, durable, and comes in countless patterns and colors. You may also want to use a lining fabric to give the bag a more professional finish and make it sturdier.
Next, you will need a zipper. The zipper is the most important element, as it keeps your items secure inside the bag. For beginners, a standard nylon zipper is recommended because it is soft, flexible, and easy to sew compared to metal zippers. Choosing the correct size of the zipper to match your fabric dimensions ensures a neat finish.
You also need basic sewing supplies such as scissors, sewing pins, thread that matches your fabric, and of course, a sewing machine. While some people may sew zippers by hand, a sewing machine makes the process smoother and quicker. If you are completely new to sewing, this tutorial will also help you become familiar with handling your machine.
An optional but helpful material is interfacing. Interfacing gives structure and stiffness to the bag, especially if you want it to stand upright rather than being floppy. Beginners may skip this step at first, but adding interfacing can really improve the final result. It all depends on the style of bag you want to achieve.
Another useful addition is decorative elements. Ribbons, patches, embroidery, or fabric paint can turn a simple zipper bag into a personalized accessory. This is where your creativity comes in, and once you master the basics, decoration becomes the fun part.
Finally, make sure your workspace is ready. A clean, flat surface to cut and sew your fabric will make the process of creating your super easy to make zipper bag- Step by Step Tutorial much more enjoyable. Preparing all your materials before starting helps you avoid interruptions and keeps the project stress-free.
Cutting and Preparing the Fabric
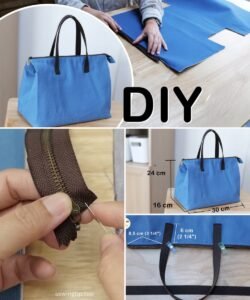
The next step in the super easy to make zipper bag- Step by Step Tutorial is preparing your fabric pieces. Measure and cut two identical rectangles of fabric for the outer part of the bag. The size is flexible depending on how big you want your bag to be. For beginners, a piece measuring 9×6 inches works well for a medium-sized pouch.
Cut two identical rectangles for the lining as well. The lining should match the exact size of the outer fabric so that the two layers fit perfectly together. If you are using interfacing, cut it to the same size and attach it to the wrong side of the outer fabric using an iron. This will give your bag structure and durability.
Once your pieces are ready, iron them to remove any wrinkles. Smooth fabric is easier to sew and gives a cleaner finish. Many beginners overlook this step, but it truly makes a difference in the quality of your final zipper bag.
Now, place one outer fabric rectangle right side up, then place the zipper on top, aligning the edge of the zipper with the edge of the fabric. On top of the zipper, place one lining fabric rectangle right side down. This creates a “fabric-zipper-fabric” sandwich. Secure the layers with sewing pins or clips to prevent slipping while sewing.
When everything is aligned, it is time to sew along the edge where the zipper is placed. Use a zipper foot on your sewing machine to make sewing close to the zipper teeth easier. Go slowly and keep the line straight for the best results.
Repeat the same process with the other side of the zipper, attaching the second outer fabric and the second lining fabric. When both sides are attached, open the fabric and press it flat with an iron. This ensures the zipper lies neatly and your bag starts to take shape.
Sewing the Zipper Bag Together
At this stage of the super easy to make zipper bag- Step by Step Tutorial, the main construction begins. With the zipper installed, open it halfway to ensure you will be able to turn the bag inside out later. Lay the fabric pieces so that the two outer fabrics face each other and the two lining fabrics face each other. Pin or clip around the edges to hold everything in place.
Start sewing around the bag, leaving a small gap of about 3 inches at the bottom of the lining. This gap is very important because it allows you to turn the bag right side out once you finish sewing. Without it, you would not be able to flip the bag neatly.
Sew all around the edges with a straight stitch, making sure to backstitch at the beginning and end for strength. Pay attention to the corners and sew carefully to keep them sharp and clean. This step forms the main body of the zipper bag.
Once you finish sewing, trim any excess fabric or threads to reduce bulk. For cleaner corners, cut small diagonals at the seam allowance in each corner, being careful not to cut through your stitching. This will help your corners look sharper when turned.
Now comes the exciting part: turning the bag inside out. Use the opening left in the lining to pull the entire bag through. Gently push out the corners with a blunt tool like a pencil to make them neat. Then, stitch the lining opening closed either by hand with a slip stitch or with a machine.
Push the lining inside the bag and smooth everything out. At this point, your super easy to make zipper bag- Step by Step Tutorial is nearly complete. You should see a neat zipper pouch that looks professional and functional.
Customizing Your Zipper Bag
One of the best things about a super easy to make zipper bag- Step by Step Tutorial is how customizable it can be. Once you understand the basic construction, you can experiment with endless variations. For example, you can make your bag larger to hold tablets or smaller for coins. Changing the size is as simple as cutting larger or smaller fabric rectangles.
Another way to customize is through fabric choice. Cotton is beginner-friendly, but once you gain confidence, try using canvas for sturdier bags, or satin for a more elegant touch. Each fabric gives the bag a unique personality, allowing you to match it with different occasions.
Decorations also bring your bag to life. Adding embroidery or applique designs can turn a plain pouch into a beautiful accessory. You can even personalize it with initials or themed patterns that make the bag a great gift.
If you enjoy practicality, consider adding inner pockets when sewing the lining. A small pocket inside the zipper bag makes it even more functional for organizing items like cards or small tools. Beginners may skip this at first, but it’s a great feature to add later.
Another idea is experimenting with double zippers or side panels. These techniques are slightly more advanced but build on the same beginner-friendly process. With practice, your skills will grow, and you’ll be able to create bags that rival store-bought ones.
Finally, do not forget about creativity. The beauty of handmade items lies in the fact that no two pieces are identical. Allow your personality to shine through each super easy to make zipper bag- Step by Step Tutorial you create, and enjoy the process as much as the result.
FAQ About Zipper Bags
1. Is sewing a zipper bag difficult for beginners?
No, with a clear guide like this super easy to make zipper bag- Step by Step Tutorial, even beginners can achieve great results. The steps are simple and repetitive.
2. What type of fabric is best for a beginner’s zipper bag?
Cotton fabric is the best option for beginners. It is easy to cut, sew, and press, making the process smooth and stress-free.
3. Do I need a sewing machine to make a zipper bag?
While it is possible to sew by hand, a sewing machine makes the project faster and ensures a stronger, cleaner finish.
4. Can I make different sizes of zipper bags using the same method?
Yes, you can adjust the size of your fabric pieces and zipper to create small coin purses, medium pouches, or large organizers.
5. How do I make my zipper bag look more professional?
Pressing the fabric, using interfacing, and sewing slowly with a zipper foot help give your bag a neat, professional appearance.
6. Can I wash my handmade zipper bag?
Yes, if you use washable fabrics like cotton. Just remember to use durable stitching and avoid delicate decorations if you plan to wash it often.
Conclusion
Creating a super easy to make zipper bag- Step by Step Tutorial is one of the most rewarding beginner projects. It teaches you basic sewing skills, introduces you to zipper installation, and results in a functional and beautiful accessory. From preparing your materials to sewing the final stitch, each step is simple enough for anyone to follow with a little patience.
By practicing, you will quickly improve and find new ways to customize your bags, whether for personal use or thoughtful handmade gifts. We hope this tutorial has inspired you to start sewing your own zipper bags and to explore your creativity.
Now that you’ve learned everything about this super easy to make zipper bag- Step by Step Tutorial, we’d love to hear from you! Leave your sincere opinion and share any suggestions for future tutorials. Your feedback helps make this community even better for beginners and crafters alike.