
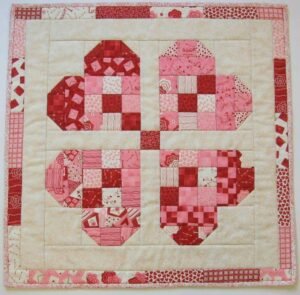
Table runner tutorial with clover print. is a charming and creative way to elevate your home décor while exploring your sewing and crafting skills. This Table runner tutorial with clover print. will guide you through a complete process of designing and assembling a beautiful table runner that features a delicate and symbolic clover pattern. Whether you are preparing for seasonal decoration or simply want to refresh your dining space, this Table runner tutorial with clover print. offers a perfect combination of creativity and functionality.
Creating a Table runner tutorial with clover print. project allows you to work with fabrics, colors, and patterns in a way that reflects your personal style. The clover print adds a natural and elegant touch, often associated with luck and freshness. In this Table runner tutorial with clover print., you will learn how to balance colors, cut fabric precisely, and assemble each piece with care, ensuring a polished and professional result.
Another advantage of following this Table runner tutorial with clover print. is that it is suitable for both beginners and experienced crafters. With clear steps and practical tips, you can build confidence while enjoying the process. This Table runner tutorial with clover print. also encourages creativity, allowing you to experiment with variations and adapt the design to suit different occasions and themes.
Materials and Preparation for Table runner tutorial with clover print.
To begin your Table runner tutorial with clover print., gathering the right materials is essential for a smooth crafting experience. You will need cotton fabric with a clover print, a coordinating backing fabric, batting for structure, scissors or a rotary cutter, pins, and a sewing machine. Having all tools ready before starting your Table runner tutorial with clover print. helps maintain focus and efficiency.
Choosing high-quality fabric is important in this Table runner tutorial with clover print. because it affects both durability and appearance. Cotton fabric is widely recommended due to its ease of handling and clean finish. Selecting complementary colors enhances the visual appeal of your Table runner tutorial with clover print..
Accurate measurements play a key role in the success of your Table runner tutorial with clover print.. Measure your table carefully and decide the desired length and width. This ensures your final piece fits perfectly and looks balanced.
Cutting the fabric precisely is another important step in the Table runner tutorial with clover print.. Using a rotary cutter and ruler can improve accuracy and create clean edges.
Preparing your workspace is often overlooked, but it is essential for the Table runner tutorial with clover print.. A clean and organized area helps you work more efficiently and avoid mistakes.
Finally, pre-washing and ironing your fabric ensures that your Table runner tutorial with clover print. maintains its shape after completion and prevents unwanted shrinking.
Step-by-Step Guide for Table runner tutorial with clover print.
The construction phase of the Table runner tutorial with clover print. begins with arranging your fabric pieces. Lay out the clover print fabric and any additional strips or borders to visualize the final design.
Next, sew the fabric pieces together. In this Table runner tutorial with clover print., maintaining straight seams is crucial for a neat finish. Use consistent seam allowances throughout the process.
Once the top layer is complete, prepare the quilt sandwich. This step in the Table runner tutorial with clover print. involves layering the top fabric, batting, and backing fabric.
Secure the layers using pins or basting stitches. This ensures that everything stays in place during sewing in the Table runner tutorial with clover print..
Quilting adds texture and stability. In the Table runner tutorial with clover print., you can choose simple straight lines or decorative patterns depending on your skill level.
Finally, finish the edges with binding. This last step in the Table runner tutorial with clover print. gives your piece a clean and professional look.
Creative Design Ideas for Table runner tutorial with clover print.
One exciting aspect of the Table runner tutorial with clover print. is the ability to experiment with different layouts. You can arrange the clover print fabric in symmetrical or asymmetrical patterns.
Adding borders is another way to enhance your Table runner tutorial with clover print.. Contrasting colors can frame the design beautifully.
Incorporating patchwork elements brings additional texture to the Table runner tutorial with clover print.. Mixing fabrics creates a more dynamic visual effect.
You can also play with quilting patterns. Decorative stitching in the Table runner tutorial with clover print. adds depth and personality.
Seasonal themes can inspire your design choices. The Table runner tutorial with clover print. works especially well for spring or festive decorations.
Personal touches such as embroidery or appliqué can make your Table runner tutorial with clover print. truly unique.
Tips for Perfect Results in Table runner tutorial with clover print.
Consistency is key in the Table runner tutorial with clover print.. Keeping your seams even ensures a professional finish.
Take your time with each step. Rushing through the Table runner tutorial with clover print. may lead to uneven stitching or misaligned pieces.
Use quality tools. Sharp scissors and a reliable sewing machine improve the outcome of your Table runner tutorial with clover print..
Press your seams regularly. This habit in the Table runner tutorial with clover print. helps maintain a neat and flat surface.
Practice on scrap fabric if needed. This builds confidence before working on your main Table runner tutorial with clover print..
Most importantly, enjoy the process. The Table runner tutorial with clover print. is meant to be a relaxing and rewarding experience.
FAQ About Table runner tutorial with clover print.
What is the ideal size for a table runner?
The size in a Table runner tutorial with clover print. depends on your table, but typically it should hang evenly on both sides.
Can beginners follow this tutorial?
Yes, the Table runner tutorial with clover print. is beginner-friendly with simple steps.
What type of fabric is best?
Cotton fabric is highly recommended for the Table runner tutorial with clover print. due to its ease of use.
Do I need a sewing machine?
While helpful, the Table runner tutorial with clover print. can also be done by hand sewing.
How do I maintain the table runner?
After completing the Table runner tutorial with clover print., gentle washing and ironing will keep it in good condition.
Can I customize the design?
Absolutely, customization is a key feature of the Table runner tutorial with clover print..
Conclusion
This complete Table runner tutorial with clover print. has shown you how to create a beautiful and functional piece of décor from start to finish.
From selecting materials and preparing your workspace to assembling and customizing your design, each step contributes to a polished final product.
The Table runner tutorial with clover print. is not only a creative project but also a practical way to enhance your home with handmade charm. If you enjoyed this tutorial, please share your honest opinion and leave your suggestions. Your feedback is important and helps inspire future creative ideas.