
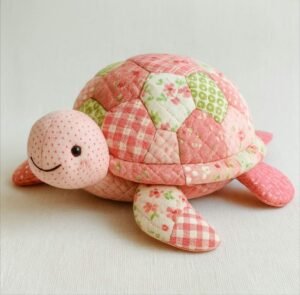
Creating a Tortoise Alfiletero in Hexagons-Step by Step Tutorial is a delightful crafting experience that brings together creativity, organization, and charm. This unique pincushion design uses hexagon shapes to form a turtle-inspired accessory that is both decorative and practical. Whether you are an experienced crafter or just starting your needlework journey, this tutorial will guide you through every detail to make your project successful. By exploring shapes, textures, colors, and assembly techniques, you can create a functional item that adds joy to your crafting space.
The Tortoise Alfiletero in Hexagons-Step by Step Tutorial also introduces a fun and relaxing way to work with geometric forms in fabric. Hexagons are widely loved for their versatility, and in this design, they work perfectly to build the turtle’s shell in an eye-catching and structured way. Many people enjoy making pincushions because they are small, fast, and satisfying projects that improve sewing organization. This article will show you how to transform simple materials into a beautiful creation that looks adorable on your sewing table.
This guide not only explains how to create the hexagon turtle pincushion but also helps you understand the importance of working slowly and carefully as you assemble the pieces. The Tortoise Alfiletero in Hexagons-Step by Step Tutorial is designed to be accessible for beginners yet detailed enough for advanced crafters to appreciate. You will learn how fabric selection affects the final look, how to stitch with precision, and how to stuff and shape the pincushion for a perfect finish. By following each section with attention, you will be able to create a pincushion that is durable, attractive, and truly unique.
Choosing Materials for the Tortoise Alfiletero
Selecting the right materials is the foundation of a successful Tortoise Alfiletero in Hexagons-Step by Step Tutorial project. Fabric choice will determine the personality, vibrancy, and durability of your pincushion. Many crafters prefer cotton fabrics because they are easy to work with and provide beautiful results. Consider using a combination of patterned and solid fabrics to bring contrast to your turtle shell design.
When preparing your materials, remember that hexagons require precise cutting. Using a template or pre-cut hexagons makes the process easier and ensures accuracy. Beginners can benefit from purchasing hexagon templates in various sizes to help maintain consistency. The goal is to achieve clean edges that will align properly when sewn together.
Another essential aspect is selecting appropriate stuffing for your pincushion. Fiberfill is the most common choice because it is lightweight and easy to shape. However, some crafters prefer a firmer filling for better needle support. Whichever option you choose, make sure the stuffing is evenly distributed to maintain the structure of your turtle.
You will also need thread, a hand-sewing needle, scissors, and optional decorative accessories such as buttons, beads, or small pieces of felt. These items bring extra personality to your Tortoise Alfiletero in Hexagons-Step by Step Tutorial and help you customize the final appearance. A small safety pin or embroidery hoop can also be helpful for keeping fabric secure during sewing.
Pay attention to color harmony when selecting your materials. The turtle shell can be made from multiple fabrics arranged to create patterns or gradients. This is an opportunity to explore creativity and experiment with different combinations. Soft pastels, warm autumn tones, or vibrant floral prints can all produce stunning results.
Before proceeding, gather all materials together so you can follow the next steps without interruption. Staying organized prevents mistakes and makes the entire crafting experience more enjoyable.
Creating the Hexagon Shell
The hexagon shell is the centerpiece of the Tortoise Alfiletero in Hexagons-Step by Step Tutorial, and assembling it requires patience and precision. Begin by tracing your hexagon template onto the fabric pieces you selected earlier. Carefully cut out each shape, making sure all sides are even. This ensures a clean final assembly.
Next, baste the fabric around paper hexagon templates if you prefer English Paper Piecing (EPP). This technique helps keep the shapes crisp and easy to join. Use small, even stitches to secure the fabric around each template. Once all hexagons are prepared, you can begin the layout.
Arrange the hexagons in a circular pattern that resembles a turtle shell. Some designs feature a central hexagon surrounded by six others, while others use more shapes for a larger shell. Play with the layout until you find a design that looks balanced and visually appealing.
Start sewing the hexagons together using a whipstitch or ladder stitch. Keep your stitches small and neat to ensure that the final shell looks clean. Avoid pulling the thread too tightly, as this can distort the shapes. Take your time with this process; precision is crucial for the quality of your pincushion.
After the hexagons are fully sewn together, gently remove the paper templates if you used them. The fabric will now hold its shape thanks to the seams. Press the shell lightly with an iron to flatten any bumps and give it a polished appearance.
Once the shell is complete, set it aside while you prepare the rest of the turtle. This component will become the charming focal point of your Tortoise Alfiletero in Hexagons-Step by Step Tutorial, so make sure it looks exactly the way you want.
Assembling the Turtle Body
Now that the shell is ready, it is time to construct the turtle’s body for your Tortoise Alfiletero in Hexagons-Step by Step Tutorial. Begin by cutting out shapes for the head, legs, and tail. These pieces are often simple ovals or teardrop shapes. Make sure to cut two layers of fabric for each part so you can sew them together and turn them inside out.
Sew each body piece with small stitching, leaving a small opening to insert stuffing. Once you have sewn the edges, gently turn the pieces inside out and fill them lightly with fiberfill. These elements should be firm enough to hold their shape but soft enough to sew easily onto the hexagon shell.
Position the head, legs, and tail underneath the edges of the completed hexagon shell. Adjust the placement until the turtle looks balanced and symmetrical. This step requires a bit of creativity, as you can tilt the head slightly or position the legs closer together for added personality.
Attach each piece to the shell using hand-sewing techniques. Ensure the stitches are secure, especially if the pincushion will be used frequently. Reinforce the areas where the legs and head meet the shell to keep everything tightly in place.
Now, fill the inside of the shell with stuffing. Add the fiberfill slowly and distribute it evenly. A well-stuffed shell keeps pins stable and gives the pincushion a smooth, rounded appearance. Aim for a firm but not overly tight structure to maintain comfort while inserting pins.
Once stuffed, sew the bottom piece of fabric to close the pincushion. Your turtle shape will now be complete, and you can move to the final decorative steps.
Adding Details and Finishing Touches
Adding final touches enhances the charm of your Tortoise Alfiletero in Hexagons-Step by Step Tutorial. Many crafters enjoy sewing small buttons for eyes or using tiny beads to create expressive facial features. You may also embroider a gentle smile or other cute details.
Consider adding decorative stitching around the hexagon shell for extra texture. Using embroidery thread in contrasting colors can help highlight the geometric design and make the pincushion even more striking. Simple running stitches, blanket stitches, or tiny decorative knots can all elevate the final look.
You can also personalize your turtle by adding accessories, such as a small felt flower or a bow on its head. These little elements make your pincushion unique and can be customized for gift-giving occasions. Handmade pincushions are thoughtful presents for fellow crafters.
Before completing the project, make sure all parts are securely attached. Gently press the entire pincushion with an iron if necessary, avoiding areas where stuffing may be sensitive to heat. Double-check for loose threads and trim them carefully.
Your completed Tortoise Alfiletero in Hexagons-Step by Step Tutorial creation should now look polished, charming, and ready to use. Place it proudly on your sewing table and enjoy its functionality and beauty.
A handcrafted pincushion like this not only helps organize your pins but also inspires creativity every time you see it.
FAQ About the Tortoise Alfiletero in Hexagons
What materials do I need to make the Tortoise Alfiletero?
You will need cotton fabric, thread, stuffing, scissors, templates, a needle, and optional decorative items.
Is this tutorial suitable for beginners?
Yes, the Tortoise Alfiletero in Hexagons-Step by Step Tutorial is beginner-friendly and explained clearly.
What is the best filling for a pincushion?
Fiberfill is the most common option, but some crafters prefer firmer fillings for better pin stability.
Can I customize the shape and colors?
Absolutely. The turtle’s shell and body parts can be fully personalized with your preferred fabrics.
How long does the project take?
Most crafters finish it in a few hours, depending on skill level and desired details.
Do I need a sewing machine?
No, the project can be completed entirely by hand.
Conclusion
The Tortoise Alfiletero in Hexagons-Step by Step Tutorial is a creative and enjoyable project that blends geometry, design, and sewing into a charming pincushion.
You learned how to choose materials, assemble hexagons, construct the turtle body, and add beautiful finishing touches.
This handmade pincushion not only organizes your sewing tools but also adds personality to your crafting space. I hope this guide helped you feel confident to make your own version. Please leave your honest opinion and suggestions so I can continue improving future tutorials.