
If you are passionate about quilting and love floral-inspired designs, this Tulip Patchwork Block – Step by Step Tutorial is the perfect project to bring a touch of spring into your sewing routine. The tulip, with its graceful petals and vibrant colors, makes a wonderful motif for any quilt. Whether you’re a beginner or an experienced quilter, learning how to create this classic tulip block will open the door to endless creative possibilities.
The Tulip Patchwork Block is an iconic design in the quilting world, combining simplicity with elegance. It can be made using various color combinations, from soft pastels to bold, bright tones. What makes this pattern special is how easy it is to customize — you can adapt it to different quilt sizes, layouts, and even use scraps of fabric to make it eco-friendly and unique.
In this Tulip Patchwork Block – Step by Step Tutorial, you’ll discover the essential materials, fabric cutting techniques, piecing tips, and pressing tricks that make all the difference. The block construction process will help you enhance your sewing precision while allowing you to play with color placement to create the illusion of blooming tulips. By the end of this tutorial, you’ll have a beautiful handmade quilt block that can stand alone as a mini quilt or become part of a larger masterpiece.
Materials You Will Need
To start your Tulip Patchwork Block – Step by Step Tutorial, you’ll need only a few essential materials that most quilters already have in their sewing kit. Gathering everything before you begin helps you work smoothly without interruptions, ensuring a professional-looking finish.
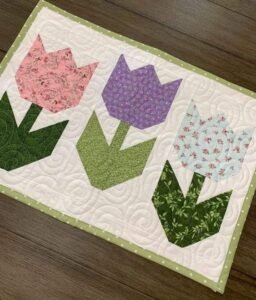
First, prepare your fabric selection. Choose at least three main colors: one for the tulip petals, one for the stem and leaves, and one for the background. Cotton fabric works best because it’s easy to cut and press. For beginners, using solid fabrics or small prints will make your block look crisp and well-defined.
Next, make sure to have a rotary cutter, cutting mat, and quilting ruler. Accurate cutting is key in patchwork, especially when working with geometric shapes like triangles and squares. These tools will help you achieve clean, straight lines for each piece.
You’ll also need thread, ideally in a neutral color that blends well with your fabric choices. Pair it with a sewing machine with a ¼-inch presser foot to maintain consistent seam allowances throughout your project.
Don’t forget pins or fabric clips, which will keep your pieces aligned during sewing. Ironing tools are also essential — a hot iron and ironing board will help flatten your seams and give your block a polished look.
Finally, prepare a fabric marking pen or chalk to mark your sewing lines. This will help you maintain accuracy, especially when creating diagonal seams or assembling multiple small sections into the final tulip shape.
Cutting and Preparing Your Fabric
Now that your materials are ready, it’s time to start cutting your fabric for the Tulip Patchwork Block – Step by Step Tutorial. Precision at this stage ensures your block pieces fit perfectly together, creating a neat and symmetrical tulip design.
Begin by cutting your background fabric into squares. Most tulip blocks use 4½-inch squares, but you can adjust the size based on your desired block dimensions. Remember that consistency in cutting is essential — even a small difference can affect how well the pieces align later.
Next, cut your petal pieces. For each tulip block, you’ll typically need four half-square triangles that form the flower shape. These can be created by cutting squares in half diagonally, ensuring the edges are clean and straight. You can choose a single fabric for the petals or mix different shades to create a gradient effect that resembles a real tulip.
For the stem and leaves, cut narrow rectangles for the stem and small triangles for the leaves. Green tones work beautifully here, and using slightly different shades of green adds depth to your design.
Once all your pieces are cut, press them carefully with your iron to remove any wrinkles. Flat pieces are much easier to sew together and help you maintain accuracy.
Finally, arrange all your fabric pieces on a flat surface before you start sewing. This visual layout helps you confirm that the colors balance well and that the tulip’s shape is correctly oriented. It’s also a great opportunity to experiment with different combinations before stitching everything together.
Sewing the Tulip Patchwork Block
This is the most exciting part of the Tulip Patchwork Block – Step by Step Tutorial — sewing your fabric pieces into a beautiful quilt block. Follow these simple steps to bring your tulip to life.
Start by assembling the flower section. Take your half-square triangles and sew them together in pairs to form the tulip’s upper petals. Use a ¼-inch seam allowance and press the seams open to reduce bulk. Accurate pressing helps your block lay flat and keeps your points sharp.
Next, add the center petal section. This is typically a small square of fabric that sits between the upper petals. Sew it in place, aligning edges carefully so your seams match perfectly. The neatness of this area greatly affects the overall look of your tulip.
Now, move on to sewing the stem section. Take your green rectangle and sew it between two background fabric rectangles to create a vertical strip. This forms the stem of the tulip. Press your seams toward the darker fabric to prevent shadowing through lighter pieces.
Attach the leaf units on both sides of the stem section. To do this, sew your small triangles of green fabric to the background pieces, forming the leaf shape. Once sewn, join the leaf units to the stem section, ensuring the angles align properly.
Finally, join the flower and stem sections. Pin them together before sewing to keep everything in line. Once sewn, press your completed tulip block well from both sides. Your finished piece should be flat and beautifully shaped, ready to be joined with other blocks or framed as a stand-alone project.
Tips for Finishing and Customizing Your Tulip Block
At this stage of the Tulip Patchwork Block – Step by Step Tutorial, your block is ready, but you can still add personal touches to make it unique and more creative. Here are some great tips to finish and customize your tulip patchwork block.
First, focus on color combinations. The tulip design looks stunning in pastels, but bold hues like red, orange, or purple can give it a modern twist. You can also experiment with tone-on-tone fabrics to add subtle texture without overpowering the design.
If you want to enhance the visual effect, try adding sashing — thin strips of fabric that separate each block in a quilt. White or light-colored sashing makes the tulips stand out, while darker shades give the quilt a dramatic flair.
For a professional look, square up your block after sewing. Trim any uneven edges to ensure that all sides are even and your block measures the correct size. This step is crucial when assembling multiple blocks into a larger quilt.
Another creative idea is to add embroidery or hand quilting. Simple stitches around the tulip petals can highlight the shape and add texture. You could also use decorative quilting to outline the flower and leaves.
Don’t be afraid to mix patterns — using floral prints, gingham, or polka dots can give your quilt a cheerful and playful appearance. The tulip pattern is very forgiving, so it’s a great opportunity to use leftover fabric scraps creatively.
Lastly, label your finished block if it’s part of a larger project. Writing the date and your name on the back can make your quilt more meaningful, especially if you plan to gift or keep it as a family heirloom.
Tulip Patchwork Block
1. What size should a tulip patchwork block be?
Most tulip blocks are between 8 and 12 inches, but you can adjust the size according to your project. Smaller blocks are perfect for table runners or wall hangings, while larger ones suit full-size quilts.
2. Can beginners make this tulip block?
Yes! The Tulip Patchwork Block – Step by Step Tutorial is perfect for beginners. It uses basic shapes like squares and triangles, making it an excellent practice project for learning seam precision.
3. What type of fabric is best for patchwork?
100% cotton quilting fabric is ideal because it’s easy to cut, press, and sew. Avoid stretchy materials, as they can distort your block’s shape.
4. How do I make sure my points match up?
Pressing seams accurately and pinning corners before sewing will help you achieve perfect points. Take your time aligning edges before stitching.
5. Can I sew tulip blocks by hand?
Absolutely. While a sewing machine speeds up the process, hand sewing with small, consistent stitches can also produce beautiful results.
6. How can I use tulip blocks in a quilt?
You can use them individually as wall decor or combine several blocks into a large floral quilt. They also look lovely on cushion covers, tote bags, and table toppers.
Conclusion
Making a Tulip Patchwork Block is a rewarding and creative experience that allows you to express your love for quilting and nature-inspired patterns. Throughout this Tulip Patchwork Block – Step by Step Tutorial, you’ve learned how to prepare materials, cut fabric accurately, assemble your tulip pieces, and finish your block with confidence.
This pattern is not only beautiful but also versatile, making it suitable for quilts, home decor, or personalized gifts. Whether you’re an experienced quilter or just starting out, the tulip block is a timeless design that adds charm and elegance to any sewing project.
We hope this tutorial inspires you to create your own tulip-themed masterpiece! Don’t forget to share your thoughts — leave a sincere opinion and suggestions below about what you enjoyed most or what kind of tutorials you’d love to see next. Your feedback helps keep this creative community blooming! 🌷