
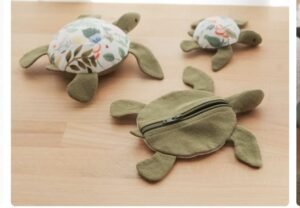
Creating a Turtle-shaped cell phone charger holder.-Step by Step Tutorial is a fun and practical craft project that adds charm and organization to your everyday routine. This adorable turtle-shaped holder keeps your phone safely stored while it charges, preventing messy cables and keeping your device off the floor. Many people enjoy projects like this because they combine creativity with functionality, making them perfect for personal use or thoughtful handmade gifts. Using the main keyword early helps establish focus and improves SEO, guiding readers smoothly into the step-by-step learning experience.
This Turtle-shaped cell phone charger holder.-Step by Step Tutorial is designed to be simple enough for beginners yet customizable for more advanced crafters. You can choose different fabrics, colors, and embellishments to give your turtle its own personality. Whether you prefer a cute, colorful turtle for your child’s room or a more elegant design for your office, this project allows complete creative freedom. It also encourages the use of leftover fabric scraps, making it a budget-friendly and eco-conscious craft idea.
The best part about this Turtle-shaped cell phone charger holder.-Step by Step Tutorial is that it helps solve a common problem: keeping your phone safely stored while charging. Instead of leaving your phone on the ground, balancing it on small surfaces, or dealing with tangled cords, this turtle-shaped holder provides a stable and attractive solution. With just a few materials and some basic sewing skills, you can create a charming accessory that keeps your space organized and adds decorative flair.
Materials Needed for the Turtle-Shaped Charger Holder
To begin the Turtle-shaped cell phone charger holder.-Step by Step Tutorial, gather all necessary materials for a smooth crafting experience. You will need cotton or felt fabric for the body, as these materials are easy to sew and hold their shape well. Choosing a fun pattern or texture can give your turtle character and make your project visually appealing. It is also helpful to have a contrasting lining fabric to create a clean interior finish that supports the structure of the phone pocket.
Interfacing is an essential material because it provides strength and stiffness to the charger holder. A medium-weight fusible interfacing works best for this project, ensuring the turtle keeps its shape while holding the phone securely. Applying interfacing to both the outer fabric and the lining makes the holder more durable and helps it withstand daily use. Many crafters skip this step, but it significantly improves the quality of the finished piece.
For the turtle’s shell, felt is a popular choice because it is easy to cut and does not fray. You can create a simple circular shell or design a textured shell using geometric pieces. Adding a bit of extra padding or batting under the shell can give it a more rounded and realistic appearance. Felt scraps can also be used for the turtle’s head, legs, and tail, adding soft and cute details to the final design.
You will also need basic sewing tools such as scissors, pins, fabric glue, a sewing machine, and thread that matches your chosen fabrics. If you prefer to sew by hand, this project is still manageable with small, secure stitches. A fabric marker is helpful for tracing patterns and marking sewing lines, ensuring proper alignment throughout the project.
Lastly, prepare a charging hole template. This opening allows the charger to fit through the holder, securing the phone while it charges. The shape is often oval or rectangular, depending on your charger size. Ensuring this opening is correctly measured is essential for functionality. Once all materials are ready, you can begin constructing your turtle-shaped charger holder.
Cutting and Assembling the Turtle Pieces
The next part of this Turtle-shaped cell phone charger holder.-Step by Step Tutorial is cutting the individual turtle components. Start by drawing or printing a simple turtle outline that includes the shell, head, legs, and tail. Make sure the body size can comfortably hold a standard cell phone, leaving enough space for seams and interfacing. Once your pattern is ready, trace each piece onto the fabric using a fabric marker.
Cut the main body twice from your chosen outer fabric and twice from the lining fabric. These pieces will form the pocket that holds the phone. Adding interfacing to all pieces ensures the holder maintains its structure while supporting the weight of the device. Fuse the interfacing carefully, smoothing the fabric to avoid wrinkles and bubbles that can affect sewing quality.
Next, cut the turtle’s shell from felt or a coordinating fabric. This piece can be a single circle or a layered design with small circles or hexagons to imitate the geometric patterns found on real turtles. Attach these elements using fabric glue or hand stitching. This step adds character and depth, allowing your turtle to feel more playful or stylish, depending on your color scheme.
Cut the turtle’s head, four legs, and tail from felt. These pieces can be stuffed lightly with fiberfill to give them dimension. You can also embroider facial details like the eyes or a small smile to add personality. Stitch or glue these pieces onto the main body fabric before assembling the pocket so they remain secure and visible once the holder is complete.
Prepare the opening for the charger cord. Mark the center of one body piece and cut a small rectangle or oval that matches the size of your charger adapter. Reinforce the edges of this opening with stitching or a small piece of interfacing to keep the fabric from stretching. This hole is essential for the functionality of the charger holder.
Once all turtle pieces are cut and embellished, arrange them on the main fabric to ensure proper placement. This step prevents misalignment and provides a clear visual reference for sewing. Double-check that the legs and head extend beyond the body edges so they remain visible once the pocket is sewn together.
Sewing the Turtle Charger Holder
At this stage of the Turtle-shaped cell phone charger holder.-Step by Step Tutorial, you will begin sewing all the pieces together to form the body. Start by placing the two outer body pieces right sides together and sewing around the edges, leaving the top open. Repeat this process with the lining fabric. Once sewn, trim the curves slightly to avoid bulk, then turn the outer body right side out.
Insert the lining inside the outer fabric, ensuring both layers align smoothly. Stitch the top edge carefully, folding the fabric inward to create a clean seam. This is a crucial step because it forms the opening of the phone pocket. Reinforcing the top seam makes the holder more durable and ensures it maintains its shape over time.
Now attach the turtle’s shell to the outer body by sewing or gluing it securely. If your shell design includes multiple pieces, stitch them individually before attaching the entire shell. This method ensures the design stays in place and adds a textured finish to the holder.
Next, position the head, legs, and tail along the edges, ensuring they extend outward. Pin them securely between the lining and the outer layer. Stitch around the edges again to reinforce their placement. This step is essential to avoid loose pieces that may detach with regular use.
Once all details are attached, sew around the body again to reinforce all seams. This extra stitching keeps the pocket stable and ensures your phone stays securely inside. After stitching, remove any loose threads and inspect all seams for strength.
Finally, test the charger opening by inserting your charger plug through the hole. Make sure it fits snugly and aligns correctly with the pocket. If necessary, make small adjustments to ensure the holder functions as intended.
Adding Final Touches and Personalization
The final stage of this Turtle-shaped cell phone charger holder.-Step by Step Tutorial involves adding unique finishing touches that make your turtle stand out. Start by checking that the seams are clean and the pocket holds the phone securely. If any area feels loose, reinforce it with additional stitching. A well-finished holder looks more professional and lasts much longer.
Personalizing your turtle holder is where creativity shines. You can embroider the turtle’s name, add decorative stitches, or use fabric paint to enhance the shell design. These artistic touches make your turtle one-of-a-kind and enjoyable to use or gift.
For added functionality, you can attach a small loop at the top of the holder for hanging on a hook or charging station. This is especially helpful for keeping your phone elevated and safe from spills or pets. Create the loop using a small strip of fabric folded and stitched securely.
Adding small accessories like buttons, ribbons, or beads is also an option, but ensure they are firmly attached. Since the turtle holder will be used near electrical outlets, avoid adding anything metallic or sharp to maintain safety. Soft and fabric-based embellishments are best for this project.
If you plan to gift or sell the holder, consider creating multiple turtles in different colors or styles. This adds visual variety and makes the project appealing to different preferences. Each turtle can have its personality, expressed through color combinations, patterns, and face designs.
Once all finishing touches are complete, your turtle-shaped charger holder is ready to use. This handmade accessory not only organizes your space but also brings joy through its charming design.
FAQ
1. What materials are best for making a turtle-shaped charger holder?
Cotton, felt, interfacing, and a small amount of padding are the most suitable materials for durability and structure.
2. Can beginners make this project?
Yes, the tutorial is beginner-friendly, with simple steps and basic sewing skills required.
3. Is interfacing necessary?
Interfacing is highly recommended to ensure the holder maintains its shape and supports the weight of the phone.
4. Can I sew the project by hand?
Yes, hand sewing is possible, but it will take longer. Use tight stitches for durability.
5. How do I customize the turtle design?
You can add embroidery, patterned fabric, small felt pieces, or decorative stitching.
6. What size should the turtle holder be?
It should be large enough to hold your specific phone model, with extra space for seam allowance.
7. Is the charger hole difficult to make?
Not at all. Carefully measure your charger plug and cut an opening slightly larger for easy use.
8. Can children help with this craft?
Children can help decorate the turtle, but an adult should handle the sewing.
9. How do I clean the turtle holder?
Spot cleaning is recommended to maintain the integrity of the felt and embellishments.
10. What is the purpose of this turtle-shaped holder?
It keeps your phone securely stored while charging, preventing clutter and cable tangling.
Conclusion
This Turtle-shaped cell phone charger holder.-Step by Step Tutorial guides you through creating a fun, useful, and creative accessory that enhances your daily routine.
You learned how to choose materials, assemble the turtle pieces, sew the holder, and personalize the final design.
The result is a functional item that keeps your phone organized while adding a decorative touch to your space. If you enjoyed this tutorial, feel free to leave a sincere opinion and share your suggestions for future craft ideas.