
When it comes to crafting a handmade accessory, you’ll be surprised how easy it is to sew this bag!- Step by Step Tutorial can turn even beginners into confident creators. Many people assume that sewing a functional and stylish bag requires advanced skills, but this guide proves the opposite. With the right instructions, some fabric, and a bit of time, anyone can make a bag they can be proud of.
The beauty of this project lies in its simplicity and versatility. By following this step by step tutorial, you can customize the size, color, and style of your bag according to your preferences. Whether you want a chic tote for shopping, a casual handbag for everyday use, or a unique gift for someone special, sewing your own bag gives you full creative control. And the best part? It’s budget-friendly and incredibly satisfying.
Before diving into the sewing process, this article will guide you through everything you need to know—from gathering materials to the final stitch. By the end of this tutorial, not only will you have a beautiful handmade bag, but you will also gain skills that can be applied to many other sewing projects. So, let’s begin this You’ll be surprised how easy it is to sew this bag!- Step by Step Tutorial and discover how fun and rewarding sewing can be.
Materials and Preparation
To start this You’ll be surprised how easy it is to sew this bag!- Step by Step Tutorial, you need to gather some basic materials. Choosing the right fabric is essential because it determines the durability and overall look of your finished bag. Cotton fabric works well for beginners as it is easy to handle and comes in countless patterns and colors.
Next, you will need a good pair of fabric scissors, a measuring tape, and some sewing pins. These tools will help you cut your fabric accurately and hold the pieces in place while you sew. Accuracy at this stage ensures your bag looks professional and neat when completed.
You will also need a sewing machine or, if you prefer, you can sew by hand using a sturdy needle and thread. While a sewing machine makes the process faster and easier, hand stitching adds a personal touch that many crafters love.
Another important element is choosing the right lining for your bag. A lining not only strengthens the bag but also gives it a polished, store-bought appearance. You can use a plain fabric or a contrasting color to add a bit of personality.
Finally, you should prepare accessories such as buttons, zippers, or Velcro closures if you want to add extra functionality. These elements give your bag a unique finish and make it more practical for everyday use.
Once all materials are ready, make sure you have a clean and organized workspace. This will make the sewing process smoother and help you avoid mistakes along the way.
Cutting and Assembling the Pieces
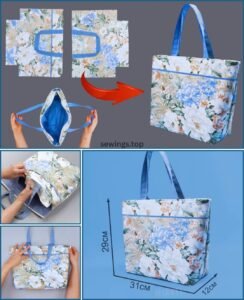
The second step in this You’ll be surprised how easy it is to sew this bag!- Step by Step Tutorial is cutting and preparing your fabric pieces. Start by measuring the dimensions of your bag based on the size you want. A common size for a simple tote bag is about 16 inches wide and 14 inches tall, but you can adjust these measurements as needed.
Use fabric chalk or a washable marker to outline the shape on your fabric before cutting. This ensures precision and prevents uneven edges that could affect the bag’s final shape.
After cutting the main pieces, remember to cut matching pieces for the lining. Having both the outer fabric and lining in identical sizes will make assembly easier later.
Once all pieces are cut, pin the lining to the outer fabric with the right sides facing each other. This will allow you to sew them together neatly without shifting or slipping.
If you want to include inner pockets, now is the time to cut smaller fabric squares for them. These pockets can be attached to the lining before assembling the entire bag.
Finally, double-check all pieces before sewing to avoid mismatched edges or missing components. Preparation at this stage saves time and prevents frustration later.
Sewing the Bag Together
This stage of the You’ll be surprised how easy it is to sew this bag!- Step by Step Tutorial brings everything to life. Start by sewing the sides and bottom of the outer fabric together, keeping the right sides facing each other. Use a straight stitch for durability and leave the top open.
Repeat the same process with the lining pieces. Remember, if you added pockets earlier, they should now be on the inside of the lining.
Next, place the lining inside the outer fabric with the right sides facing each other again. Pin them together along the top edge carefully to keep everything aligned.
Sew around the top edge, leaving a small opening so you can turn the bag right side out later. This technique gives the bag a clean, professional look without visible raw edges.
After turning the bag right side out, press the seams with an iron to give it a crisp finish. Then, stitch the opening closed by hand or with a sewing machine.
Finally, topstitch around the upper edge of the bag for added strength and a decorative touch. This step not only secures the lining but also makes the bag look polished and complete.
Adding Handles and Finishing Touches
The last phase of You’ll be surprised how easy it is to sew this bag!- Step by Step Tutorial is attaching the handles and any optional decorations. Handles can be made from the same fabric or from sturdy webbing straps for extra durability.
Cut two equal-length pieces for the handles, usually around 20 inches each, but you can adjust depending on your preference.
Pin the handles to the top edge of the bag, ensuring they are evenly spaced on both sides. Double-check the placement before sewing because this affects the bag’s balance and comfort.
Sew the handles securely with multiple stitches, especially at the points where they connect to the bag. Reinforcing these areas ensures the handles can carry weight without tearing.
If you want to add closures like buttons, snaps, or zippers, now is the time to do so. These accessories add functionality and style to your handmade creation.
At this point, your bag is complete! Take a moment to admire your work and celebrate the fact that you created a practical and beautiful accessory from scratch.
FAQ – Sewing Your Own Bag
1. Do I need a sewing machine for this tutorial?
No, you can sew by hand if you prefer. A sewing machine speeds up the process, but hand stitching works fine for beginners.
2. What is the best fabric for a beginner?
Cotton fabric is highly recommended because it is easy to cut, sew, and comes in many patterns and colors.
3. Can I wash the handmade bag?
Yes, most fabric bags can be washed gently, but it’s best to check the care instructions for the specific fabric you used.
4. How long does it take to sew a simple bag?
Beginners can usually complete the project in two to three hours, depending on the complexity and added details.
5. Can I make the bag without lining?
Yes, but lining adds strength, durability, and a professional look to your finished bag.
6. Is this tutorial suitable for kids or teens?
With supervision, older children and teens can definitely follow this tutorial as a fun and creative project.
Conclusion
As you can see, you’ll be surprised how easy it is to sew this bag!- Step by Step Tutorial truly makes sewing accessible to everyone. We covered everything from choosing materials and cutting fabric to assembling the pieces and adding finishing touches.
This tutorial proves that creating a beautiful, functional bag doesn’t have to be complicated or expensive. With a little time and patience, anyone can master the steps and enjoy the satisfaction of making something unique by hand.
Now that you’ve learned the process, we’d love to hear from you! Share your honest opinions, suggestions, or experiences with this tutorial in the comments. Your feedback helps us improve and inspires other readers to start sewing too.