
Fabric toiletry bag pattern is a practical and stylish sewing project that combines functionality with creativity. Whether you are making a cosmetic pouch for everyday use, a travel organizer, or a thoughtful handmade gift, a well-designed Fabric toiletry bag pattern is a fantastic addition to your sewing collection.
One of the reasons why the Fabric toiletry bag pattern remains so popular is its versatility. It can be used to organize makeup, skincare products, toiletries, sewing notions, stationery, electronic accessories, or even small crafting supplies.
In this complete tutorial, you will learn how to create a beautiful Fabric toiletry bag pattern inspired by a structured zippered pouch. The project focuses on careful fabric preparation, accurate cutting, simple sewing techniques, proper zipper installation, and professional finishing methods. By following each step carefully, you can achieve a polished result that looks elegant, functions well, and lasts for years of everyday use.
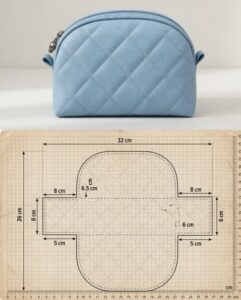
Choosing Materials for a Fabric Toiletry Bag Pattern
The success of your Fabric toiletry bag pattern begins with selecting quality materials. Quilting cotton, canvas, linen blends, lightweight denim, or home décor fabric all work beautifully. Medium-weight woven fabrics provide enough structure while remaining easy to sew.
For a medium-sized toiletry bag measuring approximately 10 inches wide, 6 inches high, and 4 inches deep, cut two exterior fabric pieces measuring 11 x 8 inches. Cut two lining pieces using the same measurements to ensure everything aligns perfectly during assembly.
To provide additional stability, cut two matching pieces of fusible interfacing measuring 11 x 8 inches. Fuse the interfacing to the wrong side of the exterior fabric using an iron. This simple step helps the finished bag hold its shape and gives it a professional appearance.
Choose a zipper that measures approximately 10 inches long. Nylon coil zippers are beginner-friendly because they sew smoothly through most domestic sewing machines. Select a zipper color that either blends with or contrasts beautifully against your chosen fabric.
Gather your sewing supplies before beginning. You will need matching thread, sewing clips or pins, fabric scissors or a rotary cutter, a quilting ruler, a zipper foot for your sewing machine, an iron, and a fabric marking tool.
Before cutting your fabric, wash, dry, and press it thoroughly. Prewashing prevents shrinkage later and removes excess fabric finishes, helping your completed Fabric toiletry bag pattern maintain its shape after future cleaning.
Cutting and Sewing the Fabric Toiletry Bag Pattern
Careful cutting is essential for achieving symmetrical results. Double-check every measurement before cutting the fabric because precision makes assembly much easier and improves the final appearance.
Begin by attaching the zipper to one exterior fabric piece and one lining piece. Place the zipper face down on the right side of the exterior fabric, then position the lining on top with right sides together. Sew close to the zipper teeth using a zipper foot.
Repeat the same process for the opposite side of the zipper using the remaining exterior and lining pieces. Once both sides are attached, press the fabric away from the zipper and topstitch close to the zipper edge. This keeps the fabric from catching during opening and closing.
Open the zipper halfway before assembling the pouch. This small detail is extremely important because it allows you to turn the finished bag right side out later. Forgetting this step can make turning the bag much more difficult.
Arrange the exterior pieces with right sides together and the lining pieces with right sides together. Match the seams around the zipper carefully and secure everything with clips or pins before stitching.
Sew around the entire perimeter using a ½-inch seam allowance, leaving an opening of approximately 4 inches along the bottom of the lining. Reinforce the zipper ends with backstitching since these areas receive frequent use.
Assembling and Finishing the Fabric Toiletry Bag Pattern
To create the depth of the toiletry bag, form boxed corners. Flatten each bottom corner so the side seam aligns with the bottom seam, then measure approximately 2 inches from the point and draw a straight line across. Stitch along this line and trim away the excess fabric.
Repeat the same boxed corner process on both the exterior and the lining. These boxed corners transform the flat pouch into a spacious organizer capable of holding bottles, cosmetics, and other everyday essentials.
Turn the entire project right side out through the opening left in the lining. Carefully push out the corners using a blunt turning tool, ensuring each corner appears crisp without damaging the fabric.
Close the opening in the lining by folding the seam allowances inward and stitching close to the folded edge. You may use either a sewing machine or an invisible ladder stitch by hand for a nearly seamless finish.
Tuck the lining neatly inside the exterior bag and press everything carefully. Proper pressing helps define the shape and gives the finished toiletry bag a clean, professional appearance.
Finally, unzip and zip the pouch several times to confirm smooth operation. Inspect every seam, trim loose threads, and give the entire bag one final press before using or gifting your finished Fabric toiletry bag pattern.
Personalizing Your Fabric Toiletry Bag Pattern
One of the greatest advantages of a Fabric toiletry bag pattern is the opportunity to customize it according to your needs. Floral prints, geometric patterns, neutral fabrics, and colorful combinations all create beautiful results suitable for different occasions.
You can easily add interior slip pockets before assembling the lining. These small compartments help organize brushes, makeup tools, travel bottles, or personal accessories, making the bag even more practical.
For extra durability and easy cleaning, consider using waterproof fabric or laminated cotton for the lining. This protects the bag from spills and makes maintenance much simpler during travel.
Decorative quilting is another excellent option. Straight-line quilting, diagonal quilting, or diamond quilting adds texture, reinforces the fabric, and creates a sophisticated handmade appearance.
Add small details such as handmade labels, decorative zipper pulls, contrasting binding, embroidery, or fabric appliqués to make every Fabric toiletry bag pattern unique. These finishing touches transform a simple project into a personalized accessory.
This project also makes an excellent handmade gift. Fill the finished bag with skincare products, travel essentials, sewing supplies, or thoughtful self-care items to create a beautiful present for birthdays, holidays, Mother’s Day, or special celebrations.
FAQ
Is the Fabric toiletry bag pattern suitable for beginners?
Yes. While sewing a zipper requires some attention, the overall construction uses straightforward sewing techniques that are appropriate for beginners with basic machine sewing experience.
What fabric works best?
Medium-weight quilting cotton, canvas, linen blends, lightweight denim, and laminated cotton are all excellent choices depending on the desired appearance and durability.
Should I use interfacing?
Yes. Fusible interfacing gives the toiletry bag additional structure, helps it maintain its shape, and improves the overall professional finish.
What zipper length is recommended?
A zipper measuring approximately 10 inches works well for a medium-sized toiletry bag, although you can adjust the size depending on your project dimensions.
Can I make the bag larger?
Absolutely. Simply increase all pattern pieces proportionally while maintaining consistent seam allowances and boxed corner measurements.
Can the bag be washed?
Most cotton fabric toiletry bags can be machine washed on a gentle cycle. Air drying helps preserve their shape and extends the life of the interfacing.
What can I store inside?
The bag is perfect for toiletries, makeup, skincare products, travel accessories, sewing supplies, stationery, charging cables, medications, or small personal belongings.
Is this project suitable for selling?
Yes. Handmade toiletry bags remain popular at craft fairs, gift shops, and online handmade marketplaces. Careful stitching, quality fabrics, and professional finishing significantly increase their appeal.
Conclusion
Creating a Fabric toiletry bag pattern is a rewarding sewing project that combines practical function with elegant design. Throughout this guide, you learned how to select suitable fabrics, prepare and reinforce the exterior with interfacing, accurately cut each pattern piece, install a zipper, sew the exterior and lining, create boxed corners for added storage space, and finish the project using professional sewing techniques. Each step contributes to a durable, attractive toiletry bag that can be used every day or given as a thoughtful handmade gift.
As you gain confidence, you can personalize future versions with different fabrics, quilted textures, waterproof linings, decorative embroidery, interior pockets, or custom zipper pulls. Every completed project is an opportunity to improve your sewing skills while creating a functional accessory that reflects your creativity and craftsmanship.
I hope this complete Fabric toiletry bag pattern tutorial has inspired you to begin your next sewing project with confidence. If you enjoyed this guide, please leave your honest opinion and share your suggestions for future sewing tutorials. Your feedback is always appreciated and helps inspire new creative projects for the entire sewing community.