
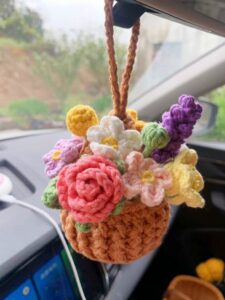
Pattern for a Small Crochet Basket with Flowers is a charming and practical project that combines beauty, functionality, and creativity into one delightful handmade piece.
One of the greatest advantages of making a Pattern for a Small Crochet Basket with Flowers is that it allows crocheters of different skill levels to practice essential stitches while producing something useful.
Throughout this complete tutorial, you will discover every stage of the project, from choosing the best yarn and crochet hook to assembling the flowers and finishing the basket with neat edges. The instructions explain the crochet process step by step using common crochet abbreviations and practical techniques that are easy to follow. By the end of this guide, you will have all the knowledge needed to confidently create your own beautiful Pattern for a Small Crochet Basket with Flowers, while improving your crochet skills and enjoying every stitch along the way.
Choosing Materials and Preparing Your Crochet Project
Before starting the Pattern for a Small Crochet Basket with Flowers, gather all the necessary supplies. Cotton yarn is usually the best option because it provides excellent stitch definition, durability, and enough structure to help the basket keep its shape.
Select a crochet hook that matches your yarn weight. Many crafters prefer using a hook slightly smaller than recommended on the yarn label because tighter stitches produce a firmer basket with stronger walls.
Choose complementary yarn colors before beginning. Neutral tones create elegant baskets, while bright floral colors give the finished project a cheerful appearance that works beautifully in children’s rooms, craft studios, or living spaces.
A stitch marker is highly recommended for projects worked in continuous rounds. It helps identify the beginning of each round and prevents counting mistakes during the construction process.
Prepare scissors, a yarn needle, measuring tape, and optional stitch counters. Having every tool nearby makes crocheting more enjoyable and keeps your workflow organized.
Read through the entire pattern before making the first stitch. Understanding the overall construction helps avoid confusion later and allows you to visualize how the basket and flowers will come together.
Step-by-Step Crochet Instructions for the Basket
Start with a magic ring and crochet 6 single crochet (sc) into the ring. Pull the tail tightly to close the center. This creates a smooth and secure foundation for the basket.
Round 2: Work 2 sc in each stitch around. You will have 12 stitches at the end of the round. Place a stitch marker in the first stitch to track your rounds.
Round 3: Follow the sequence 1 sc, increase around. Continue increasing evenly in each round until the basket base reaches your desired diameter. A base measuring approximately 5 to 6 inches works well for a small storage basket.
Once the base is complete, stop making increases. Crochet 1 sc in each stitch around to begin forming the basket walls. Working through the back loop only during the first wall round creates a clean fold that helps define the basket shape.
Continue crocheting even rounds in single crochet until the basket reaches the desired height. Depending on your preference, this may require 10 to 18 rounds. Keep your stitch tension consistent to maintain straight, sturdy sides.
Finish the basket with one decorative edging round. A simple reverse single crochet (crab stitch), slip stitch border, or small picot edging gives the basket a polished and professional appearance while reinforcing the top edge.
Crocheting and Attaching the Decorative Flowers
The flowers are what make the Pattern for a Small Crochet Basket with Flowers especially attractive. They can be made separately and attached after completing the basket.
For a simple flower, begin with a magic ring and crochet 10 single crochet into the ring. Close the ring securely and join with a slip stitch.
Create the petals by working (chain 2, 2 double crochet, chain 2, slip stitch) into each stitch around. Repeat until you have five or six petals depending on your preferred flower style.
Crochet several flowers in different colors if you want a fuller floral arrangement. Mixing pastel shades, vibrant colors, or seasonal palettes creates beautiful visual interest without making the project difficult.
Add small crochet leaves by chaining 8 stitches, then working single crochet, half double crochet, double crochet, half double crochet, single crochet along the chain before fastening off.
Use a yarn needle to securely sew each flower and leaf onto the basket. Arrange them asymmetrically for a natural look or place them evenly around the basket for a balanced decorative design.
Finishing Touches and Helpful Crochet Tips
Blocking is optional but can improve the appearance of your flowers by opening the petals and helping them lie flat. Light steaming may also enhance the basket’s overall shape if your yarn allows it.
If you want an even sturdier basket, insert a removable fabric liner after completing the crochet work. The lining protects delicate items while helping the basket maintain its structure.
Experiment with textured stitches such as waistcoat stitch or knit-look single crochet if you prefer a more modern appearance while keeping the basket durable and attractive.
This project also offers endless personalization possibilities. Wooden buttons, small bows, embroidered initials, or decorative tags can make every basket unique and suitable for gifts or craft fairs.
Practice maintaining even tension throughout the project. Consistent stitches produce smoother sides, cleaner shaping, and a much more professional finished basket.
Once completed, your Pattern for a Small Crochet Basket with Flowers can be used for organizing keys, cosmetics, baby accessories, sewing supplies, yarn, jewelry, office items, or simply displayed as a decorative centerpiece that showcases your crochet skills.
FAQ
Is the Pattern for a Small Crochet Basket with Flowers suitable for beginners?
Yes. The project mainly uses basic stitches such as chain stitch, single crochet, slip stitch, and simple increases, making it accessible for beginners who want to improve their crochet skills.
What yarn works best for this basket?
Cotton yarn is highly recommended because it provides durability, excellent stitch definition, and enough firmness to help the basket hold its shape.
Can I make the basket larger?
Absolutely. Simply continue increasing the base until it reaches your desired diameter before crocheting the sides without increases.
How do I keep the basket stiff?
Using cotton yarn, tight stitch tension, a slightly smaller crochet hook, and optional fabric lining will help create a sturdy basket.
Can I wash the finished basket?
Yes. Most cotton yarn baskets can be gently hand washed, reshaped while damp, and allowed to air dry naturally.
Can I customize the flowers?
Certainly. You can create flowers with different numbers of petals, combine multiple colors, add leaves, beads, or embroidery, and arrange them however you like to create a completely personalized design.
Conclusion
The Pattern for a Small Crochet Basket with Flowers is a rewarding project that beautifully combines practical storage with elegant handmade decoration. Throughout this tutorial, you learned how to choose the right materials, prepare your supplies, crochet a sturdy basket using basic stitches, create beautiful decorative flowers, attach them securely, and apply professional finishing techniques that enhance both durability and appearance.
This versatile project is perfect for organizing everyday items, decorating your home, creating thoughtful handmade gifts, or even producing unique products for craft markets.
As you become more confident, feel free to experiment with different yarn colors, flower designs, edging styles, and basket sizes to develop your own creative variations. I hope this complete guide has inspired you to start your own crochet basket and enjoy every step of the creative journey. If you found this article helpful, please leave your honest opinion along with your suggestions and ideas for future crochet tutorials. Your feedback is always appreciated and helps inspire new handmade projects for the entire crochet community.