
Crochet chicken-shaped trivet pattern is a delightful project that combines creativity, functionality, and charming farmhouse style into one handmade piece.
Crocheting kitchen accessories has become increasingly popular because these projects are both useful and enjoyable to make.
The beauty of a Crochet chicken-shaped trivet pattern lies in its versatility. You can customize the colors to match your kitchen, add embroidered details, or create multiple trivets for seasonal decorating. Throughout this guide, you will learn the complete process using clear crochet stitch instructions, practical assembly tips, and finishing techniques that help your project look polished and durable for everyday use.
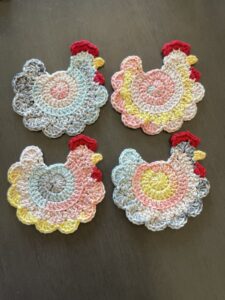
Why Make a Crochet Chicken-Shaped Trivet Pattern?
A Crochet chicken-shaped trivet pattern is much more than a decorative kitchen item. It serves as a heat-resistant surface that helps protect wooden tables, kitchen islands, and countertops from warm cookware while adding a cozy handmade touch.
Cotton yarn is the recommended fiber for this project because it tolerates heat better than acrylic yarn. Cotton also provides excellent stitch definition, allowing every detail of the chicken design to stand out beautifully.
Another advantage of this project is that it works up fairly quickly. Most crocheters can complete one trivet over a relaxing weekend, making it an enjoyable addition to any crafting schedule.
The project is also beginner-friendly for those who already understand the basic crochet stitches. While shaping the chicken requires attention, none of the techniques are overly difficult when worked carefully.
Handmade trivets also make wonderful gifts for birthdays, holidays, Mother’s Day, housewarming parties, or kitchen-themed gift baskets. Their combination of beauty and usefulness is always appreciated.
Finally, making your own kitchen accessories allows you to create unique designs that perfectly reflect your personal style while enjoying the satisfaction of handmade craftsmanship.
Materials and Crochet Stitch Guide
Before beginning your Crochet chicken-shaped trivet pattern, gather all necessary materials to ensure a smooth crocheting experience.
Recommended materials include:
- 100% cotton worsted-weight yarn in white, red, yellow, orange, and black
- 4.0 mm (G/6) crochet hook
- Yarn needle
- Stitch markers
- Sharp scissors
- Measuring tape
The finished trivet generally measures approximately 8–10 inches depending on your yarn weight and personal tension.
The basic crochet stitches used include:
- Magic Ring (MR)
- Chain (ch)
- Slip Stitch (sl st)
- Single Crochet (sc)
- Half Double Crochet (hdc)
- Double Crochet (dc)
- Increase (inc)
- Decrease (dec)
Abbreviations:
MR = Magic Ring
ch = chain
sl st = slip stitch
sc = single crochet
hdc = half double crochet
dc = double crochet
inc = 2 sc in one stitch
dec = single crochet decrease
Step-by-step stitch instructions:
Round 1: MR, ch1, work 6 sc into the ring. Join with sl st. (6)
Round 2: Ch1, inc in every stitch around. Join. (12)
Round 3: Ch1, (1 sc, inc) repeat around. (18)
Round 4: Ch1, (2 sc, inc) repeat around. (24)
Round 5: Ch1, (3 sc, inc) repeat around. (30)
Continue increasing evenly until the body reaches approximately 7 to 8 inches in diameter.
For a thicker trivet, crochet two identical circles and join them together with single crochet around the edge.
The chicken’s head is worked separately.
Head:
MR, 6 sc.
Round 2: Increase around (12).
Round 3: (1 sc, inc) repeat (18).
Rounds 4–5: sc evenly.
Fasten off leaving a long sewing tail.
Comb:
Join red yarn.
Ch3, 2 dc in second chain, sl st into next stitch.
Repeat three times to form the classic chicken comb.
Beak:
Join yellow yarn.
Ch3.
Work 1 sc back.
Fasten off.
Wattle:
Using red yarn:
Ch4.
Work 3 hdc.
Attach beneath the beak.
Tail Feathers:
Attach white yarn at the back.
Work:
Ch8.
Sl st back.
Repeat with:
Ch10
Ch12
Ch14
This creates layered decorative feathers.
Wing (make two):
MR, 6 sc.
Round 2:
Increase around (12).
Round 3:
(1 sc, inc) repeat.
Fasten off and sew to each side.
Eyes:
Use black yarn or safety embroidery.
Embroider two small French knots or satin stitches for a soft handmade appearance.
Assembling the Chicken Trivet
After all crochet pieces have been completed, the assembly process brings your Crochet chicken-shaped trivet pattern to life. Careful placement of each element creates a balanced and attractive finished project.
Begin by positioning the head near the top center of the circular body. Pinning the pieces temporarily with stitch markers can help you visualize the final arrangement before sewing everything permanently.
Using the yarn needle and matching yarn, securely sew the head onto the body with small invisible stitches. Make sure the connection is firm enough to withstand regular kitchen use.
Next, attach the wings symmetrically on both sides of the body. Position them slightly below the head so they create a natural chicken silhouette without covering too much of the circular trivet.
Sew the tail feathers onto the back of the body, allowing them to fan outward. This simple detail adds movement and gives the project a charming farmhouse appearance that complements country-style kitchens.
Finally, attach the beak, comb, wattle, and embroidered eyes. Double-check that all pieces are securely fastened, weave in every yarn end carefully, and lightly block the finished trivet if necessary to help it lie perfectly flat.
Tips for Personalizing Your Crochet Chicken-Shaped Trivet Pattern
One of the most enjoyable aspects of a Crochet chicken-shaped trivet pattern is how easily it can be customized to suit different decorating styles and personal preferences.
Try using cream, beige, brown, or speckled cotton yarn to create realistic farm-inspired chickens. Soft pastel colors also work beautifully for spring and Easter-themed kitchen décor.
Adding decorative edging around the body with reverse single crochet or crab stitch creates a polished finish while slightly increasing the trivet’s durability and structure.
You can embroider tiny flowers, hearts, or decorative stitches onto the wings to create a more whimsical design. These personalized touches make each trivet completely unique.
For hanging storage, crochet a small chain loop before fastening off. This allows the finished trivet to double as attractive wall décor when not in use.
If you enjoy making coordinated kitchen accessories, create matching potholders, dishcloths, table mats, or towel toppers using the same yarn colors. A complete handmade kitchen set makes a thoughtful and impressive gift.
Remember to use only high-quality cotton yarn for kitchen items that may come into contact with warm cookware. Cotton offers better heat resistance and maintains its shape after repeated washing.
Caring for Your Finished Crochet Chicken-Shaped Trivet
Proper care helps your Crochet chicken-shaped trivet pattern remain beautiful and functional for many years. Fortunately, cotton yarn is easy to maintain with simple cleaning routines.
Wash the trivet gently by hand or use a delicate machine cycle with cool water and mild detergent. Avoid harsh chemicals that may weaken the yarn fibers over time.
After washing, gently squeeze out excess water without twisting the crochet fabric. Twisting may distort the carefully shaped chicken design.
Lay the trivet flat on a clean towel and reshape it while it is still damp. This helps preserve the circular body and decorative details such as the comb, wings, and tail feathers.
Avoid placing the trivet in a high-heat dryer. Air drying is the safest method for maintaining both size and stitch definition.
Store the finished trivet flat or hang it using the optional hanging loop. Keeping it dry between uses helps preserve both its appearance and durability for everyday kitchen use.
FAQ
Is this Crochet chicken-shaped trivet pattern suitable for beginners?
Yes. Crocheters who already know basic stitches such as chain, single crochet, and double crochet can successfully complete this project by following the instructions carefully.
What yarn should I use?
One hundred percent cotton yarn is the best choice because it offers excellent durability and better heat resistance than acrylic yarn.
Can I make the trivet larger?
Absolutely. Continue adding increase rounds to the circular body until you reach your preferred diameter before assembling the decorative pieces.
Can I wash the finished trivet?
Yes. Hand washing or using a delicate machine cycle with cool water is recommended for maintaining its shape and appearance.
Can I use different colors?
Certainly. White chickens are classic, but brown, black, cream, gray, pastel, or multicolored chickens all create beautiful variations.
Does this project make a good gift?
Yes. A handmade Crochet chicken-shaped trivet pattern is a practical and thoughtful gift for housewarmings, birthdays, Mother’s Day, holidays, or anyone who enjoys cooking and handmade home décor.
Conclusion
Creating a Crochet chicken-shaped trivet pattern is a rewarding project that combines creativity with everyday practicality.
Throughout this guide, you learned how to choose the right materials, work the essential crochet stitches, shape each individual part of the chicken, assemble the finished design, personalize it with unique decorative details, and properly care for your handmade trivet. The result is a charming kitchen accessory that protects surfaces while adding warmth and personality to your home.
Whether you make one for yourself or several as thoughtful gifts, this project offers an enjoyable crochet experience and a beautiful finished piece you’ll be proud to display. If you enjoyed this tutorial, please leave your honest opinion in the comments and share your suggestions. Your feedback helps inspire future crochet patterns and encourages other makers to begin their own creative projects.