
Tutorial for a bow made from denim is a wonderful project for anyone who loves sewing, upcycling, and creating stylish handmade accessories.
Working with denim may seem intimidating at first because the fabric is thicker than cotton, but creating a bow requires only small fabric pieces and a few basic sewing techniques.
Another reason this project is so popular is its practicality. Handmade denim bows are inexpensive to produce, making them excellent gifts or products to sell at craft fairs and handmade marketplaces. Since denim is highly durable, the finished accessory can withstand everyday use while maintaining its shape over time. In this guide, you will learn how to select the right materials, prepare the fabric, cut precise pieces, assemble the bow, finish it neatly, and personalize it with beautiful embellishments. By following these instructions carefully, you can create a professional-quality bow using simple sewing techniques and minimal supplies.
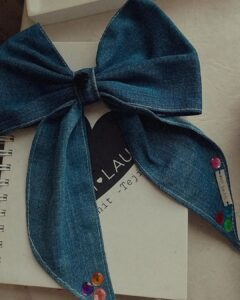
Choosing the Best Materials for a Denim Bow
The first step in any successful Tutorial for a bow made from denim is selecting quality fabric. Old jeans are an excellent choice because the material is sturdy, easy to recycle, and available in different shades of blue, black, gray, or even colored denim. Medium-weight denim is usually easier to fold and sew than very heavy jeans fabric.
Before cutting your fabric, wash and iron the denim thoroughly. Prewashing removes any dirt, excess dye, or shrinkage that could affect the finished project. Ironing creates smooth fabric, making it much easier to measure and cut accurate pieces.
For a standard decorative bow, prepare one denim rectangle measuring approximately 10 x 6 inches (25 x 15 cm). You will also need a smaller strip measuring about 3 x 1 inch (8 x 2.5 cm) to wrap around the center of the bow after assembly.
Gather basic sewing supplies including fabric scissors, matching thread, sewing pins or clips, measuring tape, fabric chalk, and a sewing machine. If you prefer, this project can also be sewn completely by hand using small backstitches for durability.
If you want a fuller bow, consider adding lightweight fusible interfacing to the wrong side of the denim before sewing. This helps the bow maintain its shape while still remaining flexible enough for everyday use.
Decorative embellishments can completely transform the finished accessory. Lace, wooden buttons, pearls, rhinestones, embroidered patches, leather labels, and decorative stitching all pair beautifully with denim and allow you to create a truly personalized design.
Step-by-Step Sewing Instructions
Begin by placing the large denim rectangle with the right sides facing together. Fold it in half lengthwise and pin the edges carefully to prevent shifting while sewing.
Using a seam allowance of approximately ¼ inch (6 mm), sew along the long edge and one short edge, leaving the remaining short edge open. Sew slowly because denim is thicker than lightweight fabrics, especially near folded edges.
Trim the seam allowances slightly to reduce bulk. Carefully turn the fabric tube right side out using a turning tool, chopstick, or blunt knitting needle. Push the corners gently until they become crisp and well defined.
Fold the raw edges of the open end inward by approximately ¼ inch (6 mm). Press the fold with an iron before closing the opening using either a neat topstitch or an invisible hand stitch for a cleaner appearance.
Create the bow shape by folding both ends toward the center so they overlap slightly on the back. Secure them with a few hand stitches or machine stitches placed discreetly in the middle where they will later be hidden by the center band.
Wrap the smaller denim strip tightly around the center of the bow. Pull it firmly enough to create the classic gathered appearance without flattening the bow completely. Stitch the ends together securely on the back, trimming any excess fabric before fastening the final stitches.
Creative Ways to Personalize Your Denim Bow
One of the greatest advantages of following a Tutorial for a bow made from denim is the ability to customize every detail according to your personal taste. Even simple adjustments can completely change the final appearance.
Try combining different shades of denim within the same bow. Light blue, dark indigo, black denim, and distressed fabric create beautiful visual contrast while emphasizing the recycled nature of the project.
Decorative topstitching using contrasting thread can become an attractive design feature. White, golden, red, or even colorful thread highlights the edges beautifully while giving the bow a handmade artisan look.
Adding lace beneath the denim creates a romantic vintage style. Allow the lace to extend slightly beyond the fabric edges for an elegant layered effect that works especially well on hair accessories and gift decorations.
If you enjoy embroidery, personalize the bow with small flowers, initials, hearts, stars, or simple geometric patterns. Hand embroidery adds texture while making every project one of a kind.
Finished denim bows can be attached to hair clips, elastic hair ties, headbands, handbags, backpacks, hats, pillows, tote bags, gift boxes, Christmas decorations, and countless other handmade creations, making this project incredibly versatile.
Finishing Techniques and Professional Sewing Tips
Pressing each seam as you sew is one of the simplest ways to achieve professional results. Well-pressed fabric creates sharper folds, smoother edges, and a more polished finished bow.
When sewing multiple bows, prepare all your fabric pieces before beginning assembly. This production-line approach saves time and ensures consistency between each finished accessory.
If your sewing machine struggles with thicker denim, use a denim needle and slightly increase the stitch length. These small adjustments help the machine sew smoothly through heavier layers without skipped stitches.
Avoid making the center wrap excessively tight. While it should gather the bow attractively, too much tension may distort the loops or create unnecessary bulk at the center.
Store finished bows flat or in shallow containers to help them maintain their shape. If a bow becomes slightly flattened during storage, gently reshape it with your hands and lightly press it with an iron using appropriate heat settings.
Most importantly, enjoy experimenting with different sizes and proportions. Small bows are perfect for children’s accessories, medium bows suit everyday fashion, and oversized denim bows make bold statement pieces for bags, clothing, and home décor.
Frequently Asked Questions
Is this Tutorial for a bow made from denim suitable for beginners?
Yes. This project requires only basic sewing skills and is an excellent introduction to working with denim fabric.
Can I use old jeans?
Absolutely. Recycling old jeans is one of the best ways to create beautiful denim bows while reducing fabric waste.
Do I need a sewing machine?
No. Although a sewing machine speeds up the process, the entire project can be completed by hand using strong, even stitches.
What size should the fabric be?
A rectangle measuring approximately 10 x 6 inches (25 x 15 cm) creates a medium-sized decorative bow, but the dimensions can easily be adjusted to make smaller or larger versions.
Can I wash the finished bow?
Yes. Hand washing is recommended to preserve decorative details and maintain the bow’s shape, especially if delicate embellishments have been added.
What can I attach the bow to?
Denim bows can be attached to hair clips, elastic bands, headbands, tote bags, backpacks, clothing, hats, pillows, gift packages, wreaths, and many other handmade projects.
How do I make the bow stiffer?
Adding lightweight fusible interfacing before sewing provides additional structure while still allowing the bow to remain flexible.
Can I sell bows made from this tutorial?
Yes. Handmade denim bows are popular craft items and make wonderful products for local markets, gift shops, and handmade businesses.
Conclusion
Creating a Tutorial for a bow made from denim is a rewarding sewing project that combines creativity, sustainability, and practical craftsmanship. Throughout this tutorial, you learned how to choose the right denim, prepare the fabric properly, cut accurate pieces, sew the bow step by step, assemble the center wrap, and personalize the finished accessory with decorative details.
You also discovered professional finishing techniques that help every bow look polished and durable. Whether you are making a single bow for personal use or producing several as thoughtful handmade gifts or items to sell, this project offers endless opportunities for creativity while giving new life to recycled denim.
I hope this guide has inspired you to start sewing your own beautiful denim bows. If you enjoyed this tutorial, please leave your honest opinion in the comments and share your suggestions, creative ideas, or favorite ways to customize a denim bow.