
Colorful crochet beanie pattern is one of the most enjoyable and creative projects for crocheters of every skill level. Whether you are making a cozy hat for yourself, creating thoughtful handmade gifts, or adding colorful products to your craft business, this timeless design offers endless opportunities for personalization.
Crocheting a beanie is an excellent project because it works up quickly while helping you practice essential crochet techniques.
Another reason why this project remains so popular is its versatility. A colorful crochet beanie can be customized for babies, children, teenagers, and adults simply by adjusting the number of rounds and stitches. You can use bright rainbow shades, elegant neutral tones, seasonal colors, or leftover yarn from previous projects. Throughout this tutorial, you will learn how to select the best materials, understand the necessary crochet stitches, follow a detailed step-by-step pattern, and finish your beanie beautifully while achieving neat and even results.
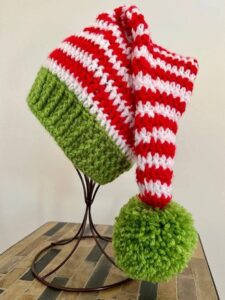
Choosing Materials for a Colorful Crochet Beanie
Selecting quality yarn is the first step toward creating a beautiful beanie. Soft acrylic yarn is one of the most popular choices because it is affordable, lightweight, durable, and available in hundreds of vibrant colors. Cotton yarn creates a breathable hat for spring and autumn, while wool blends provide exceptional warmth during colder months.
Choose a crochet hook that matches the yarn weight recommended on the yarn label. Most medium-weight yarn works well with a 5 mm (H-8) crochet hook, although you may adjust the hook size if your stitches are naturally tight or loose.
Before beginning your project, gather all necessary materials. You will need colorful yarn, a crochet hook, scissors, a yarn needle for weaving in ends, and a stitch marker to keep track of each round.
Planning your color sequence before starting will produce a cleaner and more balanced design. You may alternate two colors every few rounds, create rainbow stripes, or use variegated yarn for a naturally blended appearance.
Always crochet a small gauge swatch before beginning the full project. Checking your gauge helps ensure the finished beanie will fit comfortably without becoming too loose or too tight.
Good lighting and comfortable seating also make a noticeable difference during longer crochet sessions. Working in a relaxed environment helps maintain even stitch tension and reduces hand fatigue.
Step-by-Step Colorful Crochet Beanie Pattern
Begin with a magic ring. Chain 2 (counts as the first stitch if desired), then work 12 double crochet (dc) into the magic ring. Pull the ring closed tightly and join with a slip stitch (sl st) to complete Round 1.
Round 2: Chain 2, then work 2 dc in each stitch around. You should finish with 24 stitches. Join with a slip stitch at the end of the round.
Round 3: Chain 2. Work 1 dc in the first stitch, 2 dc in the next stitch. Repeat this sequence all the way around. You will now have 36 stitches.
Round 4: Chain 2. Crochet 1 dc in each of the next two stitches, then 2 dc in the following stitch. Continue repeating until you reach the end of the round for a total of 48 stitches.
Continue increasing in this pattern by adding one additional single double crochet between increases in each new round until the crown reaches the desired diameter. Once the crown is complete, crochet 1 dc in every stitch without increasing. Continue these rounds until the beanie reaches your preferred height.
To create colorful stripes, simply change yarn colors at the last yarn-over of the final stitch in a round. Pull the new color through, tighten gently, and continue crocheting. This technique creates smooth and nearly invisible color transitions while keeping the stripes crisp and professional.
Adding Texture and Personal Style
One of the easiest ways to make your Colorful crochet beanie pattern unique is by combining different crochet stitches. Alternate rounds of half double crochet (hdc) and double crochet (dc) to create subtle texture while maintaining a soft fabric.
Front post double crochet (FPdc) and back post double crochet (BPdc) can be used to create beautiful ribbing around the brim. This elastic finish helps the beanie fit comfortably while giving it a polished appearance.
If you enjoy decorative textures, consider adding puff stitches, bobble stitches, or cluster stitches in selected rounds. These elements create visual interest without making the pattern overly complicated.
Color placement also plays a significant role in the final design. Bright rainbow shades create playful accessories, while earth tones produce elegant everyday hats suitable for adults.
A folded brim provides extra warmth and gives the beanie a classic winter look. Simply crochet several additional rounds before folding the edge upward after completion.
For an extra decorative touch, attach a faux fur pom-pom or create a handmade crochet pom-pom using leftover yarn colors. Both options complement the vibrant design beautifully.
Finishing, Care, and Helpful Tips
Once the desired height has been reached, fasten off the yarn by cutting it with a small tail. Pull the yarn completely through the final loop and tighten securely to prevent unraveling.
Use a yarn needle to weave all loose ends neatly into the inside of the beanie. Take your time during this step because carefully hidden ends greatly improve the professional appearance of the finished project.
If the beanie appears slightly uneven after completion, lightly block it according to the yarn manufacturer’s recommendations. Blocking helps relax the stitches and creates a smoother overall shape.
Wash handmade crochet beanies gently using cool water and mild detergent. Lay them flat on a towel to dry naturally rather than hanging them, which may stretch the fabric.
As your crochet skills improve, experiment with gradient yarns, self-striping yarns, or textured fibers to create even more distinctive versions of this Colorful crochet beanie pattern.
Most importantly, enjoy the creative process. Every colorful beanie reflects your personal style, and even small variations make each handmade piece truly one of a kind.
Frequently Asked Questions
Is this Colorful crochet beanie pattern suitable for beginners?
Yes. The pattern mainly uses basic stitches such as chain (ch), slip stitch (sl st), double crochet (dc), and simple increases, making it an excellent project for beginners.
How much yarn do I need?
An adult beanie usually requires approximately 200–300 yards of medium-weight yarn, depending on the stitch pattern and desired height.
Can I use more than three colors?
Absolutely. Many crocheters enjoy using four, five, or even rainbow color combinations to create vibrant and unique beanies.
How do I make the beanie larger?
Increase the crown diameter by adding additional increase rounds before crocheting the body of the hat.
Can I sell finished beanies made from this pattern?
Yes. Handmade beanies created from your own work are excellent products for craft fairs, gift shops, and online handmade marketplaces.
Which stitch is best for a warm beanie?
Half double crochet and double crochet are among the best choices because they provide warmth while maintaining flexibility and softness.
How do I keep color changes neat?
Always switch colors during the last yarn-over of the final stitch before the new round begins. This creates cleaner transitions between stripes.
Can children wear this beanie?
Yes. Simply reduce the crown size and total number of rounds to create a child-sized version while following the same construction method.
Conclusion
Creating a Colorful crochet beanie pattern is a rewarding project that combines creativity, practical crochet skills, and endless opportunities for customization.
Throughout this guide, you learned how to select suitable materials, understand the essential crochet stitches, increase the crown correctly, crochet the body of the beanie, add decorative textures, create clean color transitions, and finish the project professionally.
By practicing these techniques, you can confidently make colorful beanies for family, friends, gifts, or even to sell at craft markets. Every finished hat becomes a unique handmade accessory that reflects your creativity and growing crochet experience. I hope this tutorial inspires you to create your own colorful designs. If you enjoyed this guide, please leave your honest opinion in the comments and share your suggestions, ideas, or favorite color combinations for future crochet projects.