
Crochet chicken hat pattern is a fun and creative project that combines adorable farm-inspired charm with practical crochet techniques.
Crocheting character hats has become increasingly popular because they allow makers to personalize every detail. Unlike ordinary hats, a chicken-themed design lets you experiment with vibrant colors, textured stitches, and decorative elements that truly stand out.
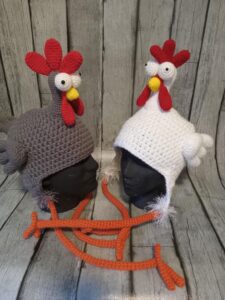
One of the best aspects of this Crochet chicken hat pattern is its flexibility. You can create a realistic farm chicken with classic white feathers and a bright red comb, or you can design a whimsical version using colorful yarns for children who love playful accessories. Handmade crochet hats also make thoughtful gifts for birthdays, baby showers, Easter celebrations, costume parties, photography sessions, or simply as a fun winter accessory. By following the step-by-step crochet instructions below, you will be able to create a beautiful hat that combines comfort, durability, and personality.
Choose the Right Materials and Prepare Your Project
Selecting quality yarn is the first step toward making a beautiful Crochet chicken hat pattern. Soft acrylic yarn is an excellent option because it is affordable, easy to wash, and comfortable against the skin. Cotton yarn also works well, especially in warmer climates where breathability is important.
Choose a crochet hook that matches your yarn weight. For worsted-weight yarn, a 5 mm (H-8) crochet hook is commonly recommended. Always crochet a small gauge swatch before beginning the full project to ensure the hat will fit properly.
The main colors for this project include white for the body of the hat, red for the comb and wattles, yellow or orange for the beak, and black yarn or safety eyes if you are making a decorative version. Remember that hats intended for babies should use embroidered facial details instead of plastic safety eyes.
Gather a yarn needle, scissors, stitch markers, and a measuring tape before starting. Having every tool ready helps you crochet smoothly without interruptions.
Take accurate head measurements before beginning. Baby, toddler, child, teen, and adult sizes all require different crown diameters and final heights. Measuring first prevents unnecessary adjustments later.
Finally, read through the entire pattern before making the first stitch. Understanding the complete construction will make the project easier and help you anticipate each step.
Crochet the Hat Base Step by Step
Start with a magic ring.
Round 1: Ch 2, work 10 hdc into the magic ring. Join with a slip stitch. (10)
Round 2: Ch 2, work 2 hdc in each stitch around. Join. (20)
Round 3: Ch 2, 1 hdc, 2 hdc in next stitch. Repeat around. Join. (30)
Round 4: Ch 2, 2 hdc, 2 hdc in next stitch. Repeat around. Join. (40)
Continue increasing evenly until the crown reaches the required diameter for your desired size. Maintaining a flat circle is essential for achieving a comfortable fit.
Once the crown diameter is correct, stop increasing. Work one hdc in each stitch around until the hat reaches the desired height. Try the hat on occasionally or compare it with standard sizing charts to ensure the perfect fit.
Finish the body with one or two rounds of single crochet for a firm edge. Fasten off and weave in the loose ends carefully so the inside of the hat remains comfortable.
Crochet the Chicken Features
The bright red comb is one of the most recognizable parts of the Crochet chicken hat pattern. Attach red yarn at the center top of the hat and crochet small scallops using sc, hdc, dc, hdc, sc across several stitches. Repeat this sequence three to five times depending on the size of the hat.
For the beak, use yellow yarn. Chain 7.
Row 1: Sc in the second chain from hook and across.
Row 2: Ch 1, sc2tog, sc across until the last two stitches, sc2tog.
Repeat until a small triangle is formed. Fasten off, fold slightly if desired, and sew securely to the front center of the hat.
Create two wattles beneath the beak using red yarn. Make a magic ring and crochet six single crochet into the ring. Fasten off, leaving a long tail for sewing.
The wings are made separately. Begin with a magic ring and crochet six single crochet into the ring. Increase gradually for two additional rounds before shaping the tip with short rows. Make two identical wings and attach them symmetrically to each side of the hat.
For the eyes, embroider two small black ovals using simple satin stitches. Embroidered eyes create a safer and more durable finish, especially for hats designed for babies and toddlers.
After attaching every decorative piece, inspect all seams carefully. Reinforce each attachment with additional stitches if needed, ensuring the hat can withstand regular use and washing.
Finishing Touches, Customization, and Care Tips
Blocking is optional but can significantly improve the final appearance of your Crochet chicken hat pattern. Lightly dampen the finished hat and shape it carefully before allowing it to dry naturally.
Personalize the design with colorful flowers, miniature bows, decorative buttons, or embroidered feathers. These additions make every hat unique without changing the overall construction.
Experiment with different yarn textures to create interesting visual effects. Fluffy yarn can imitate feathers beautifully, while smooth cotton creates a cleaner, more modern appearance.
This project is an excellent opportunity to use leftover yarn from previous crochet projects. Small amounts of red, yellow, orange, black, and white yarn are often enough to complete all decorative elements.
Wash the finished hat gently by hand or use a delicate machine cycle if the yarn label permits. Lay it flat to dry so it maintains its shape for years of use.
Whether you create one for yourself or as a thoughtful handmade gift, this charming chicken hat is certain to become a favorite accessory. Its playful design showcases creativity while helping you improve shaping, sewing, and finishing techniques that will benefit many future crochet projects.
FAQ
Is this Crochet chicken hat pattern suitable for beginners?
Yes. The basic hat uses simple stitches like single crochet and half double crochet, while the decorative pieces introduce easy shaping techniques that help beginners build confidence.
What yarn works best?
Soft worsted-weight acrylic yarn is the most popular choice because it is durable, affordable, warm, and available in many colors. Cotton yarn is another excellent option for lightweight hats.
How long does it take to finish?
Most crocheters complete the project within one to three days, depending on their experience and the amount of time available for crocheting.
Can I adjust the size?
Absolutely. Increase or decrease the crown diameter and hat height to create baby, child, teen, or adult sizes while keeping the decorative elements proportional.
Can I sell hats made from this pattern?
Yes. Handmade hats created from your own work are generally suitable for selling at craft fairs or online marketplaces. Be sure your finished products are well constructed and accurately described.
How do I make the hat more comfortable?
Choose soft yarn, avoid bulky interior knots, weave in all loose ends carefully, and ensure that decorative pieces are securely attached without creating pressure points inside the hat.
What occasions are perfect for wearing this hat?
This cheerful hat is ideal for Easter celebrations, farm-themed parties, costume events, photography sessions, holiday gifts, school activities, or simply adding a fun touch to cold-weather outfits.
Conclusion
Creating this Crochet chicken hat pattern is a rewarding project that combines practical crochet skills with playful creativity. Throughout this guide, you learned how to select the right materials, crochet the hat base using clear stitch instructions, shape the adorable chicken features, securely assemble every piece, and finish the project with professional details. Along the way, you also discovered useful customization ideas and care tips that help your handmade hat remain beautiful for years.
Every completed project strengthens your crochet skills while giving you the satisfaction of creating something truly unique by hand. With practice, you can easily personalize this design using different colors, textures, and embellishments to make every hat one of a kind.
I hope this tutorial has inspired you to start your own Crochet chicken hat pattern today. If you enjoyed this guide, please leave your honest opinion in the comments and share your suggestions. Your feedback helps improve future tutorials and inspires even more creative crochet projects for everyone.