
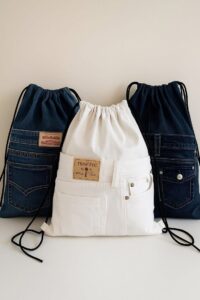
Denim Drawstring Bag Tutorial is the perfect guide for anyone who wants to transform old denim into a practical, stylish, and durable handmade accessory.
One of the greatest benefits of making a denim drawstring bag is the opportunity to recycle old jeans that might otherwise be discarded.
A finished drawstring bag can be used to organize craft supplies, carry small personal items, store cosmetics, hold travel accessories, or even serve as a reusable gift bag. The simple construction makes it suitable for beginners, while the endless customization options allow experienced sewists to add creative details such as decorative stitching, embroidery, appliqués, or colorful lining fabrics. By following this tutorial carefully, you will create a functional project that combines sustainability with timeless style.
Materials and Preparing the Denim Fabric
Before beginning your Denim Drawstring Bag Tutorial, gather all the necessary materials. You will need one piece of recycled denim, matching sewing thread, fabric scissors, pins or sewing clips, a ruler, fabric chalk, a sewing machine, an iron, and approximately 1.5 meters of cotton cord or braided rope for the drawstring closure.
Wash and dry the denim before cutting the fabric. Prewashing removes any remaining shrinkage and softens the material, making it easier to sew. Iron the denim carefully so every piece can be measured and cut accurately.
For this project, cut two rectangles measuring 14 x 16 inches (36 x 41 cm) for the outer bag. Cut two lining pieces using the same measurements if you want a fully lined bag. Also prepare two strips measuring 2 x 16 inches (5 x 41 cm) to create the drawstring casing at the top of the bag.
If you are working with recycled jeans, inspect the fabric carefully before cutting. Avoid areas that are excessively worn, damaged, or stretched. Flat sections from the pant legs usually provide the largest usable pieces and create a clean, professional appearance.
Press every fabric piece after cutting. Accurate pressing improves alignment during sewing and helps achieve straight seams. Small preparation steps like this often make a significant difference in the quality of the finished bag.
Finally, organize all the fabric pieces and sewing tools before assembling the project. Having everything within reach allows you to work more efficiently and reduces the chance of making mistakes while sewing.
Step-by-Step Sewing Instructions
Place the two denim rectangles with the right sides facing together. If you are adding a lining, prepare the lining pieces separately using the same construction method. Pin or clip all edges carefully to prevent shifting during sewing.
Using a ½-inch (1.3 cm) seam allowance, sew both side seams and the bottom seam of the denim bag. Leave the top edge completely open because this section will later receive the drawstring casing.
To create a flat-bottom bag, pinch each lower corner so the side seam aligns with the bottom seam. Measure approximately 2 inches (5 cm) from the point and sew a straight line across each corner. Trim the excess fabric, leaving a small seam allowance. This simple technique gives the bag additional depth and allows it to stand more easily.
Repeat the same construction steps with the lining if you choose to include one. Leave a small opening of about 4 inches (10 cm) in the bottom seam of the lining. This opening will be used later to turn the bag right side out.
Fold each casing strip in half lengthwise with the wrong sides together and press. Open the strip, fold both long edges toward the center crease, press again, then fold once more to create a neat finished band. Stitch along the open edge to secure each casing strip before attaching it to the top of the bag.
Position one casing strip on the front upper edge and the second strip on the back upper edge, leaving small openings at both ends for the drawstring cord to pass through. Sew each casing securely, then place the lining inside the outer bag with the right sides facing together. Stitch around the top edge, turn the bag through the opening in the lining, close the opening with a neat seam, push the lining inside the bag, and topstitch around the upper edge. Finally, thread the cotton cord through both casings using a safety pin, knot the ends securely, and your beautiful denim drawstring bag is ready to use.
Creative Ideas to Personalize Your Denim Drawstring Bag
One of the best parts of following this Denim Drawstring Bag Tutorial is the opportunity to personalize every detail of your project. Since denim is such a versatile fabric, you can easily create a bag that matches your personality and everyday needs.
Decorative topstitching is one of the simplest ways to enhance the appearance of your bag. Use contrasting thread in gold, white, or another complementary color to highlight the seams and give your project a classic denim look.
If you are recycling old jeans, consider incorporating existing pockets into the design. Sewing a pocket onto the outside of the bag creates extra storage for keys, phones, notebooks, or other small accessories while adding authentic denim character.
Embroidery is another beautiful option for customization. Floral motifs, geometric patterns, initials, or inspirational words can transform a simple bag into a unique handmade accessory. Even basic embroidery stitches can create an elegant result.
Fabric appliqués are also an excellent choice. Hearts, stars, flowers, butterflies, or patchwork details made from colorful cotton fabrics add personality and create a cheerful design that appeals to both children and adults.
You can also experiment with different drawstring materials. Braided cotton cord, leather laces, colorful rope, or handmade fabric ties each create a different style while maintaining the same practical closure system. These small details make every denim drawstring bag truly one of a kind.
Care Tips and Practical Uses for Your Handmade Bag
Taking proper care of your finished bag will help preserve its appearance and durability for years. Denim is naturally strong, but gentle maintenance helps prevent fading and unnecessary wear.
Wash the bag inside out using cool or lukewarm water with a mild detergent. Avoid bleach or harsh cleaning products because they may weaken the fibers or alter the denim color over time.
Allow the bag to air dry whenever possible. Excessive heat from dryers may cause slight shrinkage and reduce the lifespan of both the denim and the drawstring cord. A natural drying process also helps maintain the bag’s original shape.
If wrinkles appear after washing, iron the bag using the appropriate temperature for denim. Pressing the seams carefully restores the professional appearance and keeps the bag looking neat after every use.
This Denim Drawstring Bag Tutorial can easily be adapted into many different sizes. A smaller version works perfectly as a cosmetic pouch, jewelry organizer, or gift bag, while a larger version is ideal for carrying books, knitting supplies, shoes, travel accessories, or children’s toys.
As you gain more confidence, you can combine denim with cotton prints, canvas, linen, or patchwork fabrics to create entirely new designs. Every completed project teaches valuable sewing skills while encouraging creativity and sustainable crafting.
Frequently Asked Questions (FAQ)
1. Is this Denim Drawstring Bag Tutorial suitable for beginners?
Yes. The construction is simple and uses straight seams, making it an excellent beginner sewing project while still producing a professional-looking result.
2. What type of denim works best?
Medium-weight denim from old jeans is usually the best choice because it is durable, already softened through use, and easy to sew with a standard home sewing machine.
3. Can I make the bag without a lining?
Absolutely. A lined bag offers a cleaner interior and additional strength, but an unlined version is faster to sew and works very well for everyday use.
4. What can I use instead of cotton cord?
You may use braided rope, satin ribbon, paracord, leather lace, fabric ties, or any durable cord that slides smoothly through the casing.
5. How do I adjust the size of the bag?
Simply increase or decrease the size of the rectangular fabric pieces while maintaining the same construction method. Larger rectangles create larger bags, while smaller rectangles create compact pouches.
6. Can I sell bags made from this tutorial?
Yes. Handmade denim drawstring bags are popular at craft fairs, online handmade shops, and gift markets. Personalizing each bag with unique fabrics or decorative details helps create products that stand out.
Conclusion
This Denim Drawstring Bag Tutorial has shown how easy it is to transform recycled denim into a beautiful, durable, and practical handmade bag. You learned how to prepare the fabric, choose the right materials, cut accurate pieces, sew the body of the bag, create a flat bottom, install the drawstring casing, and finish the project with professional-looking details. Along the way, you also discovered creative customization ideas and practical care techniques that will help your bag remain attractive and functional for years.
Making your own denim drawstring bag is not only a rewarding sewing experience but also a sustainable way to reuse old jeans and reduce fabric waste. Every project offers the chance to improve your sewing skills while creating something useful for everyday life, thoughtful gifts, or even products to sell.
Thank you for reading this Denim Drawstring Bag Tutorial. I hope this guide has inspired you to start your next sewing project with confidence. If you enjoyed this tutorial, please leave your honest opinion and share your suggestions. Your feedback is always appreciated and helps inspire even more creative sewing tutorials in the future.