
Crocheted Slipper Tutorial is one of the most enjoyable and rewarding projects for anyone who loves creating handmade items.
Creating your own crocheted slippers is not only a relaxing hobby but also an excellent way to practice crochet techniques while producing something practical.
Another great advantage of this Crocheted Slipper Tutorial is that it requires only a few basic supplies and stitches. Once you understand the structure of the sole, sides, and upper section, you can easily modify the pattern to create different styles. You may choose a classic slipper, an ankle slipper, or even decorate it with flowers, bows, buttons, or textured stitches. With patience and creativity, this project quickly becomes one of your favorite handmade creations.
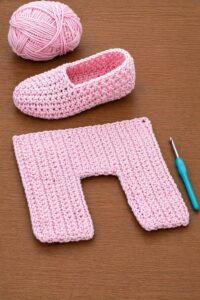
Materials and Basic Crochet Stitches
Before starting your Crocheted Slipper Tutorial, gather all the necessary materials. You will need medium-weight yarn, an appropriate crochet hook, scissors, a tapestry needle for weaving in ends, and stitch markers if desired. Choosing a soft and durable yarn will help your slippers remain comfortable after repeated use.
For this project, a 5.0 mm crochet hook works well with medium-weight yarn. If you prefer thicker slippers, simply use bulky yarn with a larger hook. Always crochet a small sample first to check your gauge before beginning the full project.
The basic stitches used in this pattern are chain stitch (ch), slip stitch (sl st), single crochet (sc), half double crochet (hdc), and double crochet (dc). These simple stitches create a flexible yet durable fabric that is perfect for slippers.
Understanding stitch tension is very important. Tight stitches create firm slippers that keep their shape, while looser stitches produce softer slippers. Try to maintain consistent tension throughout the entire project for the best appearance.
If you are completely new to crochet, practice each stitch several times before beginning the slipper. This small investment of time makes the entire pattern much easier to follow and greatly improves the final result.
Finally, remember that handmade projects do not need to be perfect. Small variations make every pair unique and showcase the charm of handcrafted crochet.
Step-by-Step Crocheted Slipper Pattern
Begin by making a foundation chain of 21 chains for an average adult size. You can increase or decrease the number of chains depending on the desired slipper size. The foundation chain determines the overall length of the sole.
Round 1: Starting in the second chain from the hook, work 1 single crochet (sc) in each chain across. In the final chain, make 3 single crochets to turn the corner. Continue working on the opposite side of the foundation chain with 1 sc in each stitch, ending with 2 sc in the last stitch. Join with a slip stitch.
Round 2: Chain 1. Work 2 sc in each curved corner stitch while making 1 sc in every other stitch around the sole. Join with a slip stitch. This round gently widens the sole to fit the foot comfortably.
Round 3: Chain 1. Continue with 1 sc in each stitch around without increasing. This creates a firm foundation before building the slipper sides. Join with a slip stitch to finish the round.
To form the sides, chain 1 and crochet 1 half double crochet (hdc) in every stitch around for 4 complete rounds. These rounds begin shaping the slipper and provide enough height to comfortably cover the sides of the foot.
Next, identify the front third of the slipper. This section will become the toe area. Crochet back and forth only across these front stitches using half double crochet (hdc) rows. Continue decreasing one stitch at each end of every row until the opening comfortably fits the foot. Fasten off, weave in all loose ends with a tapestry needle, and lightly block the slippers if desired. Your basic crocheted slippers are now complete and ready for customization.
Tips for the Perfect Fit and Creative Customization
One of the biggest advantages of following this Crocheted Slipper Tutorial is that the pattern can easily be adjusted for different foot sizes. If you need a larger slipper, simply add a few extra foundation chains before beginning the sole. For a smaller size, reduce the number of chains while keeping the same construction method.
Measuring the foot before starting is always recommended. Compare the foundation chain with the foot length and remember that crochet fabric naturally stretches a little after use. A snug fit usually becomes the most comfortable after a short period of wear.
To create a warmer pair of slippers, crochet an additional round of single crochet (sc) around the opening after completing the slipper. This simple border improves durability while giving the project a polished appearance.
You can also personalize your slippers with decorative details. Crochet small flowers, hearts, bows, or simple appliqués and sew them securely onto the finished slippers. These embellishments make wonderful gifts for birthdays, holidays, or special occasions.
Changing yarn colors is another easy way to customize your slippers. Use a single solid color for a timeless design, or alternate colors every few rounds to create cheerful stripes. Variegated yarn also produces beautiful results with very little effort.
For extra comfort, consider sewing a soft felt or suede sole underneath the crochet sole. This addition provides better grip, increases durability, and makes the slippers more suitable for indoor use on smooth floors.
Caring for Your Handmade Slippers and Exploring New Designs
Proper care helps your handmade slippers stay beautiful for a long time. Wash them gently by hand using cool water and a mild detergent. Avoid twisting or wringing the fabric because this may stretch the stitches and alter the slipper’s shape.
After washing, gently squeeze out excess water using a clean towel. Lay the slippers flat on a dry towel and reshape them before allowing them to air dry naturally. Avoid direct sunlight or high heat, which can weaken some yarn fibers.
As you gain confidence with this Crocheted Slipper Tutorial, experiment with different stitch combinations. Puff stitches, bobble stitches, and front post stitches can add beautiful texture while keeping the slippers warm and cozy.
Another popular variation is creating ankle slippers by simply adding several extra rounds after finishing the sides. These taller slippers provide additional warmth during colder seasons and are especially comfortable around the house.
You may also create matching accessories such as crochet headbands, blankets, or fingerless gloves using the same yarn colors. Coordinated handmade sets are thoughtful gifts and are always appreciated because they combine beauty with practicality.
The more pairs you crochet, the more comfortable you will become adjusting sizes, experimenting with colors, and creating your own unique versions. Every finished project helps improve your crochet skills while allowing your creativity to grow.
Frequently Asked Questions (FAQ)
1. Is this Crocheted Slipper Tutorial suitable for beginners?
Yes. The pattern uses basic crochet stitches such as chain, single crochet, half double crochet, and slip stitch, making it an excellent project for beginners who already know the fundamentals.
2. What is the best yarn for crocheted slippers?
Medium-weight acrylic yarn, cotton blends, or wool blends are all excellent choices. Soft yarns provide comfort, while durable fibers help the slippers last longer.
3. How can I make the slippers non-slip?
You can sew suede or felt soles onto the bottom, apply non-slip fabric paint, or use specialized rubber sole products designed for handmade footwear.
4. Can I adjust this pattern for children’s sizes?
Absolutely. Simply reduce the foundation chain and the number of rounds while following the same construction process described in this tutorial.
5. How long does it take to finish one pair?
For most crocheters, a pair can be completed in approximately three to six hours, depending on experience, yarn thickness, and the amount of decorative work added.
6. Can I sell slippers made from this tutorial?
Yes. Handmade slippers created from your own work can be sold at local craft fairs, online marketplaces, or gifted to family and friends. Many crocheters also customize colors and decorations to create unique products for customers.
Conclusion
This Crocheted Slipper Tutorial has demonstrated that creating comfortable, stylish, and durable crochet slippers is easier than many people imagine. You learned how to gather the right materials, practice the essential crochet stitches, build the sole, shape the sides, form the toe section, and personalize the finished slippers with creative details. You also discovered practical care tips that will help your handmade slippers remain beautiful for years.
Whether you are making your very first pair or expanding your crochet collection with new designs, each project is an opportunity to improve your skills and express your creativity. Handmade slippers combine comfort, functionality, and personal style, making them perfect for everyday use or thoughtful handmade gifts.
Thank you for reading this Crocheted Slipper Tutorial. I hope this guide has inspired you to pick up your crochet hook and create something beautiful. If you enjoyed this tutorial, please leave your honest opinion in the comments and share your suggestions. Your feedback helps improve future tutorials and inspires even more creative crochet projects for everyone.