
Crochet cat bag pattern with zipper is a fun and practical project that combines creativity, functionality, and adorable design into a single handmade accessory.
One of the reasons why the Crochet cat bag pattern with zipper has become so popular is its versatility. You can customize the colors, facial features, strap length, and decorative details to match your own personality.
In this complete tutorial, you will learn the step-by-step process to create a beautiful Crochet cat bag pattern with zipper, including the recommended crochet stitches, assembly process, shaping techniques, zipper installation, and finishing details. By carefully following each section, you’ll be able to produce a durable and attractive handmade accessory that is perfect for daily use or as a thoughtful handmade gift.
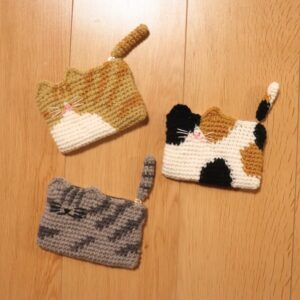
Materials and Crochet Foundation for the Cat Bag
Before starting the Crochet cat bag pattern with zipper, gather all the necessary materials. Medium-weight cotton yarn is an excellent choice because it offers durability, beautiful stitch definition, and enough structure for a bag. You will also need the appropriate crochet hook, a zipper, stitch markers, scissors, tapestry needle, and optional lining fabric.
Choose colors that complement your design. Beige, cream, gray, black, brown, white, or orange work beautifully for realistic cats, while pastel or vibrant shades create playful modern versions. Small amounts of contrasting yarn will be useful for embroidering facial details.
The project begins with the base of the bag. Start with a foundation chain that matches the desired width of your finished purse. The size can easily be adjusted depending on whether you want a small crossbody bag or a larger everyday shoulder bag.
Crochet Stitch Foundation
Foundation Chain: Ch 36
Row 1: Sc in second ch from hook and in each ch across (35 sc)
Row 2-20: Ch 1, turn, sc across (35 sc)
Repeat to make two identical rectangular panels.
These two panels will become the front and back of the bag. Keeping both panels identical ensures symmetry once the bag is assembled.
If you prefer a sturdier structure, work all stitches through the back loops only for a subtle textured appearance. This technique creates clean horizontal ridges while maintaining flexibility.
Shaping the Cat Design and Assembling the Bag
Once both panels are complete, begin shaping the cat ears. Fold each upper corner slightly inward and crochet triangular ears separately before attaching them securely to the top corners.
Cat Ear Pattern
Magic Ring
Round 1: 4 sc in MR
Round 2: Inc in each st (8)
Round 3: (Sc, Inc) repeat around (12)
Round 4: Sc around
Fasten off leaving a long tail for sewing.
Make two ears and sew them evenly onto the top edge of the front panel.
For the facial features, embroider the eyes, nose, whiskers, and mouth using contrasting yarn. Safety eyes may also be used if the bag is intended for older children or adults.
Join the front and back panels using single crochet stitches around the sides and bottom, leaving the upper edge completely open for zipper installation.
Assembly Round
Join yarn at one corner.
Sc evenly around both panels.
Work 3 sc in each bottom corner.
Do not crochet across the top opening.
Fasten off.
This method creates a strong decorative seam that also reinforces the structure of the bag.
Before continuing, weave in all loose yarn ends carefully to ensure the inside of the bag remains neat and comfortable during everyday use.
Installing the Zipper and Creating the Shoulder Strap
The zipper is one of the most important features of the Crochet cat bag pattern with zipper because it keeps personal items secure while adding a professional appearance.
Measure the opening carefully before selecting the zipper. It should fit the width of the bag without stretching the crochet fabric.
Using a tapestry needle and matching sewing thread, sew the zipper by hand directly onto the inner edge of the crochet stitches. Small even stitches provide the cleanest finish.
For additional stability, many crocheters choose to add a simple cotton fabric lining before attaching the zipper. Although optional, this lining improves durability and prevents smaller objects from slipping through crochet stitches.
Next, crochet the shoulder strap.
Shoulder Strap Pattern
Foundation: Ch 121
Row 1: Sc in second ch from hook and across.
Rows 2-5: Ch 1, turn, sc across.
Fasten off.
Fold the strap lengthwise if extra thickness is desired and sew both long edges together before attaching each end securely to the sides of the bag.
Reinforce the attachment points with multiple rows of stitching. Since these areas support the weight of the bag, strong seams will greatly improve long-term durability.
Finally, open and close the zipper several times to confirm it moves smoothly without catching on the crochet stitches.
Finishing Details, Customization Ideas, and Care Instructions
One of the best aspects of the Crochet cat bag pattern with zipper is how easy it is to personalize. Every maker can create a unique version simply by changing colors, facial expressions, or decorative accessories.
Small crochet flowers, bows, tiny collars, miniature hearts, or embroidered paw prints can all enhance the finished design without making the project overly complicated.
For a realistic appearance, lightly shade the ears or cheeks using embroidery techniques with slightly darker yarn. This simple detail creates additional depth and character.
If you enjoy experimenting with textures, combine smooth cotton yarn with fluffy chenille yarn for certain facial features, creating an even more expressive cat face.
To keep the bag looking beautiful, wash it gently by hand using mild soap and cool water. Avoid twisting the fabric aggressively, and reshape the bag while it dries naturally on a flat surface.
Store the finished bag in a dry place away from direct sunlight. Proper care helps preserve the yarn colors, zipper quality, and overall shape for many years of enjoyable use.
A handmade crochet bag is not only a useful accessory but also a wonderful reflection of your creativity. Every stitch represents time, patience, and craftsmanship, making the finished project especially meaningful whether you keep it for yourself or give it as a thoughtful handmade gift.
Frequently Asked Questions
Is the Crochet cat bag pattern with zipper suitable for beginners?
Yes. Beginners with basic knowledge of chain stitches, single crochet, increasing, and simple sewing can successfully complete this project by working carefully through each step.
What yarn works best?
Medium-weight cotton yarn is highly recommended because it offers excellent stitch definition, durability, and structure.
Can I make the bag larger?
Absolutely. Simply increase the length of the starting chain and continue adding additional rows until reaching the desired dimensions.
Do I need to add a fabric lining?
No, but it is recommended if you plan to carry small objects such as keys, coins, or cosmetics.
Can I use a magnetic clasp instead of a zipper?
Yes. While the zipper provides better security, magnetic snaps or buttons are also suitable alternatives.
How long does the project usually take?
Most crocheters complete the project over a weekend, although experienced makers may finish it in a single day.
Can I sell bags made from this pattern?
Many crocheters sell handmade finished products created from their own craftsmanship. Always ensure your finished work is original and professionally made.
How can I make the bag sturdier?
Using cotton yarn, adding interfacing to the lining, reinforcing the strap attachments, and sewing the zipper securely all contribute to a stronger finished bag.
Conclusion
Creating your own Crochet cat bag pattern with zipper is a rewarding crochet project that combines adorable design with everyday practicality. Throughout this tutorial, you learned how to prepare the materials, crochet the front and back panels, shape the cat ears, embroider the facial features, assemble the bag, install the zipper, create a durable shoulder strap, and add beautiful finishing touches. These techniques not only help you complete this project successfully but also strengthen your overall crochet skills for future handmade accessories.
The finished bag is both charming and functional, making it an excellent gift or a unique accessory for daily use. Because every detail can be customized, no two bags will ever look exactly alike, allowing your creativity to shine through every stitch.
If you enjoyed this tutorial, please leave your sincere opinion and share your suggestions in the comments. Your feedback inspires new crochet ideas, helps improve future patterns, and encourages other makers to continue exploring the wonderful world of handmade crochet. Happy crocheting!