
Crochet Amigurumi fish pattern is a wonderful crochet project that combines creativity, simple shaping techniques, and colorful yarn to create an adorable handmade sea creature.
Amigurumi has become one of the most popular crochet techniques because it transforms basic stitches into beautiful handmade characters.
This tutorial explains every step needed to complete your own Crochet Amigurumi fish pattern, from selecting the right materials to crocheting the body, stuffing the fish correctly, shaping the fins, assembling each piece, and adding the finishing details. The instructions are written using easy-to-follow crochet terminology that helps beginners gain confidence while providing experienced crocheters with ideas for customization. By the end of this guide, you will have a beautiful handmade amigurumi fish that can be displayed, gifted, or enjoyed for years.
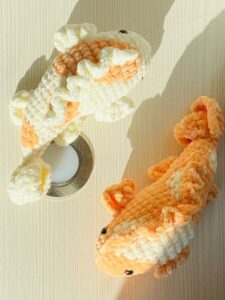
Choosing Materials and Starting the Fish
Selecting quality yarn is the first step toward creating a beautiful Crochet Amigurumi fish pattern. Cotton yarn produces excellent stitch definition and a firm finish, while acrylic yarn creates a softer and more cuddly toy. Choose vibrant shades such as orange, yellow, turquoise, blue, pink, purple, or green to give your fish a lively underwater appearance.
Use a crochet hook slightly smaller than the yarn label recommends. This creates tighter stitches that prevent the stuffing from showing through the fabric. A 2.5 mm to 3.5 mm hook is commonly used for lightweight yarn, while a 3.5 mm to 4 mm hook works well with worsted-weight yarn.
Gather your supplies before starting. You will need polyester fiberfill stuffing, stitch markers, scissors, a yarn needle, embroidery thread, and safety eyes if the fish is intended for decorative purposes. For children’s toys, embroidered eyes are always the safest choice.
Begin with a magic ring.
Round 1: Crochet 6 single crochet (sc) into the magic ring. (6)
Round 2: Work 2 sc in each stitch around. (12)
Round 3: 1 sc, increase. Repeat around. (18)
Round 4: 2 sc, increase. Repeat around. (24)
Round 5: 3 sc, increase. Repeat around. (30)
Continue increasing until the fish reaches the desired width. Keep your stitch tension even throughout the project to create a smooth and symmetrical body. A stitch marker placed at the beginning of each round helps maintain accuracy when crocheting in continuous spirals.
Crocheting the Body and Creating the Fish Shape
Once the body has reached the correct width, crochet one single crochet into every stitch around for six to eight rounds. These straight rounds build the length of the fish while maintaining its rounded shape. Avoid overstuffing during this stage because additional stuffing will be added later.
Begin shaping the fish by working gradual decreases. Crochet 3 sc, invisible decrease around the round. Continue reducing the stitch count evenly in each following round. Invisible decreases produce a cleaner appearance than traditional decreases and help maintain a smooth surface.
As the opening becomes smaller, begin filling the body with polyester fiberfill. Add the stuffing gradually instead of all at once. This allows you to distribute it evenly and prevents lumps from forming inside the finished fish.
When only a small opening remains, flatten the body slightly and crochet through both layers using single crochet stitches. This creates a strong foundation for attaching the tail while securely closing the stuffed body.
To crochet the tail, attach yarn to one side of the flattened body and chain 10. Starting in the second chain from the hook, work one single crochet, one half double crochet, three double crochet, one half double crochet, and one single crochet. Repeat the same sequence on the opposite side to create two symmetrical tail fins.
Your fish now has its recognizable shape. Before continuing, check that the stuffing is evenly distributed and gently shape the body with your hands. A balanced body makes the finished Crochet Amigurumi fish pattern look much more polished and professional.
Crocheting the Fins and Adding Charming Details
Now it is time to give your Crochet Amigurumi fish pattern its unique personality by adding the remaining fins and decorative details. Although the body forms the foundation of the project, the small finishing pieces transform it into an expressive and lifelike amigurumi fish.
To make each side fin, begin with a chain of 6 stitches.
Row 1: Starting in the second chain from the hook, work 1 single crochet (sc), 1 half double crochet (hdc), 2 double crochet (dc), 1 hdc, and fasten off. Make two identical fins and sew one onto each side of the fish body using matching yarn.
For the top fin, chain 8 stitches.
Row 1: Starting in the second chain from the hook, work 1 sc, 1 hdc, 3 dc, 1 hdc, and 1 sc. Sew the fin along the top center of the fish, positioning it evenly between the head and tail for a balanced appearance.
If you would like to add texture, embroider scales using a tapestry needle and a slightly darker shade of yarn. Small overlapping semicircles stitched across the body create a realistic scale effect while keeping the fish soft and flexible.
The face brings your fish to life. Embroider a small smiling mouth using black embroidery floss and add tiny blush details with pink yarn if desired. If the fish is intended for decorative use only, safety eyes may be attached before stuffing the body. For children’s toys, embroidered eyes remain the safest and most durable option.
Finally, inspect every seam carefully. Reinforce the fins and tail with a few additional stitches if necessary, weave in all loose yarn ends securely, and gently shape the fish with your hands. These finishing touches give your Crochet Amigurumi fish pattern a polished, professional appearance.
Finishing Tips, Care Instructions, and Creative Ideas
Once your Crochet Amigurumi fish pattern is complete, spend a few moments adjusting the stuffing to ensure the body has a smooth, rounded shape. Evenly distributed stuffing helps the fish maintain its form and improves the overall appearance of the finished project.
This crochet fish can be used in many creative ways. It makes a wonderful keychain, nursery decoration, baby mobile, backpack charm, holiday ornament, educational toy, or ocean-themed garland. Several colorful fish displayed together create a beautiful underwater decoration for children’s rooms.
You can easily customize the size by changing the yarn weight and hook size. Fine cotton yarn creates miniature fish suitable for keychains, while bulky yarn produces soft plush toys that children will enjoy cuddling.
To keep your crochet fish looking beautiful, wash it gently by hand using cool water and mild detergent. Press out excess moisture with a clean towel and allow it to air dry on a flat surface. Avoid twisting or wringing the project, as this may distort its shape.
As your confidence grows, experiment with different species of fish by changing the body proportions, fin shapes, and color combinations. Bright tropical colors, striped clownfish designs, elegant angelfish, or shimmering goldfish can all be created using the same basic construction techniques.
Most importantly, enjoy every step of the creative process. Every completed Crochet Amigurumi fish pattern improves your crochet skills while giving you the satisfaction of creating a unique handmade piece that can be treasured for years or shared as a thoughtful gift.
Frequently Asked Questions
Is this Crochet Amigurumi fish pattern suitable for beginners?
Yes. The project mainly uses basic crochet stitches, continuous rounds, increases, decreases, and simple shaping techniques, making it an excellent introduction to amigurumi.
Which yarn works best?
Cotton yarn offers excellent stitch definition and durability, while acrylic yarn provides a softer finish. Both are great choices depending on the desired appearance and purpose of the finished fish.
How long does it take to complete one fish?
Most crocheters can finish a small amigurumi fish within two to four hours, although larger versions or additional decorative details may require more time.
Can I make different sizes?
Absolutely. Simply use thicker or thinner yarn along with the appropriate crochet hook. You can also add extra increase and decrease rounds to create larger or smaller fish.
Can I sell finished crochet fish?
Yes. Handmade amigurumi fish are popular at craft fairs, gift shops, and online marketplaces. Their colorful appearance and handmade quality make them attractive gifts and decorations.
How can I make the fish safe for babies?
Use embroidered facial features instead of plastic safety eyes, securely sew every piece in place, and avoid adding small detachable embellishments.
What are the best uses for this project?
A Crochet Amigurumi fish pattern is perfect for nursery décor, educational toys, baby mobiles, keychains, ocean-themed gifts, backpack charms, decorative garlands, party favors, and handmade keepsakes.
Conclusion
Creating a Crochet Amigurumi fish pattern is a fun and rewarding crochet project that combines creativity with practical amigurumi techniques. Throughout this tutorial, you learned how to choose suitable materials, crochet the rounded body, shape the tail and fins, add expressive facial details, assemble every component securely, and finish the project with professional-looking touches. These same techniques can also be applied to many other amigurumi animals and sea creatures, helping you continue developing your crochet skills.
One of the greatest advantages of this project is its versatility. By changing the colors, yarn textures, sizes, and decorative details, you can create an endless variety of unique fish that reflect your own creativity and personal style. Whether you make a single fish as a thoughtful handmade gift or an entire colorful collection for decoration, every finished project becomes a special piece crafted with care and imagination.
I hope this Crochet Amigurumi fish pattern tutorial has inspired you to pick up your crochet hook and start creating today. Thank you for following this guide from beginning to end. If you enjoyed this article, please leave your honest opinion, share your experience with the pattern, and send your suggestions. Your feedback is always appreciated and helps inspire even more creative crochet tutorials in the future.