
Crochet bow pattern projects are a wonderful way to create charming handmade accessories that can decorate clothing, hats, bags, blankets, gift packages, hair clips, and many other creative items.
Crochet enthusiasts love bows because they are quick to complete, require only a small amount of yarn, and offer countless design possibilities.
Another advantage of creating a Crochet bow pattern is that it helps beginners practice essential crochet techniques while allowing experienced crafters to experiment with colors, textures, borders, and embellishments. Every completed bow improves stitch consistency and confidence. Throughout this tutorial, you will discover how to choose materials, crochet each section, assemble the bow neatly, and personalize it for different occasions using simple yet effective techniques.
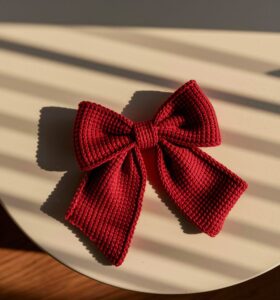
Choosing Materials for the Perfect Crochet Bow Pattern
Before starting your Crochet bow pattern, gather all the necessary supplies. Medium-weight cotton yarn is one of the best options because it provides excellent stitch definition and helps the bow maintain its shape. Acrylic yarn also works well if you want softer, lightweight bows with vibrant colors.
Select a crochet hook that matches your yarn weight. Most medium yarns work beautifully with a 4 mm to 5 mm crochet hook. Using the recommended hook size creates balanced stitches that are neither too tight nor too loose.
Other useful supplies include scissors, a yarn needle for weaving in the ends, stitch markers if needed, and optional embellishments like beads, pearls, ribbons, or decorative buttons. These finishing touches can make each bow look even more elegant.
Start your project with a foundation chain. A common size is chaining between 20 and 35 stitches, depending on the desired width of the bow. Smaller bows require fewer chains, while decorative bows benefit from longer foundations.
Work rows using simple stitches. Single crochet creates a firm, structured bow, while half double crochet adds softness and flexibility. Double crochet produces a larger, fuller bow with beautiful texture. Beginners often find single crochet the easiest stitch to master.
Continue crocheting back and forth until the rectangle reaches approximately 10 to 18 rows, depending on the thickness you want. The finished rectangle should feel flexible but still sturdy enough to hold its shape after assembly.
Step-by-Step Crochet Bow Pattern Instructions
Begin by making a slip knot and chaining 25 stitches. This creates a medium-sized decorative bow suitable for many different projects. Add one extra chain for turning before beginning the first row.
Row 1: Work one single crochet into the second chain from the hook and continue placing one single crochet into every remaining chain across the row. Chain one and turn your work.
Rows 2 through 12: Continue working one single crochet into every stitch across each row. Chain one at the end of every row before turning. Keep your tension even to create smooth, straight edges.
Once the rectangle is complete, fasten off while leaving a long yarn tail. Fold the rectangle in half lengthwise to locate the center, then pinch the middle together to create the classic bow shape with two rounded loops.
Using the remaining yarn tail or a separate strand, wrap tightly around the center approximately 10 to 15 times. Pull firmly so the bow keeps its shape without becoming distorted. Secure the yarn at the back with several tight knots before weaving in the loose ends.
To finish the center neatly, crochet a small strip by chaining six stitches and working several rows of single crochet until the strip wraps comfortably around the middle of the bow. Sew the ends together at the back for a polished appearance. This simple finishing step gives your Crochet bow pattern a clean, professional look while hiding the wrapped yarn underneath.
Creative Ways to Customize Your Crochet Bow Pattern
One of the greatest advantages of a Crochet bow pattern is how easily it can be personalized. Once you have mastered the basic design, you can experiment with different yarn colors, textures, and stitch combinations to create bows that perfectly match any occasion. A simple change in yarn can transform the overall appearance from elegant to playful.
Try using pastel shades for baby accessories, vibrant colors for children’s projects, or neutral tones for home décor. Seasonal colors also work beautifully. Red and green create festive holiday bows, while soft pinks, lavender, and cream are perfect for spring-themed decorations.
You can also play with different stitch patterns. Although single crochet creates a firm structure, half double crochet offers a softer finish, and double crochet produces a fuller, more decorative bow. Mixing rows of different stitches can add subtle texture without making the project difficult.
Adding decorative borders is another excellent way to enhance your Crochet bow pattern. A round of slip stitches around the finished rectangle creates a clean edge, while a row of crab stitch or reverse single crochet adds an elegant professional finish that makes the bow stand out.
Don’t hesitate to embellish your finished bow with pearls, wooden buttons, tiny flowers, embroidered details, or even small beads sewn into the center. These additions make each project unique and suitable for gifts, handmade products, or personal accessories.
Finished bows can be attached to hair clips, headbands, hats, scarves, tote bags, baby blankets, keychains, pillows, gift wrapping, wreaths, and countless other handmade creations. Their versatility makes them one of the most useful crochet embellishments you can learn.
Tips for Beautiful Results and Common Mistakes to Avoid
Maintaining even tension throughout your project is one of the most important aspects of creating a beautiful Crochet bow pattern. Consistent stitches produce straight edges and symmetrical loops that give the bow a polished appearance.
Count your stitches at the end of every row, especially if you are a beginner. Accidentally increasing or decreasing stitches may cause the rectangle to become uneven, making the finished bow appear lopsided.
Choose yarn that complements the purpose of your project. Cotton yarn creates crisp, structured bows that hold their shape well, while acrylic yarn offers softness and flexibility. Blended fibers can provide the best of both worlds depending on the desired result.
When wrapping the center of the bow, avoid pulling the yarn too tightly. Excessive tension may flatten the loops and reduce the fullness that gives the bow its attractive shape. Wrap firmly enough to secure the center while allowing the loops to remain rounded.
Always weave in the yarn ends carefully using a yarn needle. Loose ends can gradually work themselves free after repeated handling or washing. Taking a few extra minutes to secure them properly will greatly improve the durability of your finished project.
Finally, don’t be afraid to practice. Every completed Crochet bow pattern helps improve your stitch consistency, shaping skills, and finishing techniques. As your confidence grows, you’ll be able to create bows in various sizes and styles, adapting them to almost any crochet project you can imagine.
FAQ
Is the Crochet bow pattern suitable for beginners?
Yes. This project uses basic crochet stitches, making it an excellent choice for beginners who want to practice essential techniques while completing a beautiful and useful item.
What yarn works best for a Crochet bow pattern?
Cotton yarn is highly recommended because it provides excellent stitch definition and helps the bow maintain its shape. Acrylic yarn is also a great option if you prefer a softer finish.
Which crochet stitches are commonly used?
Most bows can be made using single crochet, half double crochet, or double crochet. Single crochet produces the firmest result, while double crochet creates a fuller, softer bow.
How long does it take to complete a crochet bow?
A simple bow usually takes between 20 and 45 minutes, depending on your crochet experience and the size of the project.
Can I make different sizes?
Absolutely. Simply adjust the number of foundation chains and the total number of rows. A longer foundation chain creates a wider bow, while additional rows create fuller loops.
What can I use crochet bows for?
Crochet bows are incredibly versatile. They can decorate hats, handbags, baby blankets, clothing, scarves, pillows, gift wrapping, hair accessories, keychains, bookmarks, wreaths, and home décor projects.
How do I make the bow stiffer?
Using cotton yarn with a slightly smaller hook creates tighter stitches that naturally hold their shape better. Light starch or fabric stiffener can also be applied if extra structure is desired.
Can I sell bows made from this pattern?
Yes. Handmade crochet bows are popular items at craft fairs, online shops, and local markets. Creating high-quality finishing details and offering a variety of colors and sizes can make your products even more appealing.
Conclusion
Creating a Crochet bow pattern is a fun, relaxing, and rewarding project that combines creativity with practical crochet skills. Throughout this guide, you learned how to choose The right materials, work the basic crochet stitches, crochet the rectangular base, shape the bow, secure the center, and customize the finished piece with decorative details. You also discovered helpful tips for achieving neat, professional-looking results while avoiding common beginner mistakes.
Whether you are making bows for personal projects, thoughtful handmade gifts, or products to sell, this versatile design offers endless opportunities for creativity. By practicing regularly and experimenting with different yarns, colors, stitch patterns, and embellishments, you’ll soon be able to create beautiful crochet bows for every season and occasion.
Thank you for reading this complete Crochet bow pattern guide. I hope it inspires you to start your next crochet project with confidence and creativity. If you enjoyed this tutorial, please leave your sincere opinion in the comments and share your suggestions or ideas for future crochet patterns. Your feedback is always appreciated and helps inspire even more creative handmade projects.