
Crochet hat pattern projects are among the most enjoyable and rewarding creations for crocheters of every skill level.
Crocheting a hat is an excellent way to improve your stitch consistency while completing a practical project in a relatively short amount of time.
This complete tutorial focuses on building a classic hat that can easily be adjusted for children, teenagers, or adults. Throughout this guide, you will learn the purpose of each crochet stitch, how to keep your rounds even, and how to achieve a professional-looking finish. With patience and practice, your handmade hat will not only look beautiful but also become a comfortable accessory that can be worn for many seasons.
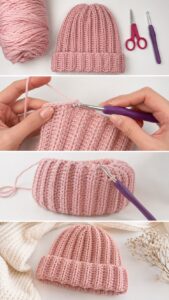
Choosing Materials for a Beautiful Crochet Hat Pattern
Selecting the right materials is the first step toward creating a successful Crochet hat pattern. Medium-weight yarn is one of the most popular choices because it provides warmth while remaining easy to handle. Acrylic yarn is affordable and beginner-friendly, cotton works well for breathable hats, and wool offers excellent insulation during colder months.
Choose a crochet hook recommended on the yarn label, but remember that hook size can be adjusted depending on how tightly or loosely you crochet. A slightly larger hook creates a softer fabric, while a smaller hook produces a denser texture. Testing your tension before starting helps ensure the finished hat has the correct measurements.
Gather a few basic accessories before beginning your project. Stitch markers help identify the beginning of each round, scissors make trimming yarn easier, a yarn needle is essential for weaving in loose ends, and a measuring tape helps monitor the hat’s dimensions as you progress.
Understanding the basic crochet stitches is equally important. The magic ring creates a neat center without leaving a visible hole. The chain stitch establishes the starting height for many rounds, while the slip stitch joins rounds smoothly with minimal bulk.
The single crochet stitch creates a dense and warm fabric that works especially well for winter hats. Half double crochet provides a balance between softness and speed, while double crochet creates a lighter fabric with more flexibility and drape.
Finally, choose colors that match the style you want to achieve. Neutral shades produce timeless hats suitable for everyday wear, while bright combinations add personality and make excellent gifts for children or anyone who enjoys colorful handmade accessories.
Step-by-Step Crochet Hat Pattern Instructions
Begin your Crochet hat pattern by creating a magic ring. This adjustable loop forms the top center of the hat and produces a much cleaner finish than starting with several chain stitches. Secure the ring carefully so the center closes completely after the first round.
Round 1 consists of making ten half double crochet stitches into the magic ring. Once completed, pull the yarn tail gently to tighten the center, then join the round with a slip stitch. This creates the foundation for the crown of the hat.
Round 2 starts with two chain stitches. Work two half double crochet stitches into every stitch from the previous round. This doubles the stitch count and allows the crown to expand evenly while maintaining a flat circular shape.
Round 3 follows an increase pattern. Crochet two half double crochet stitches into the first stitch, then one half double crochet into the next stitch. Repeat this sequence around the entire circle. Each increase helps the crown grow gradually without curling or becoming wavy.
Continue increasing in each new round by adding one additional regular stitch between increases. For example, the following round consists of two half double crochet in one stitch followed by two individual half double crochet stitches. Repeat this pattern until the crown reaches the desired diameter for the intended head size.
Once the crown is complete, stop increasing and crochet one half double crochet into every stitch around. Continue working evenly until the hat reaches the preferred height. Finish with one round of single crochet or ribbing made from front and back loop stitches to create a comfortable, stretchy brim.
Customizing and Finishing Your Crochet Hat Pattern
One of the greatest advantages of following a Crochet hat pattern is the freedom to personalize the finished piece. Once you have mastered the basic structure, you can easily adjust the height, width, and decorative elements to create a completely unique hat. Small changes in stitch selection or yarn color can transform a simple design into an elegant fashion accessory.
If you would like a slouchy hat, simply continue crocheting additional rounds without making increases. This extra length allows the top of the hat to drape naturally at the back, creating a relaxed and modern look. For a fitted beanie, stop once the hat reaches the top of the ears.
Texture can also make your project stand out. Alternating rounds of half double crochet and single crochet creates subtle dimension, while working only in the back loop produces attractive horizontal ridges. Front post and back post stitches are another excellent option for creating stretchy ribbing around the brim.
Adding decorative details is another fun way to personalize your Crochet hat pattern. Pom-poms remain one of the most popular finishing touches and can be made using matching or contrasting yarn. Small crochet flowers, bows, appliqués, or buttons can also enhance the overall appearance while reflecting your own style.
Always try the hat on during the final rounds whenever possible. Checking the fit before fastening off allows you to make small adjustments in height or brim size without having to undo large sections later. This simple habit helps ensure a comfortable and professional result.
After completing the final round, cut the yarn while leaving a long tail. Pull the yarn through the last loop, tighten gently, and use a yarn needle to weave the remaining end securely through the inside stitches. Hide all loose ends carefully so the finished hat looks neat from every angle.
Tips for Success, Care Instructions, FAQ, and Conclusion
Consistent tension is one of the most important factors when creating a beautiful Crochet hat pattern. Avoid pulling the yarn too tightly, as this can make the fabric stiff and reduce flexibility. Likewise, overly loose stitches may cause the hat to lose its shape after repeated use. Taking your time and maintaining an even rhythm produces the best results.
Practice is the key to improving your crochet skills. If your first hat is not perfect, do not be discouraged. Every completed project teaches valuable lessons about stitch placement, shaping, counting, and finishing techniques. Even experienced crocheters continue refining their methods with every new design they create.
Proper care helps your handmade hat remain beautiful for years. Wash it gently according to the yarn manufacturer’s recommendations, preferably by hand using mild detergent. Lay the hat flat on a clean towel to dry naturally rather than hanging it, which can stretch the fabric and alter its shape.
Storing the hat correctly also extends its lifespan. Fold it carefully and keep it in a dry location away from direct sunlight and excessive humidity. Avoid placing heavy objects on top of the hat to preserve its structure, especially if decorative elements such as pom-poms or flowers have been added.
FAQ
1. Is this Crochet hat pattern suitable for beginners?
Yes. The pattern uses basic stitches and simple increases, making it an excellent first hat project.
2. What yarn is best for a crochet hat?
Medium-weight acrylic, wool, or cotton yarn all work well depending on the season and the desired warmth.
3. How do I know when to stop increasing?
Measure the crown frequently. Once it reaches the appropriate diameter for the intended head size, continue without increases.
4. Can I make this hat in different sizes?
Absolutely. Simply adjust the crown diameter and the number of body rounds to fit babies, children, or adults.
5. Why is my hat curling?
Curling usually means there are not enough increases in the crown. Double-check your stitch count each round.
6. How can I make the brim stretchier?
Working ribbing with front post and back post stitches or crocheting through the back loop creates excellent elasticity.
Conclusion
Learning a Crochet hat pattern is one of the best ways to strengthen your crochet skills while creating a practical and beautiful handmade accessory.
Throughout this tutorial, you learned how to choose the right materials, work with essential crochet stitches, build the crown using gradual increases, crochet the body evenly, create a comfortable brim, personalize the design with decorative details, and finish the project with professional techniques. By practicing these methods, you will gain confidence to create hats in many different colors, textures, and sizes for yourself, your family, or thoughtful handmade gifts.
Thank you for reading this complete guide. If you enjoyed this tutorial, please leave your honest opinion in the comments and share any suggestions or ideas for future crochet patterns. Your feedback is always appreciated and helps inspire even more creative crochet projects for everyone.