
Granny square crochet glove pattern projects are a beautiful way to combine the timeless charm of granny squares with the comfort and practicality of handmade fingerless gloves.
One of the reasons a Granny square crochet glove pattern remains so popular is its versatility. Granny squares can be made using solid colors, vibrant combinations, or soft neutral shades that complement every wardrobe.
Creating a Granny square crochet glove pattern is more than simply joining crochet motifs together. It involves choosing the right yarn, maintaining even tension, constructing balanced granny squares, assembling them neatly, shaping the thumb opening, and adding finishing rounds for a polished appearance. In this complete guide, you will learn each step needed to crochet elegant fingerless gloves that are both fashionable and comfortable while improving your crochet skills along the way.
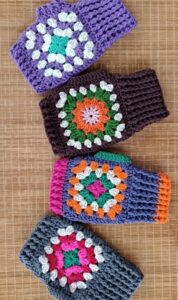
Choosing Materials for Your Granny Square Crochet Glove Pattern
Selecting the right yarn is the foundation of a successful project. Soft acrylic, merino wool, cotton blends, or lightweight alpaca yarn provide warmth while remaining comfortable against the skin.
Choose a crochet hook that matches your yarn weight. A 4 mm to 5 mm hook is ideal for most medium-weight yarns and creates a flexible fabric with excellent stitch definition.
Select two to five coordinating yarn colors if you want the traditional granny square appearance. Neutral palettes create elegant gloves, while colorful combinations add a cheerful handmade touch.
Before beginning, crochet a sample granny square to verify the finished size. Small adjustments in hook size can make a noticeable difference in the final glove fit.
Additional supplies include scissors, stitch markers, a yarn needle for weaving in ends, and a measuring tape to monitor sizing throughout the project.
Preparing your materials before crocheting allows you to work continuously and helps maintain consistency throughout every granny square used in your gloves.
Step-by-Step Granny Square Crochet Glove Pattern Instructions
Begin with a magic ring. Chain (ch) 3 to count as the first double crochet (dc), then work 2 dc into the ring. Chain 2.
Continue by crocheting 3 dc into the ring followed by ch 2. Repeat this sequence until you have four groups of 3 dc separated by chain-2 corners.
Join with a slip stitch (sl st) to the top of the beginning chain. Pull the magic ring closed securely and fasten the center tightly.
Round 2: Slip stitch into the first corner space. Ch 3, work 2 dc, ch 2, and 3 dc into the same corner. In every remaining corner, crochet (3 dc, ch 2, 3 dc).
Repeat additional rounds if necessary until each granny square measures approximately 4½ to 5 inches across. Most gloves require two identical granny squares.
Fold each square carefully to determine the thumb opening. Join the edges using slip stitches or single crochet (sc), leaving a comfortable opening where the thumb will be positioned.
Shaping and Finishing the Gloves
Once the main seams are complete, attach yarn at the wrist opening. Work one round of single crochet evenly around the wrist to create a clean foundation.
Round 2: Crochet one half double crochet (hdc) into each stitch around. This creates a flexible cuff that comfortably hugs the wrist.
Repeat additional cuff rounds until the wrist reaches your preferred length. Ribbing may be created by working into the back loop only for extra texture.
Attach yarn around the thumb opening. Crochet one round of single crochet followed by one round of half double crochet to reinforce the opening and improve comfort.
Around the finger opening, work a neat round of single crochet to stabilize the edge and prevent stretching over time.
Finish by fastening off the yarn securely and weaving every loose end carefully using a yarn needle. A thorough final inspection ensures a professional-looking finished project.
Creative Ways to Personalize Your Granny Square Crochet Glove Pattern
The beauty of a Granny square crochet glove pattern lies in its endless customization possibilities. Every pair can reflect your personal style through colors, textures, and decorative details.
Choose seasonal colors such as burgundy, mustard, forest green, and cream for autumn-inspired gloves or soft pastels for spring accessories.
Decorative edging adds elegance. A simple picot border or shell stitch trim creates a refined finish while remaining easy enough for confident beginners.
Experiment with textured yarns or subtle sparkle yarn to produce gloves suitable for holidays, special occasions, or evening wear.
You can also embroider small flowers, leaves, hearts, or initials onto the completed granny squares for a personalized handmade touch.
Once comfortable with this Granny square crochet glove pattern, try adjusting the square size, cuff length, or stitch combinations to create unique fingerless gloves for every season and every member of the family.
FAQ
Is this pattern suitable for beginners?
Yes. This Granny square crochet glove pattern uses classic granny square construction and basic crochet stitches, making it an excellent project for beginners.
How many granny squares are needed?
Most fingerless glove designs require one granny square for each glove, resulting in two granny squares for a complete pair.
What yarn works best?
Medium-weight acrylic, merino wool, cotton blends, and alpaca yarn all provide excellent comfort, durability, and stitch definition.
Can I make full gloves instead of fingerless gloves?
Yes. Additional rounds can be crocheted around the finger openings to create individual fingers or a mitten-style extension.
How do I adjust the glove size?
Increase or decrease the number of granny square rounds or use a different hook size to create larger or smaller gloves.
Are granny square gloves good gift ideas?
Absolutely. Handmade crochet gloves are thoughtful gifts because they combine practicality, warmth, creativity, and timeless handmade charm.
Conclusion
A Granny square crochet glove pattern is a rewarding project that combines classic crochet techniques with modern style and everyday functionality. Throughout this guide, you learned how to choose the right yarn and crochet hook, crochet traditional granny squares, assemble the glove structure, shape the thumb opening, create comfortable cuffs, reinforce the edges, and personalize your finished gloves with decorative details.
These fingerless gloves are quick to make, highly customizable, and suitable for crocheters of every skill level. By practicing these techniques, you will build confidence while creating accessories that are both beautiful and practical. We hope this tutorial inspires you to begin your own handmade project today.
If you enjoyed this guide, please leave your honest opinion and share your suggestions or creative ideas. Your feedback helps improve future crochet tutorials and inspires fellow crochet enthusiasts to continue creating beautiful handmade pieces.