
Fabric duck-shaped bag pattern projects are a wonderful way to combine creativity, functionality, and sewing skills into one adorable handmade accessory.
One of the greatest advantages of making a Fabric duck-shaped bag pattern is the opportunity to personalize every detail.
This sewing project is not only enjoyable but also an excellent way to improve several sewing techniques. While working through the Fabric duck-shaped bag pattern, you will practice fabric cutting, curved stitching, layering, appliqué details, zipper installation, strap attachment, and final assembly. Each step helps build confidence while producing an accessory that is both decorative and functional. With careful preparation and attention to detail, you can create a beautiful bag that looks professionally made while still reflecting your own creative style.
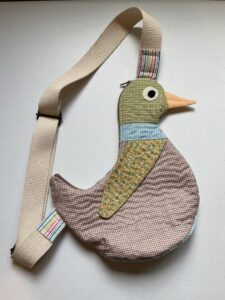
Choosing Materials for a Beautiful Fabric Duck-Shaped Bag
Selecting high-quality fabrics is one of the most important steps when beginning your Fabric duck-shaped bag pattern. Cotton fabric is often the preferred choice because it is easy to sew, durable, and available in countless colors and prints. Quilting cotton works especially well because it maintains its shape while remaining soft enough for curved sewing.
For the duck’s body, choose cheerful colors such as yellow, cream, white, or light beige. These shades instantly create the recognizable appearance of a duck while allowing decorative accents to stand out beautifully. If you want a more whimsical style, floral or patterned fabrics also work wonderfully.
The duck’s beak and feet can be sewn using bright orange fabric. Felt, cotton, or lightweight canvas are all excellent choices. Using a slightly heavier fabric helps these small details keep their shape after repeated use.
Interfacing plays a significant role in giving the bag structure. Fuse medium-weight interfacing to the exterior fabric pieces before sewing. This helps the finished bag maintain its rounded duck shape while making it more durable for everyday use.
For the lining, choose a coordinating cotton print. A soft floral or polka-dot lining adds an unexpected decorative surprise whenever the bag is opened. Since the lining is visible inside, selecting a complementary fabric improves the overall appearance.
Finally, gather all remaining supplies before starting. You’ll typically need matching thread, scissors or a rotary cutter, sewing clips or pins, a zipper or magnetic snap, adjustable bag strap hardware if desired, and basic sewing tools. Organizing your materials before sewing helps the project move smoothly from beginning to end.
Step-by-Step Guide to Sewing the Fabric Duck-Shaped Bag
Begin by preparing your paper pattern pieces. The Fabric duck-shaped bag pattern generally consists of two body panels, two lining panels, wing pieces, beak pieces, eye appliqués, optional tail pieces, and the strap connectors. Carefully trace every pattern piece onto your chosen fabrics.
Cut two exterior duck body pieces and two lining pieces. Add seam allowances if they are not already included in the pattern. Accuracy during cutting helps ensure both sides match perfectly during assembly.
Apply fusible interfacing to the wrong side of the exterior body panels. Follow the manufacturer’s instructions for proper pressing temperature and time. Allow the pieces to cool completely before handling them.
Create the decorative features first. Sew or applique the wings, beak, eyes, and optional embroidered eyelashes onto the front body panel. Completing these decorative elements before assembling the bag makes the sewing process much easier.
If your design includes a zipper closure, install the zipper between the exterior fabric and lining before sewing the main body together. Sew slowly and carefully around the zipper to achieve neat, professional-looking stitches.
Place the exterior panels right sides together and sew around the curved edges, leaving the opening where indicated by your pattern. Repeat the same process for the lining pieces. After stitching, clip the curved seam allowances to reduce bulk and help the curves lie flat when turned right side out.
Adding the Finishing Details for a Professional Result
Turn the exterior bag right side out and gently shape every curved section using a turning tool or the rounded end of a chopstick. Avoid using sharp objects that could damage the fabric.
Insert the lining into the exterior with wrong sides facing each other. Align all edges carefully before topstitching around the opening. This step secures the lining while giving the bag a polished appearance.
Prepare the shoulder strap according to your preferred length. You may sew a fabric strap using matching cotton or attach purchased webbing for additional durability. Adjustable hardware allows the bag to fit children and adults comfortably.
Secure the strap connectors to the side seams using reinforced stitching. Since these areas receive the most stress during use, sewing several rows of stitches greatly improves durability.
If your duck design includes small decorative features such as fabric flowers, bows, tiny pockets, or embroidered feathers, add them after the main assembly is complete. These finishing touches personalize your Fabric duck-shaped bag pattern while enhancing its overall charm.
Once everything is assembled, press the finished bag carefully using the correct heat setting for your chosen fabric. Proper pressing removes wrinkles, flattens seams, and gives the entire project a clean, professional finish that looks ready to use or gift.
Tips for Personalizing Your Fabric Duck-Shaped Bag Pattern
One of the best aspects of the Fabric duck-shaped bag pattern is its versatility. You can easily resize the pattern to create mini bags for children, medium-sized everyday purses, or larger tote-style versions for carrying books or craft supplies.
Experiment with different fabric combinations throughout the year. Soft pastel colors are perfect for spring, bright floral prints create cheerful summer bags, earthy tones suit autumn, and festive holiday fabrics transform the project into seasonal accessories.
Instead of traditional embroidered eyes, consider using safety eyes only if the bag is purely decorative. For children’s accessories, embroidered eyes remain the safest option because they eliminate small detachable parts.
Decorative quilting adds another layer of beauty to the finished bag. Simple straight-line quilting, free-motion feathers, or gentle wave stitching create texture while helping stabilize the fabric layers.
This project also makes excellent use of fabric scraps. Small leftover pieces from quilting or sewing projects can become wings, pockets, appliqués, bows, or decorative patches, reducing fabric waste while adding extra personality.
Most importantly, enjoy the creative process. Handmade sewing projects are rarely identical, and every small variation becomes part of the bag’s unique character. Taking your time during each stage helps ensure the finished Fabric duck-shaped bag pattern becomes a treasured accessory you’ll be proud to use or give as a gift.
FAQ
1. Is the Fabric duck-shaped bag pattern suitable for beginners?
Yes. Beginners with basic sewing experience can complete this project successfully by following each step carefully and sewing slowly around the curved sections.
2. What is the best fabric for this project?
Quilting cotton is one of the best choices because it is durable, easy to sew, and available in countless colors and prints.
3. Do I need interfacing?
Yes. Medium-weight fusible interfacing helps the bag maintain its shape and gives the finished project a more professional appearance.
4. Can I add a zipper instead of a snap closure?
Absolutely. A zipper provides extra security for the contents and gives the bag a polished finish.
5. Can I wash the finished bag?
Most cotton versions can be gently machine washed or hand washed. Always follow the care instructions for your chosen fabrics and interfacing.
6. How can I personalize the duck design?
You can use different fabric prints, embroidery, appliqué flowers, bows, lace, quilting stitches, decorative buttons, or colorful linings to create a completely unique bag.
7. Is this project suitable for children?
Yes. The finished bag is ideal for children, but avoid using small detachable embellishments if the bag will be used by very young children.
8. Can I make the bag larger?
Certainly. Simply enlarge the pattern proportionally while maintaining the same overall shape and seam allowances.
Conclusion
Creating a Fabric duck-shaped bag pattern is a rewarding sewing project that combines creativity, practical sewing skills, and charming design. Throughout this tutorial, you learned how to select appropriate materials, prepare the pattern pieces, assemble the decorative duck features, sew the exterior and lining, install closures, attach the strap, and finish the bag with professional details. By carefully following each step, even beginners can create a durable, functional, and adorable handmade accessory that reflects their own personal style.
Every completed bag becomes a unique handmade creation that can be enjoyed daily, given as a thoughtful gift, or even sold at local craft fairs and handmade markets. As your sewing confidence grows, you can experiment with different colors, fabrics, embellishments, and sizes to make every version even more special.
Thank you for reading this guide. I hope this tutorial has inspired you to start your own Fabric duck-shaped bag pattern project. If you make one, I’d love to hear about your experience. Please leave your honest opinion, share your results, and feel free to suggest ideas or improvements for future sewing tutorials. Your feedback and creative inspiration are always appreciated.