
Fabric drawstring bag pattern is one of the most practical and rewarding sewing projects for beginners and experienced crafters alike.
A handmade drawstring bag is not only beautiful but also highly versatile. You can customize the size, choose your favorite fabrics, add decorative details, and even personalize it with embroidery or appliqués.
In this complete guide, you will learn every step needed to create your own Fabric drawstring bag pattern from start to finish. We’ll cover fabric selection, measurements, cutting instructions, sewing techniques, assembling the casing, inserting the drawstring, and adding finishing touches that give your project a professional appearance. By the end of this tutorial, you’ll have the confidence to sew drawstring bags in various sizes for countless purposes.
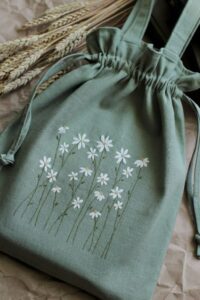
Choosing Materials and Preparing Your Fabric
The first step in making a beautiful Fabric drawstring bag pattern is selecting the right fabric. Quilting cotton is one of the best choices because it is easy to cut, stable while sewing, and available in countless colors and prints. Linen blends, lightweight canvas, and cotton poplin are also excellent alternatives.
For a medium-sized bag, cut two rectangles measuring approximately 12 inches wide by 15 inches high (30 x 38 cm). If you prefer a larger storage bag, simply increase both measurements while maintaining the same basic construction method.
Before cutting your fabric, wash, dry, and iron it. Prewashing removes any shrinkage that could occur after the finished bag is used or cleaned. Ironing also helps ensure accurate cutting and smoother seams.
Gather your sewing supplies before beginning. You’ll need matching thread, scissors or a rotary cutter, pins or sewing clips, a ruler, an iron, a sewing machine, and approximately 40 to 50 inches of drawstring cord, ribbon, or cotton rope.
If you’d like your bag to be more durable, choose a lining fabric. Although a lining is optional, it creates a cleaner interior finish and adds extra structure, especially for bags that will carry heavier items.
Finally, plan your design before sewing. Decide whether you’d like contrasting fabrics, decorative pockets, lace trim, quilting details, or embroidery. Planning ahead helps create a polished finished project.
Cutting and Sewing the Main Bag Pieces
Once your fabric has been prepared, place it on a flat cutting surface. Carefully measure and cut two identical rectangles. Accuracy during this step ensures the bag will align perfectly during assembly.
If you’re using directional fabric prints, make sure both pieces face the correct direction before sewing. This small detail gives the finished bag a much more professional appearance.
Fold the top edge of each rectangle down about ¼ inch (6 mm), press with an iron, then fold another ¾ inch (2 cm) to create the casing where the drawstring will slide later. Stitch close to the folded edge on each panel.
Place the two fabric rectangles with their right sides facing each other. Pin around the sides and bottom, leaving the casing area open so the drawstring can move freely once completed.
Using a standard straight stitch, sew along both side seams and the bottom seam with a ¼ to ⅜ inch seam allowance. Reinforce the beginning and end of each seam by backstitching for added durability.
Trim excess threads and finish the raw seam edges using a zigzag stitch, serger, or pinking shears. This prevents fraying and extends the lifespan of your handmade drawstring bag.
Creating the Drawstring Channel and Finishing the Bag
After sewing the main seams, gently open the casing sections you prepared earlier. Make sure the side seams below the casing remain securely stitched while the folded channel stays open.
Turn the bag right side out through the top opening. Carefully push out the bottom corners using a blunt tool such as a chopstick or point turner, taking care not to damage the fabric.
Press the entire bag thoroughly with an iron. Crisp seams immediately improve the appearance of any sewing project and make the finished bag look much more professional.
Cut two equal lengths of cord, ribbon, or braided cotton rope. Each piece should measure approximately twice the width of the bag plus several extra inches for tying comfortable knots.
Attach a safety pin to one end of the first cord and feed it completely around the casing until it exits the same side where it entered. Repeat the process with the second cord, beginning from the opposite side.
Tie secure knots at both ends of each cord. Pull both cords simultaneously to test the closing mechanism. Your Fabric drawstring bag pattern should now open and close smoothly with balanced tension on both sides.
Decorating, Customizing, and Using Your Fabric Drawstring Bag
One of the greatest advantages of a Fabric drawstring bag pattern is the endless customization possibilities. Even simple fabric combinations can create elegant results that suit different occasions and personal styles.
You can decorate the exterior using patchwork blocks, decorative machine stitches, fabric labels, embroidery, appliqués, lace, ric-rac trim, or contrasting pockets. Small details often make handmade bags truly unique.
If you’re creating bags for gifts, personalize each one with embroidered names or monograms. These thoughtful additions transform a practical sewing project into a memorable keepsake.
Experiment with different sizes depending on their intended purpose. Small bags work well for jewelry, makeup, earbuds, and craft notions, while larger versions are ideal for shoes, travel accessories, knitting projects, or children’s toys.
Eco-conscious sewists appreciate reusable fabric bags because they reduce waste from disposable wrapping paper and plastic gift bags. A handmade drawstring bag can be reused for years, making it both beautiful and environmentally friendly.
As your sewing confidence grows, try combining different fabrics, adding boxed corners for extra depth, inserting interfacing for additional stability, or quilting the outer fabric before assembly. Each new version helps improve your sewing skills while producing useful handmade creations.
FAQ About Fabric drawstring bag pattern
1. Is a fabric drawstring bag suitable for beginners?
Yes. This is one of the easiest sewing projects available because it uses straight seams and basic construction techniques while teaching valuable sewing fundamentals.
2. What is the best fabric for a drawstring bag?
Quilting cotton is the most beginner-friendly choice, but canvas, linen blends, denim, lightweight upholstery fabric, and cotton poplin also work beautifully depending on the desired style.
3. Can I make different bag sizes?
Absolutely. Simply increase or decrease the size of your fabric rectangles while keeping the same sewing method for the casing and seams.
4. Do I need a sewing machine?
A sewing machine makes the project much faster, but it can also be sewn entirely by hand using strong, even stitches.
5. What can I use as a drawstring?
Cotton rope, satin ribbon, braided cord, paracord, twill tape, macramé cord, or handmade fabric ties all work well.
6. Should I add a lining?
A lining is optional but recommended for a cleaner finish, improved durability, and better structure.
7. How do I prevent fabric from fraying?
Finish the seam allowances with a zigzag stitch, serger, or pinking shears before turning the bag right side out.
8. Can I wash my finished drawstring bag?
Yes. If prewashed cotton fabric was used, the bag can generally be machine washed on a gentle cycle and air-dried for best results.
Conclusion
Learning a Fabric drawstring bag pattern is an enjoyable sewing experience that combines simplicity, creativity, and everyday practicality. Throughout this tutorial, you learned how to choose the best materials, prepare and cut the fabric accurately, sew the main bag pieces, construct a smooth drawstring casing, insert the cords correctly, and customize the finished project with decorative details. Once you’ve completed your first bag, you’ll discover how easy it is to create additional versions in different sizes, colors, and styles for gifts, home organization, travel, or personal use.
The more you practice this Fabric drawstring bag pattern, the more confident you’ll become with essential sewing techniques such as accurate cutting, pressing seams, topstitching, and creating neat finishes. Handmade drawstring bags are timeless projects that remain useful for years while allowing endless opportunities for personalization and creativity.
If you enjoyed this tutorial, we’d love to hear your honest opinion. Please share your experience, let us know how your project turned out, and leave your sincere suggestions or tips. Your feedback can inspire other sewing enthusiasts and help make future tutorials even more helpful and enjoyable.