
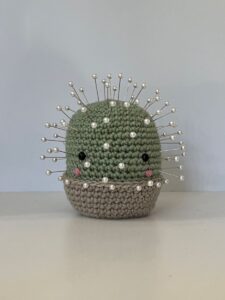
Crochet cactus pincushion pattern is a delightful project that combines creativity, functionality, and the timeless charm of handmade crochet.
One of the best things about this project is its versatility. You can make your cactus tall or short, use different shades of green, add colorful crochet flowers, or even create an entire collection of cactus pincushions in various shapes and sizes.
In this complete guide, you will learn every step required to create your own Crochet cactus pincushion pattern, from selecting the right yarn and hook to crocheting the cactus body, making the flowerpot, assembling the project, and adding decorative details. Every section explains the stitches clearly, making it easier to achieve a professional-looking result while improving your crochet skills. By the end of this tutorial, you’ll have a beautiful pincushion that is both decorative and useful for everyday sewing.
Choosing Materials and Understanding the Crochet Stitches
Before beginning your Crochet cactus pincushion pattern, gather all of your materials. You will need green cotton or acrylic yarn for the cactus, brown yarn for the soil, terracotta or beige yarn for the flowerpot, polyester fiberfill, a small amount of cardboard for stability, tapestry needle, stitch marker, scissors, and a crochet hook that matches your yarn weight.
A smaller hook than normally recommended often produces tighter stitches. Tight fabric is important because it prevents the stuffing from showing through the stitches and creates a firm surface that securely holds sewing pins.
The primary stitches used in this Crochet cactus pincushion pattern include the magic ring (MR), chain (ch), slip stitch (sl st), single crochet (sc), increase (inc), invisible decrease (dec), and back loop only (BLO). These stitches form the foundation of most beginner amigurumi projects.
Begin the cactus by creating a magic ring. Work 6 sc into the ring and pull the tail tightly closed. Place a stitch marker in the first stitch to help track each round since the project is worked continuously without joining.
Round 2: Work 2 sc into each stitch around (12 stitches).
Round 3: (1 sc, inc) repeat around (18 stitches).
Round 4: (2 sc, inc) repeat around (24 stitches). Continue increasing evenly until the cactus reaches approximately 36 stitches around, depending on your preferred size.
Once the desired diameter is reached, continue crocheting one single crochet into every stitch for 18–25 rounds. This forms the tall cylindrical shape that gives the cactus its realistic appearance.
Crocheting the Cactus Body Step by Step
To create natural cactus ridges, alternate several rounds worked in the back loops only (BLO). This technique creates subtle vertical texture without making the pattern overly complicated.
If you’d like a slightly curved cactus, place a few invisible decreases on one side and corresponding increases on the opposite side over several rounds. This gentle shaping gives the finished cactus a more organic appearance.
Continue stuffing the cactus gradually as you crochet. Adding small amounts of fiberfill every few rounds produces an even shape and prevents lumps from forming inside the project.
When the cactus reaches the desired height, begin closing the top. Work (4 sc, dec) around, followed by (3 sc, dec), then (2 sc, dec) until only a small opening remains.
Add the final amount of stuffing before closing completely. Pull the remaining stitches together using a tapestry needle, weave in the yarn end securely, and shape the cactus gently with your hands.
For extra realism, thread green yarn vertically from the bottom to the top several times, pulling slightly to create soft ridges. This simple finishing technique gives the cactus a beautiful sculpted appearance without requiring complicated stitch patterns.
Making the Flowerpot and Assembling the Pincushion
Using terracotta-colored yarn, begin another magic ring with 6 sc. Increase gradually in the same manner used for the cactus base until the flowerpot reaches approximately the same diameter as the cactus.
Work several rounds without increasing to create the sides of the pot. For a realistic flowerpot shape, add a few increase rounds near the top so the opening flares outward slightly.
To create the decorative rim, work one round in the back loops only, then crochet one additional round into both loops. This creates a subtle folded edge that resembles a ceramic flowerpot.
Crochet a separate brown circle representing the soil. Begin with a magic ring and increase until the circle fits snugly inside the flowerpot opening. This small detail makes the finished project look much more realistic.
Insert a small cardboard circle into the bottom of the flowerpot before stuffing. This reinforcement keeps the pincushion standing upright while providing a stable foundation during use.
Place the stuffed cactus into the center of the flowerpot, position the brown soil circle around the base, and sew all pieces together securely using matching yarn. The assembly should feel firm enough to hold pins safely without wobbling.
Decorating and Personalizing Your Crochet Cactus Pincushion
One of the most enjoyable parts of making a Crochet cactus pincushion pattern is adding decorative details that reflect your personal style. Small embellishments transform a simple crochet project into a charming handmade decoration.
Crochet tiny flowers using bright pink, yellow, white, purple, or red yarn. A simple flower can be made by creating a magic ring, working five chain loops, and adding small petals with single crochet and half double crochet stitches.
Attach one or more flowers near the top of the cactus using a tapestry needle. Positioning them slightly off-center often creates a more natural appearance inspired by real blooming cacti.
Consider embroidering tiny white dots or short stitches across the cactus surface to imitate the appearance of cactus spines. These decorative stitches provide texture while remaining completely safe to handle.
Experiment with different flowerpot colors including cream, gray, blue, pastel pink, or rustic brown. Decorative stripes, textured stitches, or embroidered patterns can further personalize your finished pincushion.
Once complete, your Crochet cactus pincushion pattern becomes a practical sewing accessory that beautifully stores pins, brightens your craft room, and makes a thoughtful handmade gift for anyone who enjoys sewing, quilting, embroidery, or crochet.
FAQ About Crochet cactus pincushion pattern
1. Is this pattern suitable for beginners?
Yes. Beginners who know basic crochet stitches such as single crochet, increases, and decreases can successfully complete this project with patience.
2. What yarn works best?
Cotton yarn is highly recommended because it creates firm stitches and excellent stitch definition. Acrylic yarn also works well if crocheted tightly.
3. Which crochet hook should I use?
Choose a hook slightly smaller than the yarn label recommends. Tight stitches help contain the stuffing and create a durable pincushion.
4. How much stuffing is needed?
Only a small amount of polyester fiberfill is necessary. Stuff firmly enough to support pins while maintaining a smooth shape.
5. Can I make different cactus shapes?
Absolutely. You can create tall, round, oval, branching, or clustered cactus designs simply by adjusting the number of rounds and shaping.
6. How do I keep the flowerpot standing upright?
Insert a cardboard or plastic circle into the bottom before stuffing the pot. This provides excellent stability.
7. Can I wash the finished pincushion?
Yes. Hand washing with mild detergent is recommended. Allow the project to air dry completely before using it again.
8. Is this project suitable as a handmade gift?
Definitely. A crochet cactus pincushion is a thoughtful gift for sewists, quilters, embroiderers, crafters, teachers, and anyone who appreciates handmade accessories.
Conclusion
Creating a Crochet cactus pincushion pattern is an enjoyable project that combines useful functionality with beautiful handmade artistry. Throughout this tutorial, you learned how to choose suitable materials, understand the essential crochet stitches, crochet the cactus body using continuous rounds, shape the flowerpot, assemble all the components, and personalize the finished pincushion with decorative flowers and realistic details. These techniques not only help you complete this project successfully but also strengthen your overall amigurumi crochet skills for future creations.
As you continue practicing this Crochet cactus pincushion pattern, you’ll discover countless opportunities to customize your design by experimenting with different yarn colors, cactus shapes, flower styles, and decorative finishes. Each new version becomes a unique handmade piece that adds warmth and creativity to your sewing or crochet space while providing a practical place to store pins safely.
If you enjoyed this tutorial, we would truly appreciate hearing your honest opinion. Please share your experience, let us know how your crochet cactus turned out, and leave your sincere suggestions or creative ideas. Your feedback helps inspire fellow crocheters and contributes to creating even more enjoyable crochet tutorials in the future.