
Crochet monster bag pattern is a fun and creative project that combines practicality with playful design. Whether you are making it for a child, a teenager, or simply adding a whimsical accessory to your handmade collection, a Crochet monster bag pattern is an enjoyable crochet project that allows you to experiment with colors, textures, and imaginative details.
One of the greatest advantages of this project is how customizable it is. You can create a friendly monster with big smiling eyes, colorful horns, tiny ears, funny teeth, or even fluffy hair.
In this complete tutorial, you will learn how to crochet the entire Crochet monster bag pattern step by step. From selecting yarn and understanding the stitches to creating the body, assembling facial features, attaching the strap, and adding finishing touches, every stage is explained clearly. This beginner-friendly guide focuses on simple crochet techniques while producing a professional-looking finished project that is sturdy, colorful, and full of personality.
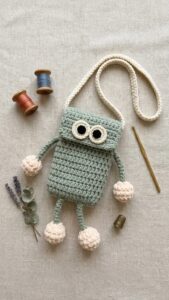
Choosing Materials and Learning the Crochet Stitches
Before beginning your Crochet monster bag pattern, gather all the necessary materials. Medium-weight cotton or acrylic yarn works beautifully because it creates a durable fabric that helps the bag maintain its shape. Choose one main color for the monster and additional colors for the eyes, teeth, horns, mouth, and decorative details.
Select a crochet hook that matches your yarn, although many crocheters prefer using a hook one size smaller than recommended. This creates tighter stitches, producing a stronger fabric that prevents stretching while carrying small personal items.
The basic stitches used throughout this project include the magic ring (MR), chain (ch), slip stitch (sl st), single crochet (sc), half double crochet (hdc), double crochet (dc), increase (inc), and invisible decrease (dec). These stitches are commonly used in beginner-friendly crochet projects.
Begin by crocheting the front panel of the bag. Create a foundation chain measuring approximately 26 chains, depending on your desired bag size. Add one extra chain for turning before working into the second chain from the hook.
Row 1: Work 26 single crochet across the foundation chain. Chain 1 and turn. Continue working one single crochet into every stitch for approximately 28 to 34 rows, depending on the desired height of your monster bag.
Repeat the same process to crochet an identical back panel. Keeping both panels the same size ensures the bag assembles neatly and maintains a symmetrical appearance.
Crocheting the Monster Bag Body Step by Step
After completing both body panels, place them together with the right sides facing outward if you plan to use a decorative edging, or wrong sides together if using single crochet seams. Align every stitch carefully before joining.
Join the panels using single crochet around both sides and the bottom, leaving the top edge completely open. This opening will become the main compartment of the bag.
For extra durability, crochet one additional round of single crochet around the entire opening. This reinforcement strengthens the edge and creates a cleaner finish that resists stretching during everyday use.
To create the monster flap, attach yarn to the upper back edge of the bag. Crochet rows of single crochet across approximately two-thirds of the bag width until the flap reaches about 5 to 6 inches long.
Round the corners of the flap by working invisible decreases at the beginning and end of the last several rows. This soft curve gives the finished bag a polished appearance while making it easier to close.
If desired, add a button loop by chaining 8 to 10 stitches at the center of the flap and securing it with a slip stitch. A colorful button sewn onto the front completes a simple yet effective closure.
Making the Monster Face and Decorative Details
The personality of the Crochet monster bag pattern comes from its playful facial features. Begin by crocheting two large eyes. Create a magic ring with 6 single crochet, increase evenly until each eye reaches approximately 2 inches in diameter.
For the pupils, crochet small black circles using another magic ring. Sew them slightly off-center onto the white eye circles to create a funny, expressive look. Different pupil positions give every monster its own personality.
Crochet tiny horns using a magic ring followed by several rounds of single crochet while gradually decreasing toward the tip. Stuff lightly before sewing them securely onto the top corners of the bag.
To make monster teeth, crochet several small white triangles. Chain 4, work single crochet back toward the base, and fasten off. Sew the triangles beneath the mouth to create either a friendly grin or a silly monster smile.
Create the mouth using black or red yarn. A simple chain stitched onto the front works well, or crochet a small oval separately before attaching it. Embroider a smile if you prefer a softer appearance.
Finally, crochet small ears, eyebrows, cheeks, or even colorful hair strands. Every decorative addition transforms your Crochet monster bag pattern into a completely original creation that reflects your imagination.
Crocheting the Strap and Finishing the Project
A comfortable strap is essential for a functional Crochet monster bag pattern. Begin by chaining approximately 100 to 120 stitches depending on the desired strap length and whether the bag will be worn over the shoulder or crossbody.
Row 1: Work one single crochet into each chain across. Chain 1 and turn. Repeat this process for three to five rows until the strap reaches your preferred width and feels sturdy.
For additional strength, fold the strap lengthwise and crochet through both layers using single crochet. This creates a thicker strap that comfortably supports the bag while reducing stretching over time.
Attach the finished strap securely to both sides of the bag using a tapestry needle and matching yarn. Reinforce each attachment point by sewing multiple passes through the stitches to ensure durability.
Carefully weave in every yarn end using a tapestry needle. Block the finished bag lightly if necessary to smooth the stitches and improve the overall shape without flattening the decorative facial features.
Your completed Crochet monster bag pattern is now ready to use. It makes a delightful accessory for carrying small everyday essentials, children’s treasures, craft supplies, or lightweight personal items while showcasing your crochet creativity.
FAQ About Crochet monster bag pattern
1. Is this pattern suitable for beginners?
Yes. Anyone familiar with basic crochet stitches such as chain, single crochet, increases, and decreases can successfully complete this project.
2. Which yarn works best?
Cotton yarn provides excellent durability and stitch definition, while acrylic yarn offers softness, vibrant colors, and affordability.
3. Can I make the bag larger?
Absolutely. Simply increase the number of foundation chains and crochet additional rows before assembling the body.
4. How do I keep the bag sturdy?
Using tight stitches, a smaller crochet hook, and optionally adding a fabric lining helps the bag maintain its shape during use.
5. Can I customize the monster face?
Yes. Change the number of eyes, horn shapes, ears, teeth, mouth design, or colors to create completely unique monster characters.
6. Is a lining necessary?
A lining is optional but recommended if the bag will carry smaller items or receive frequent daily use.
7. Can children use this bag?
Yes. The playful monster design makes it especially popular with children. Ensure all decorative pieces are sewn on securely for safety.
8. Does this project make a good handmade gift?
Definitely. A Crochet monster bag pattern makes a thoughtful handmade gift for birthdays, holidays, school events, craft fairs, or anyone who enjoys fun and colorful crochet accessories.
Conclusion
Creating a Crochet monster bag pattern is a rewarding crochet project that combines practical construction techniques with endless creative possibilities. Throughout this tutorial, you learned how to select the appropriate yarn and crochet hook, crochet the front and back panels, assemble the bag body, create the flap, design expressive monster facial features, crochet a sturdy shoulder strap, and finish every detail for a polished handmade accessory. These techniques strengthen your crochet skills while allowing you to create a fun and functional bag that stands out from ordinary designs.
One of the greatest advantages of the Crochet monster bag pattern is that no two finished bags ever have to look alike. By experimenting with different yarn colors, eye shapes, smiles, horns, ears, and decorative elements, you can design countless friendly monster characters that reflect your own creativity and personal style. Whether you keep it for yourself, give it as a thoughtful handmade gift, or sell it at craft markets, this cheerful project is sure to bring smiles wherever it goes.
If you enjoyed this tutorial, we would truly love to hear your honest opinion. Please share your experience, tell us how your monster bag turned out, and leave your sincere suggestions or creative ideas for future crochet projects. Your feedback helps inspire other crocheters and contributes to making future tutorials even more helpful and enjoyable.