
Butterfly Quilt Pattern projects are a wonderful way to combine creativity, colorful fabrics, and timeless quilting techniques into one stunning handmade masterpiece.
One of the greatest advantages of making a Butterfly Quilt Pattern is that it allows quilters of different skill levels to practice several essential quilting techniques in a single project.
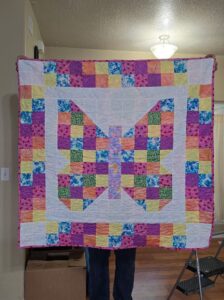
If you are looking for a quilt that combines traditional patchwork with modern color choices, this design is an excellent option. The large butterfly becomes the focal point while the colorful border frames the entire quilt beautifully. Throughout this guide, you will learn how to recreate a quilt similar to the one shown, including fabric selection, cutting measurements, assembly tips, quilting ideas, and finishing techniques. With patience and careful sewing, you can create a handmade quilt that will be treasured for many years.
Choosing Fabrics and Preparing Your Butterfly Quilt Pattern
Begin by selecting high-quality quilting cotton fabrics. Since the butterfly wings are made from small patchwork pieces, using a variety of coordinating prints adds texture and visual interest. Floral fabrics, soft solids, and tone-on-tone prints work especially well.
For a quilt similar to the one shown, choose several shades of purple, pink, blue, yellow, peach, and green. A white or cream background fabric allows the butterfly to stand out clearly and creates a clean, fresh appearance.
Prepare approximately 2½-inch fabric squares for the patchwork sections. These charm-sized squares make construction easier while giving the butterfly wings a balanced mosaic appearance. You may also cut your own squares from fabric scraps for a scrappy quilt look.
The butterfly body can be created using a vertical strip approximately 3 inches wide, combined with smaller rectangles for the head area. Selecting a coordinating floral fabric helps distinguish the body from the colorful wings.
For the outer border, continue using 2½-inch squares arranged randomly. This colorful frame ties the entire design together while using leftover fabric efficiently.
Before sewing, press all fabrics carefully and organize them into color groups. Keeping pieces neatly arranged makes assembly faster and helps maintain color balance across both butterfly wings.
Cutting and Sewing the Butterfly Blocks
Start by creating the patchwork squares that form each butterfly wing. Sew the 2½-inch squares into rows using a consistent ¼-inch seam allowance. Press seams to one side or open according to your preferred quilting method.
The upper wings are formed using square sections combined with large white background triangles. Mark diagonal cutting lines carefully to ensure both sides remain symmetrical.
For the lower wings, continue building patchwork rectangles before trimming the outer corners with matching background triangles. Accurate trimming is essential for maintaining the butterfly shape.
The butterfly body is assembled separately. Cut one center strip and attach the small top sections before positioning it between the completed wings. This creates a strong visual center for the entire quilt.
Lay all pieces on a design wall or large table before sewing them together. Viewing the full arrangement allows you to adjust color placement and maintain balance between the left and right wings.
Once satisfied with the layout, join the wings to the body and carefully attach the surrounding background sections. Press each seam thoroughly to keep the quilt top flat and square.
Assembling the Quilt Top Step by Step
After completing the butterfly center, add the large white background panels around the design. These wide borders create negative space that draws attention directly to the butterfly.
Measure the quilt center before cutting each background strip. Accurate measurements prevent stretching and ensure perfectly straight borders.
Construct the colorful outer border by sewing together rows of 2½-inch squares. Mix colors randomly while avoiding large clusters of the same print to achieve a balanced appearance.
Attach the top and bottom borders first, followed by the side borders. Press after each addition to maintain a smooth quilt top without ripples.
Check the quilt for any loose threads or seams before preparing the quilt sandwich. Taking time to inspect your work now will help produce a more professional finish later.
Square the completed quilt top using a large quilting ruler. Straight edges make layering, quilting, and binding much easier during the final stages of the project.
Quilting, Binding, and Finishing Your Butterfly Quilt Pattern
Prepare the quilt sandwich by layering the quilt top, batting, and backing fabric. Smooth each layer carefully to eliminate wrinkles before securing everything with quilting pins or temporary spray adhesive.
Simple meandering quilting works beautifully across the white background, while gentle curved quilting lines can enhance the butterfly wings without overwhelming the patchwork design.
For beginners, stitching along the ditch around the butterfly sections provides stability while emphasizing the geometric piecing. More experienced quilters may choose feather, floral, or free-motion quilting designs.
Trim away the excess batting and backing after quilting. Use a long ruler and rotary cutter to ensure perfectly straight edges before adding the binding.
Create double-fold binding strips approximately 2½ inches wide. Join the strips diagonally, press them in half lengthwise, and attach them to the quilt using a consistent seam allowance. Hand-finish or machine-finish the binding according to your preference.
After giving the quilt a final press, your Butterfly Quilt Pattern will be ready to display, gift, or enjoy every day. The colorful butterfly design becomes a beautiful reminder of creativity, patience, and the joy of handmade quilting.
FAQ
What skill level is required for a Butterfly Quilt Pattern?
This project is suitable for confident beginners and intermediate quilters. Basic knowledge of rotary cutting, sewing a quarter-inch seam, and assembling patchwork blocks is recommended.
What size should the fabric squares be?
Using 2½-inch squares is a popular choice because they are easy to sew and create a balanced patchwork effect. However, you can adjust the size to make a larger or smaller quilt.
Can I use fabric scraps?
Yes. A Butterfly Quilt Pattern is an excellent scrap quilting project. Mixing various coordinating prints creates a lively and unique butterfly design.
Which batting works best?
Cotton batting provides a traditional look with excellent stitch definition, while cotton-poly blends offer additional durability and softness.
How can I keep the butterfly symmetrical?
Lay out all pieces before sewing, use accurate measurements, trim carefully, and compare both wings frequently during assembly.
What quilting design works well with this pattern?
Free-motion meandering, loops, gentle feathers, or stitch-in-the-ditch quilting all complement the butterfly without distracting from the colorful patchwork.
Can I enlarge the quilt?
Absolutely. Increase the size of the background borders or use larger fabric squares to create a bigger finished quilt while preserving the butterfly proportions.
What colors work best?
Pastel shades, floral prints, bright spring colors, and coordinated scraps all produce beautiful results. White or cream backgrounds provide excellent contrast.
Conclusion
Creating a Butterfly Quilt Pattern is a rewarding quilting experience that combines classic patchwork techniques with a cheerful and elegant design.
By carefully selecting coordinating fabrics, cutting accurate pieces, assembling symmetrical butterfly wings, adding spacious background sections, and finishing with thoughtful quilting, you can produce a stunning handmade quilt that reflects your personal style. This project is ideal for using fabric scraps while practicing precision piecing and color placement, making it enjoyable for both beginners and experienced quilters alike.
I hope this guide has helped you understand every step needed to recreate a beautiful butterfly quilt similar to the one featured. Take your time, enjoy each stage of the process, and don’t be afraid to personalize your quilt with your favorite colors and fabrics. If you found this tutorial helpful, please leave your honest opinion and share your suggestions. Your feedback can inspire future quilting projects and help other quilting enthusiasts create something truly special.