
Pencil-shaped crochet pencil case pattern projects are a fun and practical way to combine creativity with functionality.
One of the best features of a Pencil-shaped crochet pencil case pattern is its versatility. You can customize the colors to resemble a classic yellow pencil, create bright rainbow versions, or even personalize the pencil case using your favorite color combinations.
This detailed guide explains every stage of creating a Pencil-shaped crochet pencil case pattern, from selecting materials to finishing the zipper installation. You will also learn the crochet stitch abbreviations used throughout the project, practical assembly tips, and finishing techniques that give your handmade pencil case a polished appearance. By following these instructions step by step, you can confidently complete a beautiful crochet project that combines creativity, organization, and handmade charm.
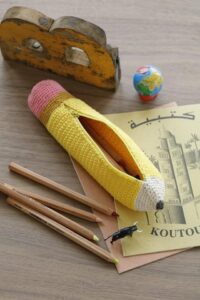
Choosing Materials and Understanding the Crochet Stitch Keys
Selecting the right materials is the first step toward making a successful Pencil-shaped crochet pencil case pattern. Cotton yarn is highly recommended because it produces a firm structure that helps the pencil case maintain its shape while remaining durable for everyday use. Medium-weight (Category 4) cotton yarn is an excellent choice for this project.
Choose traditional pencil colors such as yellow for the body, pink for the eraser, beige or cream for the wooden section, black or dark gray for the pencil tip, and silver or gray for the metal band. These classic colors instantly create the recognizable appearance of a real pencil.
Use a crochet hook that matches your yarn weight, typically 3.5 mm to 4.0 mm for medium cotton yarn. A slightly smaller hook creates tighter stitches, giving the pencil case more structure and preventing small items from slipping through the fabric.
You will also need a zipper measuring approximately 8 to 10 inches, a yarn needle for sewing pieces together, stitch markers, scissors, and optional fabric lining if you want additional durability inside the case.
Before beginning, become familiar with the stitch abbreviations used throughout the pattern. The main stitch keys include: ch (chain), sl st (slip stitch), sc (single crochet), hdc (half double crochet), dc (double crochet), inc (increase), dec (decrease), BLO (back loop only), FLO (front loop only), and MR (magic ring).
Maintaining even stitch tension throughout the project is one of the most important factors in achieving a neat and professional-looking Pencil-shaped crochet pencil case pattern. Count your stitches at the end of every round to ensure consistent shaping.
Step-by-Step Crochet Instructions for the Pencil-Shaped Crochet Pencil Case Pattern
Begin with the black pencil tip. Create a MR with 6 sc, tighten the ring, and join with a sl st. Round 2: inc in each stitch (12 stitches). Round 3: (1 sc, inc) repeat around (18 stitches). Continue increasing until the tip reaches the desired circumference.
Switch to beige yarn to create the wooden portion of the pencil. Crochet several rounds using sc in each stitch without increasing. This section should measure approximately 1.5 inches in length to resemble the sharpened wood of a pencil.
Change to yellow yarn for the main body. Continue working continuous rounds of sc until the body reaches approximately 8 to 10 inches, depending on the desired pencil case length. Place a stitch marker at the beginning of each round.
To create enough room for supplies, crochet two identical body panels or continue working in a tube if your zipper will be inserted along the top opening. Both construction methods produce excellent results depending on your preferred finishing style.
Near the opposite end, change to gray yarn and crochet several rounds of hdc to imitate the metal ferrule that connects the pencil to the eraser. This small detail adds realism and visual contrast.
Finish the project by changing to pink yarn and crocheting several rounds of sc to create the eraser section. Fasten off, weave in all loose ends, and prepare the pencil case for assembly.
Assembling and Finishing Your Crochet Pencil Case
If you created two separate panels, place them with the right sides facing outward. Join the edges using sl st or sc, leaving the zipper opening unworked until the zipper is attached.
Carefully sew the zipper into the opening using matching sewing thread or yarn. Small, evenly spaced stitches help secure the zipper while maintaining a clean appearance. Take your time during this step for the best results.
For additional durability, consider adding a simple fabric lining before attaching the zipper. The lining protects the crochet stitches from stretching and helps the pencil case maintain its shape after repeated use.
After sewing the zipper, inspect all seams carefully. Reinforce any areas that may receive extra stress, particularly around the zipper ends and corners where the pencil case opens and closes frequently.
Add optional decorative details such as embroidered initials, small crochet appliqués, or stitched lines to imitate the hexagonal edges of a traditional pencil. These personalized touches make every Pencil-shaped crochet pencil case pattern unique.
Finally, steam block the completed pencil case lightly if your yarn allows it. Blocking helps smooth the stitches, improve the overall shape, and give the finished project a polished, professional appearance.
Helpful Tips, Customization Ideas, and Care Instructions
A Pencil-shaped crochet pencil case pattern can easily be adapted to different sizes. Increase the body length to hold crochet hooks, knitting needles, paintbrushes, or makeup brushes instead of pencils and pens.
Experiment with different yarn colors to create themed pencil cases. Bright rainbow pencils, pastel school supplies, holiday-inspired versions, or personalized favorite colors all make wonderful gifts.
Using cotton yarn instead of acrylic helps maintain the pencil case’s structure while providing better durability for everyday use. Cotton also resists stretching more effectively over time.
If you are making this project for children, securely weave in every yarn end and double-check all seams before use. A sturdy construction ensures the pencil case withstands daily handling.
Hand washing is usually the safest cleaning method. Use cool water, mild detergent, and lay the finished pencil case flat to dry. Proper care helps preserve both the yarn and the zipper.
Most importantly, enjoy the creative process. Every completed Pencil-shaped crochet pencil case pattern reflects your personal style, crochet skills, and attention to detail, making each handmade project truly one of a kind.
FAQ
Is the Pencil-shaped crochet pencil case pattern suitable for beginners?
Yes. Confident beginners who are comfortable with basic crochet stitches such as chain, single crochet, slip stitch, increases, and decreases can successfully complete this project.
Which yarn is best for this pattern?
Cotton yarn is highly recommended because it creates a firm structure, excellent stitch definition, and long-lasting durability for everyday use.
What crochet hook size should I use?
Most medium-weight cotton yarn works well with a 3.5 mm to 4.0 mm crochet hook, although you should always check your yarn label for recommendations.
Can I make the pencil case without a zipper?
Yes. You may substitute the zipper with crochet button loops, snaps, or a flap closure, although a zipper offers the most secure storage.
How long does this project usually take?
Depending on your experience, most crocheters can complete the project within one or two days, including assembly and finishing.
Can I adjust the size?
Absolutely. Simply increase or decrease the number of body rounds to make the pencil case longer or shorter while keeping the same overall design.
Is a fabric lining necessary?
A lining is optional but highly recommended. It improves durability, protects the crochet stitches, and helps prevent small objects from catching on the yarn.
Can this pattern be used as a gift?
Yes. A handmade Pencil-shaped crochet pencil case pattern makes an excellent gift for students, teachers, artists, writers, and anyone who appreciates creative handmade accessories.
Conclusion
Creating a Pencil-shaped crochet pencil case pattern is a rewarding crochet project that combines practical functionality with creative design.
Throughout this guide, you learned how to choose the right materials, understand the essential crochet stitch keys, crochet each section of the pencil step by step, assemble the zipper, personalize the finished project, and properly care for your handmade pencil case. With basic stitches, careful shaping, and attention to detail, you can create a durable accessory that is both useful and visually appealing.
Whether you decide to make a classic yellow pencil, a colorful custom version, or a personalized gift, this project offers plenty of opportunities to practice your crochet skills while creating something truly unique. We hope this tutorial has inspired you to start your own Pencil-shaped crochet pencil case pattern and enjoy every stitch along the way. If you found this article helpful, please leave your honest opinion and share your suggestions. Your feedback is always appreciated and helps inspire even more creative crochet projects in the future.