
Fabric panel pattern with pockets is a practical and stylish sewing project that helps keep everyday essentials neatly organized while adding a decorative touch to your home.
One of the greatest advantages of making your own fabric organizer is the freedom to choose the size, number of pockets, colors, and decorative details.
Throughout this complete tutorial, you will learn how to select suitable fabrics, prepare and reinforce the panel, cut accurate pattern pieces, sew durable pockets, assemble the organizer, attach a hanging sleeve or loops, and finish every detail professionally. By following each step carefully, you will create a beautiful Fabric panel pattern with pockets that is both durable and highly functional for everyday use.
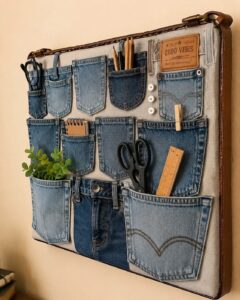
Choosing Materials and Preparing the Pattern
Before beginning your Fabric panel pattern with pockets, gather all the necessary materials. Quilting cotton is one of the most popular fabric choices because it is easy to sew, durable, washable, and available in a wide variety of attractive prints. Linen blends and lightweight canvas are also excellent options if you prefer a slightly firmer organizer.
For a medium-sized wall panel, you will typically need approximately one yard of outer fabric, one yard of lining fabric, lightweight or medium-weight fusible interfacing, coordinating thread, sewing scissors or a rotary cutter, measuring ruler, pins or clips, an iron, and optional batting if you would like a quilted finish.
Begin by deciding the finished dimensions of your organizer. A common size is approximately 18 x 24 inches, although the measurements can easily be adjusted to fit the available wall space or the specific items you plan to store.
Cut one front panel, one lining panel, and several pocket pieces according to your chosen design. Remember to include seam allowances around every piece. If your pockets will hold heavier items, apply interfacing to both the main panel and the pocket pieces for additional stability.
Press every fabric piece thoroughly before assembly. Smooth, wrinkle-free fabric allows for more accurate sewing, cleaner seams, and a professional appearance throughout the finished project.
Arrange the pockets on the main panel before sewing. Experiment with different layouts until you are satisfied with both the appearance and functionality. Taking a few extra minutes during this planning stage helps prevent mistakes later.
Step-by-Step Sewing Instructions
Begin by preparing each pocket individually. Fold the upper raw edge inward by ¼ inch, press, fold once more, and stitch close to the folded edge to create a neat double-fold hem.
If desired, gather the lower edge of larger pockets slightly before attaching them to the panel. Gentle fullness creates roomier storage while adding an attractive decorative effect.
Position each finished pocket on the main panel according to your planned layout. Pin or clip the pockets securely before stitching to prevent shifting during sewing.
Topstitch along the sides and bottom of every pocket using a ¼-inch seam allowance. Reinforce the upper corners with additional backstitching because these areas experience the greatest amount of stress during everyday use.
To create multiple compartments within one large pocket, sew straight vertical stitching lines from the lower edge upward to divide the pocket into smaller sections. Measure carefully before stitching to ensure each compartment accommodates its intended contents.
Place the completed front panel and lining right sides together. Sew around the outer edges while leaving a turning opening. Turn the panel right side out, press carefully, close the opening with topstitching, and add a hanging sleeve, fabric loops, or metal grommets to complete your Fabric panel pattern with pockets.
Creative Ways to Customize Your Fabric Panel Pattern with Pockets
One of the most enjoyable aspects of making a Fabric panel pattern with pockets is choosing fabrics that complement your home décor. Floral prints create a cozy cottage style, while neutral linen or modern geometric prints suit contemporary interiors beautifully.
Decorative quilting can be added before attaching the pockets. Straight-line quilting, diagonal grids, or free-motion quilting increase durability while adding beautiful texture to the organizer.
Embroidery offers another wonderful personalization option. Stitch family names, inspirational quotes, floral designs, seasonal motifs, or monograms onto the panel before assembling the pockets.
Mix different pocket sizes to accommodate a variety of items. Larger pockets can hold notebooks or craft supplies, while smaller compartments are ideal for scissors, pens, measuring tapes, sewing clips, or remote controls.
Decorative trims such as lace, piping, ric-rac, decorative buttons, or contrasting bias tape can enhance the finished appearance without affecting the organizer’s functionality.
The completed Fabric panel pattern with pockets can be adapted for many purposes including nursery organizers, bathroom storage, kitchen utensil holders, jewelry organizers, office supply panels, gardening tool storage, or entryway organizers for keys and mail.
Tips for Professional Sewing Results
Always reinforce the upper corners of every pocket with additional rows of stitching. These stress points receive frequent use and benefit greatly from extra durability.
Press after every major sewing step rather than waiting until the end of the project. Frequent pressing produces sharper edges and significantly improves the finished appearance.
Use interfacing appropriate for your fabric weight. Heavier organizers designed to hold larger items benefit from medium-weight interfacing or additional batting for improved stability.
Test the pocket sizes by placing the intended items inside before permanently stitching them to the panel. Small adjustments at this stage help maximize functionality.
Choose high-quality thread that matches your fabric. Strong thread improves durability while creating smooth, balanced stitches throughout the project.
Practice making several versions of your Fabric panel pattern with pockets using different layouts, pocket configurations, fabrics, and decorative techniques. Every completed organizer improves your sewing skills while expanding your collection of beautiful handmade storage solutions.
FAQ
Is this Fabric panel pattern with pockets suitable for beginners?
Yes. The project mainly uses straight stitching, simple hems, topstitching, and basic assembly techniques, making it an excellent sewing project for beginners.
Which fabric works best?
Quilting cotton is the most popular choice because it is easy to sew, washable, and durable. Canvas and linen blends provide additional structure for heavier storage.
Do I need interfacing?
Interfacing is strongly recommended because it gives the organizer extra stability, helps the pockets maintain their shape, and improves durability over time.
Can I adjust the size?
Absolutely. The panel dimensions and pocket sizes can easily be customized to fit different spaces or accommodate specific storage needs.
How do I hang the finished organizer?
You can add fabric loops, a hanging sleeve for a wooden dowel, metal grommets, or sturdy tabs depending on your preferred hanging method.
Can I wash the organizer?
Yes. Most cotton organizers can be machine washed on a gentle cycle. Air drying and light pressing afterward help maintain their appearance.
Can I sell handmade organizers?
Certainly. Fabric wall organizers remain popular at craft fairs, handmade markets, home décor boutiques, and online shops because they combine beauty with practical everyday use.
What can I store inside the pockets?
The organizer is perfect for sewing tools, office supplies, remote controls, mail, craft materials, toiletries, children’s toys, kitchen utensils, gardening accessories, or many other household essentials.
Conclusion
Creating this Fabric panel pattern with pockets is a rewarding sewing project that combines organization, creativity, and timeless home décor. Throughout this tutorial, you learned how to choose suitable materials, prepare and reinforce the fabric, cut accurate pattern pieces, sew durable pockets, divide compartments, assemble the organizer, add a hanging system, and apply professional finishing techniques that improve both appearance and durability. These valuable sewing skills can easily be transferred to many future home organization projects.
Whether you sew one organizer for your own home or create several personalized versions as thoughtful handmade gifts, this project offers endless opportunities for creativity through different fabrics, pocket arrangements, embroidery, quilting, and decorative trims. Every new Fabric panel pattern with pockets you complete will strengthen your sewing confidence while producing practical accessories that bring both beauty and organization to everyday life.
Thank you for reading this tutorial. I hope this Fabric panel pattern with pockets inspires your next sewing project and encourages you to continue exploring creative handmade home organization ideas. If you decide to make this organizer, I would truly appreciate your honest opinion. Please share your experience, suggestions, and creative variations, as your feedback can inspire other sewing enthusiasts and help improve future tutorials.