
Crochet pumpkin basket pattern is one of the most enjoyable seasonal projects for crochet enthusiasts who love combining creativity with functionality.
One of the greatest advantages of making your own pumpkin basket is its versatility. It can be used to hold candy, yarn, small toys, keys, craft supplies, decorative pinecones, or even small potted plants.
Throughout this guide, you will learn how to choose the best yarn, understand the essential crochet abbreviations, crochet a firm basket base, build textured pumpkin sides, shape the decorative ridges, create the stem and leaf, and finish your basket with professional details. By following the complete stitch-by-stitch instructions, you will create a durable handmade basket that is both practical and decorative while expanding your crochet skills.
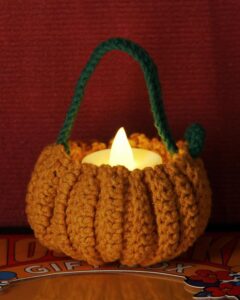
Choosing Materials and Understanding the Crochet Stitches
Before starting your Crochet pumpkin basket pattern, gather all the required materials. Medium-weight cotton yarn is highly recommended because it provides excellent stitch definition and creates a basket that holds its shape well. Chunky cotton or braided cotton cord can also be used if you prefer a sturdier finished basket.
Choose classic autumn colors such as pumpkin orange, rust, mustard, cream, sage green, olive, chocolate brown, or deep forest green. These warm shades beautifully capture the cozy atmosphere of the fall season.
A crochet hook between 4.5 mm and 5.5 mm works well for most medium-weight yarns. If you are using bulky yarn or cotton cord, increase the hook size according to the yarn manufacturer’s recommendation while maintaining firm tension.
Useful crochet abbreviations include:
MR = Magic Ring
ch = chain
sl st = slip stitch
sc = single crochet
hdc = half double crochet
dc = double crochet
inc = increase
dec = decrease
BLO = back loop only
st = stitch
Additional tools include scissors, a yarn needle, stitch markers, measuring tape, and optional stuffing or plastic canvas if you would like additional structure inside the basket.
Before beginning the project, crochet a small gauge swatch to ensure your stitches are firm. A tightly crocheted fabric helps the finished basket remain upright without collapsing.
Step-by-Step Crochet Pumpkin Basket Pattern
Basket Base
Round 1:
MR.
Work 6 sc into the Magic Ring.
Pull the ring closed tightly.
Round 2:
Inc in every stitch.
12 sc.
Round 3:
Sc, inc.
Repeat around.
18 sc.
Round 4:
2 sc, inc.
Repeat around.
24 sc.
Continue increasing evenly until the base reaches approximately 6 to 8 inches in diameter, depending on your desired basket size.
Basket Sides
Next Round:
Work one complete round in BLO.
This creates a sharp fold between the base and the basket walls.
Following Rounds:
Sc in every stitch around.
Continue until the basket reaches the desired height.
Pumpkin Texture
Every fourth round:
Work front post double crochet around selected stitches to create raised pumpkin ridges.
Repeat these vertical ridges evenly around the basket for a realistic pumpkin appearance.
Stem
Using brown yarn:
MR.
6 sc.
Increase slightly for two rounds.
Crochet several rounds without increases to form a short cylinder.
Stuff lightly if desired.
Sew securely to the center of the basket opening.
Leaf
Using green yarn:
Ch 8.
Sc in second chain.
Hdc.
Dc.
Tr.
Dc.
Hdc.
Sc.
Fasten off and sew beside the stem.
Carefully weave in all yarn ends. Light blocking may help smooth the basket shape before use.
Creative Ways to Use Your Crochet Pumpkin Basket Pattern
One completed Crochet pumpkin basket pattern makes a beautiful centerpiece for autumn dining tables. Fill it with pinecones, mini pumpkins, dried leaves, or seasonal flowers to create an inviting display.
These baskets are also perfect candy containers during Halloween. Their sturdy construction allows children and guests to easily reach treats while adding festive charm to your décor.
Smaller versions make adorable organizers for crochet hooks, stitch markers, sewing clips, jewelry, or office supplies. Functional handmade storage always adds personality to creative spaces.
Create matching baskets in different sizes to decorate shelves, mantels, entryway tables, or kitchen counters. Grouping several pumpkins together produces a beautiful layered autumn display.
Handmade pumpkin baskets also make thoughtful gifts. Fill them with baked treats, candles, tea, chocolates, yarn, or small seasonal decorations for birthdays, Thanksgiving, or housewarming celebrations.
The Crochet pumpkin basket pattern can easily be adapted by changing colors. White pumpkins create elegant farmhouse décor, while sage green, cream, blush, or mustard versions offer a modern seasonal aesthetic.
Tips for Professional Crochet Results
Maintain firm and consistent tension throughout the basket. Tight stitches provide the stability necessary for the basket to stand upright without additional support.
Count your stitches after every increase round to ensure the base remains perfectly flat. Accurate stitch counts help prevent unwanted curling or rippling.
Use stitch markers to identify the beginning of each round, especially when working continuous spirals. This simple habit improves accuracy throughout the project.
If additional stiffness is desired, insert a plastic canvas circle into the basket base before finishing. This optional reinforcement provides extra durability for heavier contents.
Take your time while creating the front post ridges. Even spacing between each ridge gives the basket a balanced pumpkin appearance that looks neat and professional.
Practice making several versions of your Crochet pumpkin basket pattern using different yarn weights, colors, and dimensions. Every completed basket strengthens your crochet skills while expanding your collection of beautiful handmade autumn decorations.
FAQ
Is this Crochet pumpkin basket pattern suitable for beginners?
Yes. The project mainly uses beginner-friendly stitches such as single crochet, increases, and simple shaping. The decorative ridges introduce an enjoyable technique that is easy to learn.
Which yarn works best?
Medium-weight cotton yarn is highly recommended because it creates a durable basket with excellent stitch definition. Cotton cord also produces very sturdy results.
Can I make the basket larger?
Absolutely. Continue increasing the base until it reaches the desired diameter, then crochet additional side rounds to achieve your preferred height.
Why does my basket collapse?
This usually happens when stitches are too loose or the hook is too large. Using tighter tension and cotton yarn helps the basket maintain its structure.
Can I wash the finished basket?
Yes. Most cotton yarn baskets can be hand washed or machine washed on a gentle cycle. Reshape the basket while damp and allow it to air dry.
Can I use different colors?
Certainly. White, cream, mustard, blush, sage green, teal, and even multicolored pumpkins all create beautiful decorative baskets for different decorating styles.
Can I sell handmade pumpkin baskets?
Yes. Seasonal crochet baskets remain popular at craft fairs, farmers’ markets, holiday events, and online handmade shops. High-quality finishing and durable construction increase their appeal.
What can I store inside the basket?
The basket is perfect for candy, yarn, crochet accessories, keys, remote controls, cosmetics, office supplies, decorative items, or small gifts depending on its size.
Conclusion
Creating this Crochet pumpkin basket pattern is a rewarding crochet project that combines beautiful seasonal design with everyday functionality. Throughout this tutorial, you learned how to select appropriate materials, understand the essential crochet abbreviations, build a sturdy circular base, shape the basket walls, add realistic pumpkin ridges, crochet a decorative stem and leaf, and apply professional finishing techniques that enhance both appearance and durability. These valuable skills can also be applied to many future basket and home décor projects.
Whether you make a single pumpkin basket for your own autumn decorations or crochet an entire collection in different sizes and colors, this pattern offers endless opportunities for creativity. Each new Crochet pumpkin basket pattern you complete helps improve your stitch consistency, shaping techniques, and confidence while producing charming handmade decorations that can be enjoyed year after year.
Thank you for reading this tutorial. I hope this Crochet pumpkin basket pattern inspires your next seasonal crochet project and encourages you to continue exploring creative handmade designs. If you decide to make this basket, I would truly appreciate your honest opinion. Please share your experience, suggestions, and creative variations, as your feedback can inspire other crochet enthusiasts and help improve future tutorials.