
Crocheted pumpkin pattern is one of the most popular seasonal crochet projects because it combines simple techniques with beautiful results.
One of the reasons crocheted pumpkins have become a favorite among crafters is their incredible versatility. They can be displayed individually on shelves, arranged into decorative centerpieces, added to wreaths, placed inside baskets, or combined with other handmade autumn decorations.
Throughout this complete tutorial, you will learn how to select the best yarn, understand the essential crochet abbreviations, follow a detailed stitch-by-stitch pattern, shape the pumpkin using simple construction methods, create a realistic stem and leaf, and finish the project with professional details. By the end of this guide, you will have a beautiful handmade pumpkin and the confidence to create many more in different sizes and colors for your seasonal décor.
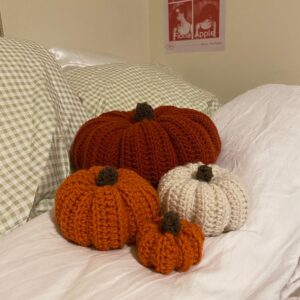
Choosing Materials and Understanding the Basic Crochet Stitches
Before beginning your Crocheted pumpkin pattern, gather all the necessary materials. Medium-weight cotton yarn is highly recommended because it creates excellent stitch definition while producing a firm, durable pumpkin. Acrylic yarn is another excellent option if you prefer a softer texture or want access to a larger variety of colors.
Traditional pumpkin colors include bright orange, burnt orange, rust, mustard, cream, white, sage green, and dusty blue. Brown yarn works beautifully for the stem, while green shades are ideal for crocheting leaves and decorative vines.
A 4.0 mm to 5.0 mm crochet hook is suitable for most worsted-weight yarns. If your stitches tend to be loose, choose a slightly smaller hook to produce a firmer fabric that holds its shape more effectively after stuffing.
Useful crochet abbreviations include:
MR = Magic Ring
ch = chain
sl st = slip stitch
sc = single crochet
hdc = half double crochet
dc = double crochet
inc = increase
dec = decrease
st = stitch
Additional supplies include polyester fiberfill stuffing, a yarn needle, stitch markers, scissors, and optional floral wire if you would like to create curly decorative vines.
Before starting the full project, crochet a small sample swatch to check your gauge. Consistent stitch size helps ensure your finished pumpkin has an even shape and smooth texture.
Step-by-Step Crocheted Pumpkin Pattern
Body of the Pumpkin
Round 1:
MR.
Work 6 sc into the Magic Ring.
Pull the ring closed tightly.
Round 2:
Inc in every stitch.
12 sc.
Round 3:
Sc, inc.
Repeat around.
18 sc.
Round 4:
2 sc, inc.
Repeat around.
24 sc.
Continue increasing evenly until reaching approximately 42 to 48 stitches depending on your preferred pumpkin size.
Next Rounds:
Sc in every stitch around without increasing.
Continue until the body measures approximately the same height as its width.
Decrease Section:
Reverse the increase pattern by working decreases evenly around each round until only a small opening remains.
Stuff the pumpkin firmly with polyester fiberfill before completing the final decrease rounds.
Close the opening securely and weave the yarn through the remaining stitches to tighten the top.
Stem:
Using brown yarn:
MR.
6 sc.
Work several rounds without increases to create a short cylinder.
Stuff lightly if desired.
Fasten off and sew securely to the top center.
Leaf:
Using green yarn:
Ch 8.
Sc in second chain.
Hdc.
Dc.
Tr.
Dc.
Hdc.
Sc.
Fasten off and sew beside the stem.
Using a long piece of yarn, insert the needle through the center of the pumpkin from top to bottom several times, pulling gently to create the characteristic pumpkin segments before fastening securely.
Creative Ways to Use Your Crocheted Pumpkin Pattern
A completed Crocheted pumpkin pattern makes a beautiful table centerpiece when displayed alongside candles, pinecones, dried leaves, and seasonal flowers. Mixing different pumpkin sizes creates an elegant layered arrangement.
Crocheted pumpkins also make wonderful mantel decorations. Arrange several pumpkins in coordinating autumn colors across a fireplace mantel to create a cozy seasonal atmosphere.
Small pumpkins are perfect bowl fillers. Display them inside decorative baskets, wooden trays, or glass containers to bring warmth and texture to your home décor.
If you enjoy handmade gifts, crocheted pumpkins make thoughtful presents for birthdays, Thanksgiving hosts, teachers, neighbors, or anyone who appreciates handcrafted decorations.
Experiment with different yarn textures such as velvet, chenille, chunky wool, or cotton cord. Each material creates a completely different appearance while using the same Crocheted pumpkin pattern.
You can also adapt this pattern into ornaments, garlands, wreath decorations, baby room décor, or festive gift toppers simply by changing the finished size and adding hanging loops.
Tips for Professional Crochet Results
Maintain consistent yarn tension throughout the project. Even stitches produce smoother shaping and more symmetrical pumpkin segments after assembly.
Stuff the pumpkin gradually instead of adding all the fiberfill at once. Even stuffing helps eliminate lumps while maintaining a balanced rounded shape.
When shaping the pumpkin segments, pull the yarn firmly but not excessively. Gentle tension creates attractive indentations without distorting the overall structure.
Use stitch markers to identify the beginning of each round. This simple technique helps maintain accurate stitch counts, especially during increase and decrease rounds.
Weave in every yarn end securely by following the direction of nearby stitches. Proper finishing greatly improves durability and prevents loose ends from becoming visible over time.
Practice making several versions of your Crocheted pumpkin pattern using different yarn weights, colors, and sizes. Every completed pumpkin strengthens your crochet skills while expanding your collection of beautiful handmade autumn decorations.
FAQ
Is this Crocheted pumpkin pattern suitable for beginners?
Yes. The project mainly uses beginner-friendly stitches such as single crochet, increases, and decreases, making it an excellent pattern for learning three-dimensional crochet.
Which yarn works best?
Medium-weight cotton provides excellent stitch definition and durability, while acrylic yarn offers softness, affordability, and a wide selection of colors.
Can I make larger pumpkins?
Absolutely. Continue increasing additional rounds before crocheting the straight body section to create larger pumpkins. Thicker yarn also increases the finished size.
Why does my pumpkin look uneven?
Uneven tension, inconsistent stuffing, or incorrect stitch counts can affect the final shape. Counting stitches carefully and stuffing evenly usually solves the problem.
Can I wash crocheted pumpkins?
Yes. Most cotton and acrylic pumpkins can be hand washed or gently machine washed if necessary. Reshape while damp and allow them to air dry completely.
Can I use different colors?
Certainly. Cream, white, sage green, blush pink, mustard, dusty blue, and even striped pumpkins all create beautiful decorative variations while maintaining the same basic pattern.
Can I sell handmade crocheted pumpkins?
Yes. Handmade pumpkins remain popular at autumn festivals, holiday craft fairs, farmers’ markets, and online handmade shops because they are timeless seasonal decorations.
What decorations can I add?
You can embellish your pumpkins with embroidered vines, wooden stems, cinnamon sticks, raffia bows, beads, crocheted leaves, or curly wire tendrils for additional character.
Conclusion
Creating this Crocheted pumpkin pattern is a rewarding crochet project that beautifully combines seasonal charm with enjoyable craftsmanship. Throughout this tutorial, you learned how to choose suitable yarn, understand the essential crochet abbreviations, crochet the pumpkin body step by step, shape realistic segments, create a decorative stem and leaf, stuff the pumpkin evenly, and apply professional finishing techniques for a polished result. These valuable crochet skills can also be applied to many future amigurumi and decorative crochet projects.
Whether you crochet a single pumpkin to decorate your home or create an entire autumn collection in various colors and sizes, this project offers endless opportunities for creativity. Every new Crocheted pumpkin pattern you complete helps improve your stitch consistency, shaping techniques, and confidence while producing beautiful handmade decorations that can be enjoyed year after year.
Thank you for reading this tutorial. I hope this Crocheted pumpkin pattern inspires your next seasonal crochet project and encourages you to continue exploring creative handmade designs. If you decide to make this pumpkin, I would truly appreciate your honest opinion. Please share your experience, suggestions, and creative variations, as your feedback can inspire other crochet enthusiasts and help improve future tutorials.